Welcome, Guest
Username: Password: Remember me
  • Page:
  • 1

TOPIC: 1963 MFG Edinboro Floor

1963 MFG Edinboro Floor 9 years 2 months ago #115118

Hello all, although I have been "creeping" Fiberglassics for a long time, I just set up a profile, admittedly because I am hoping this group might be able to provide some guidance on a newer project. I recently aquired a 1963 MFG Edinboro Custom, and from what I have found in the library, it seems the boat has an all fiberglass floor and stringers, which is great, but based on the adds, there is also foam in ther, which is pretty saturated. I would like to open the floor and remove the foam, but have some questions about how the floor is attached. Does anyone know if the floor is attached to the fiberglass stringers? If I cut the edges will it lift off? Where and how ideal places to make the cuts without damaging the stringers, which I assume are hollow. Also, does anyone have recommendations for rebuilding a transom which is curved. Lay up lots of thin layers of wood? I know, Seacast would be great, but expensive. Thanks!

Please Log in or Create an account to join the conversation.

Re:1963 MFG Edinboro Floor 9 years 2 months ago #115120

Others can chime in, but in my opinion, getting an MFG with saturated foam is a showstopper. I would sell it and find one in better shape. Rule of thumb is if it has the original seats and they are in good shape with no rot, chances are the foam is not saturated from sitting outside. Water gets in from the wellnut rubber deteriorating, and letting water in and under the floor to saturate the foam is kind of a mess to fix. When that happens, you've just partially negated having fiberglass floors and stringers, since you'll still have to rip the floor out, which is a time consuming and a lot of work. Just my opinion. I should note I'd rather spend time finding the right boat than having a project, but that's just me. But, if you like a challenge, go for it.

One way to determine for sure if a particular boat has saturated foam is to weigh it. All that water significantly adds to the weight of the boat, and if way over spec, it's saturated.

The 14' Niagara, 16' Westfield, and 17' Edinboro had fiberglass floors and stingers. The 18' Erie and 19' Seaway and Sea Cruiser models were hand layup boats, and have wood stringers with fiberglass floors. (The larger boats were sold in much lower volumes, and probably did not justify the cost of making matched metal dies for molding the hulls.) If you have one of the bigger boats, expect to replace the stringers at some point.

I've seen a number of solid, well-maintained examples of the smaller all-fiberglass boats go for under $2000 around NE Ohio, so I'd keep looking. Mine was $2600, but included perfect full canvas, an almost perfect outboard, and a TeeNee trailer that only needed painting, so it was worth paying extra, in my opinion.

Transom repair is much easier, but as you point out, Seacast is a bit expensive. Nidacore is a somewhat less expensive option. My brother used Seacast as a do-it-yourself project on his Edinboro over 10 years ago, and it has held up fine. Note: 1966-1967 Westfields have a transom design that makes transom repair harder - look at the pictures on the old brochures and you'll see what I mean.

One problem that has cropped up, but easily fixed, on my Niagara since I've had it is cracks in the seam where the floor bonds with the hull, in the front cockpit area of the boat. I've fixed it with epoxy putty, then gotten paint to match the splatter paint, adding the white and black dots myself. Hides it well and no new cracks have formed. I guess after 50 years, some work is needed. The rest of the boat is fine.

Overall, these are very solid boats if they have been kept in a garage and covered. I plan to keep my Niagara for the rest of my life.

Please Log in or Create an account to join the conversation.

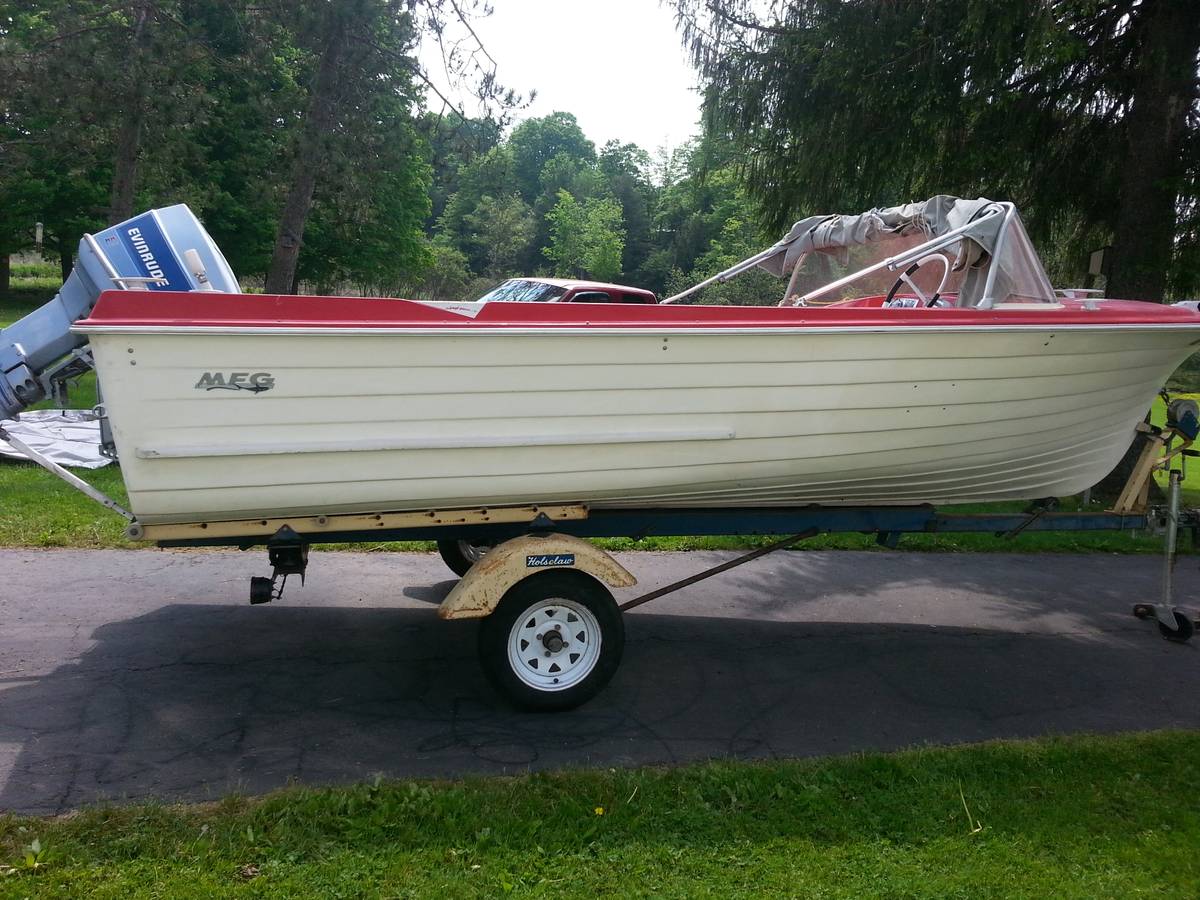
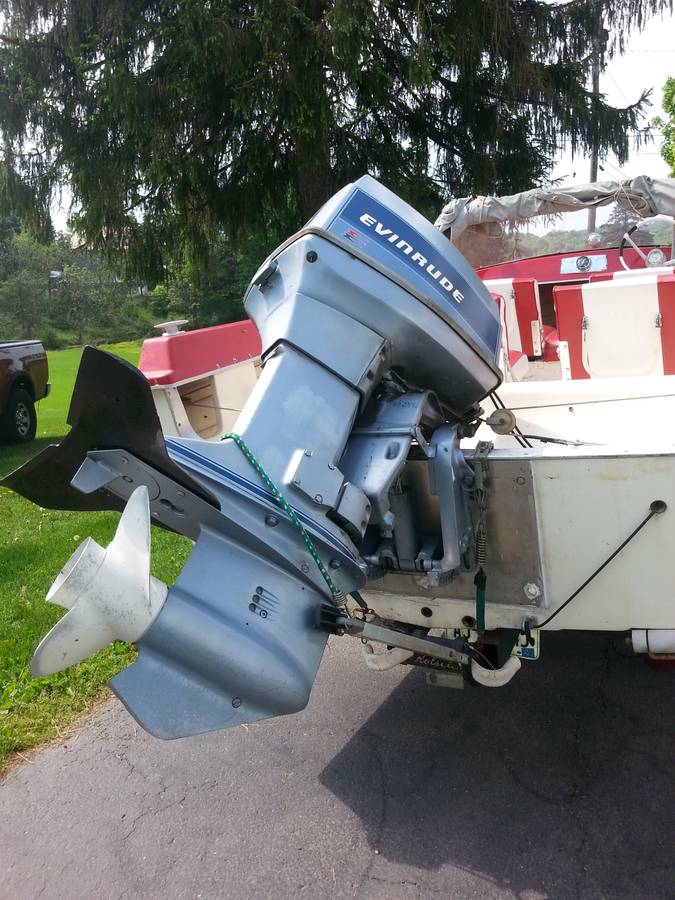
Dave Nau - 1966 MFG Niagara with 1963 Mercury 350 (35hp) outboard and 1966 Tee Nee trailer. Second boat is a 1962 MFG Edinboro with a 1984 Evinrude 70hp and Holsclaw trailer.

Re:1963 MFG Edinboro Floor 9 years 1 month ago #115232

Hi Dave, thanks for the input, I agree, having to remove the floor is not fun, although it is not too bad since I am hoping to remove it, clear the foam, and replace it, without messing with the stringers. I would love to find one in better shape, but alas, I have not found one yet. This one was extremely inexpensive, and I love projects, so I'll still take it on. Thanks for the Nidacore info, I'll check it out, but its likely I'll just go with laminating on thin layers to accommodate the curvature of the transom.

Does anyone know if the fiberglass floor is laminated to the hull only at the edges, or is it also bonded to the stringers underneath? If its also bonded to the stringers, then Dave may be right, messing with the foam could turn into a really messy job.

I have not weighed the boat, but the boat:
1) Was sitting outside since about 97 in New England, with the bow slightly down
2) The seats are long gone, and the mounting holes are open
3) There is a blue-berry bush growing from one of the mounting holes (like a little bonsai!), and we have been in a severe drought for some time, so its been getting water from the bilge. Maybe I should leave it there and let the roots "suck" the water out of the foam!
4) And last but not least, the lower drain plug has been slowly dripping for a couple of weeks now that the bow is up.

So saturated foam seems like a safe assumption. Other than weight (and the associated performance), is there any reason the foam has to be removed?

Thanks!

Please Log in or Create an account to join the conversation.

Re:1963 MFG Edinboro Floor 9 years 1 month ago #115245

Not positive, but I'm pretty sure the stringers are bonded to floor and hull.

You're looking at a complete rebuild with what you've described. All that saturated foam adds up to be the same as equivalent weight and in people, thus reducing your carrying capacity by whatever the water weighs.

Good luck. Others may chime in who have done this before to give you more details.

I too am looking for an Edinboro but decent ones are hard to find. I want one that still has the Sun 'n Fun seats - even harder.

Please Log in or Create an account to join the conversation.

Dave Nau - 1966 MFG Niagara with 1963 Mercury 350 (35hp) outboard and 1966 Tee Nee trailer. Second boat is a 1962 MFG Edinboro with a 1984 Evinrude 70hp and Holsclaw trailer.

Re:1963 MFG Edinboro Floor 9 years 1 month ago #115285

I suspect you are right since if the stringers were not bonded to the underside of the floor, the floor sheet would likely "rattle" against the stringers. I am going to try using the existing seat-mounting holes to probe around under there and try to feel whether they are bonded. I'll post an update if I am able to figure it out.

I would love the Sun-n-Fun seats! They are a great idea! I wonder why manufacturers did not continue with those, rather than the back-to-back seats (which I have had in quite a few boats, but am not fond of). Especially since the Sun-n-Fun design can effectively be used as back-to-back seats.

As an alternative, I could dry the foam out. All I need is a freeze-dryer large enough to put the boat in...

Please Log in or Create an account to join the conversation.

Re:1963 MFG Edinboro Floor 9 years 1 month ago #115288

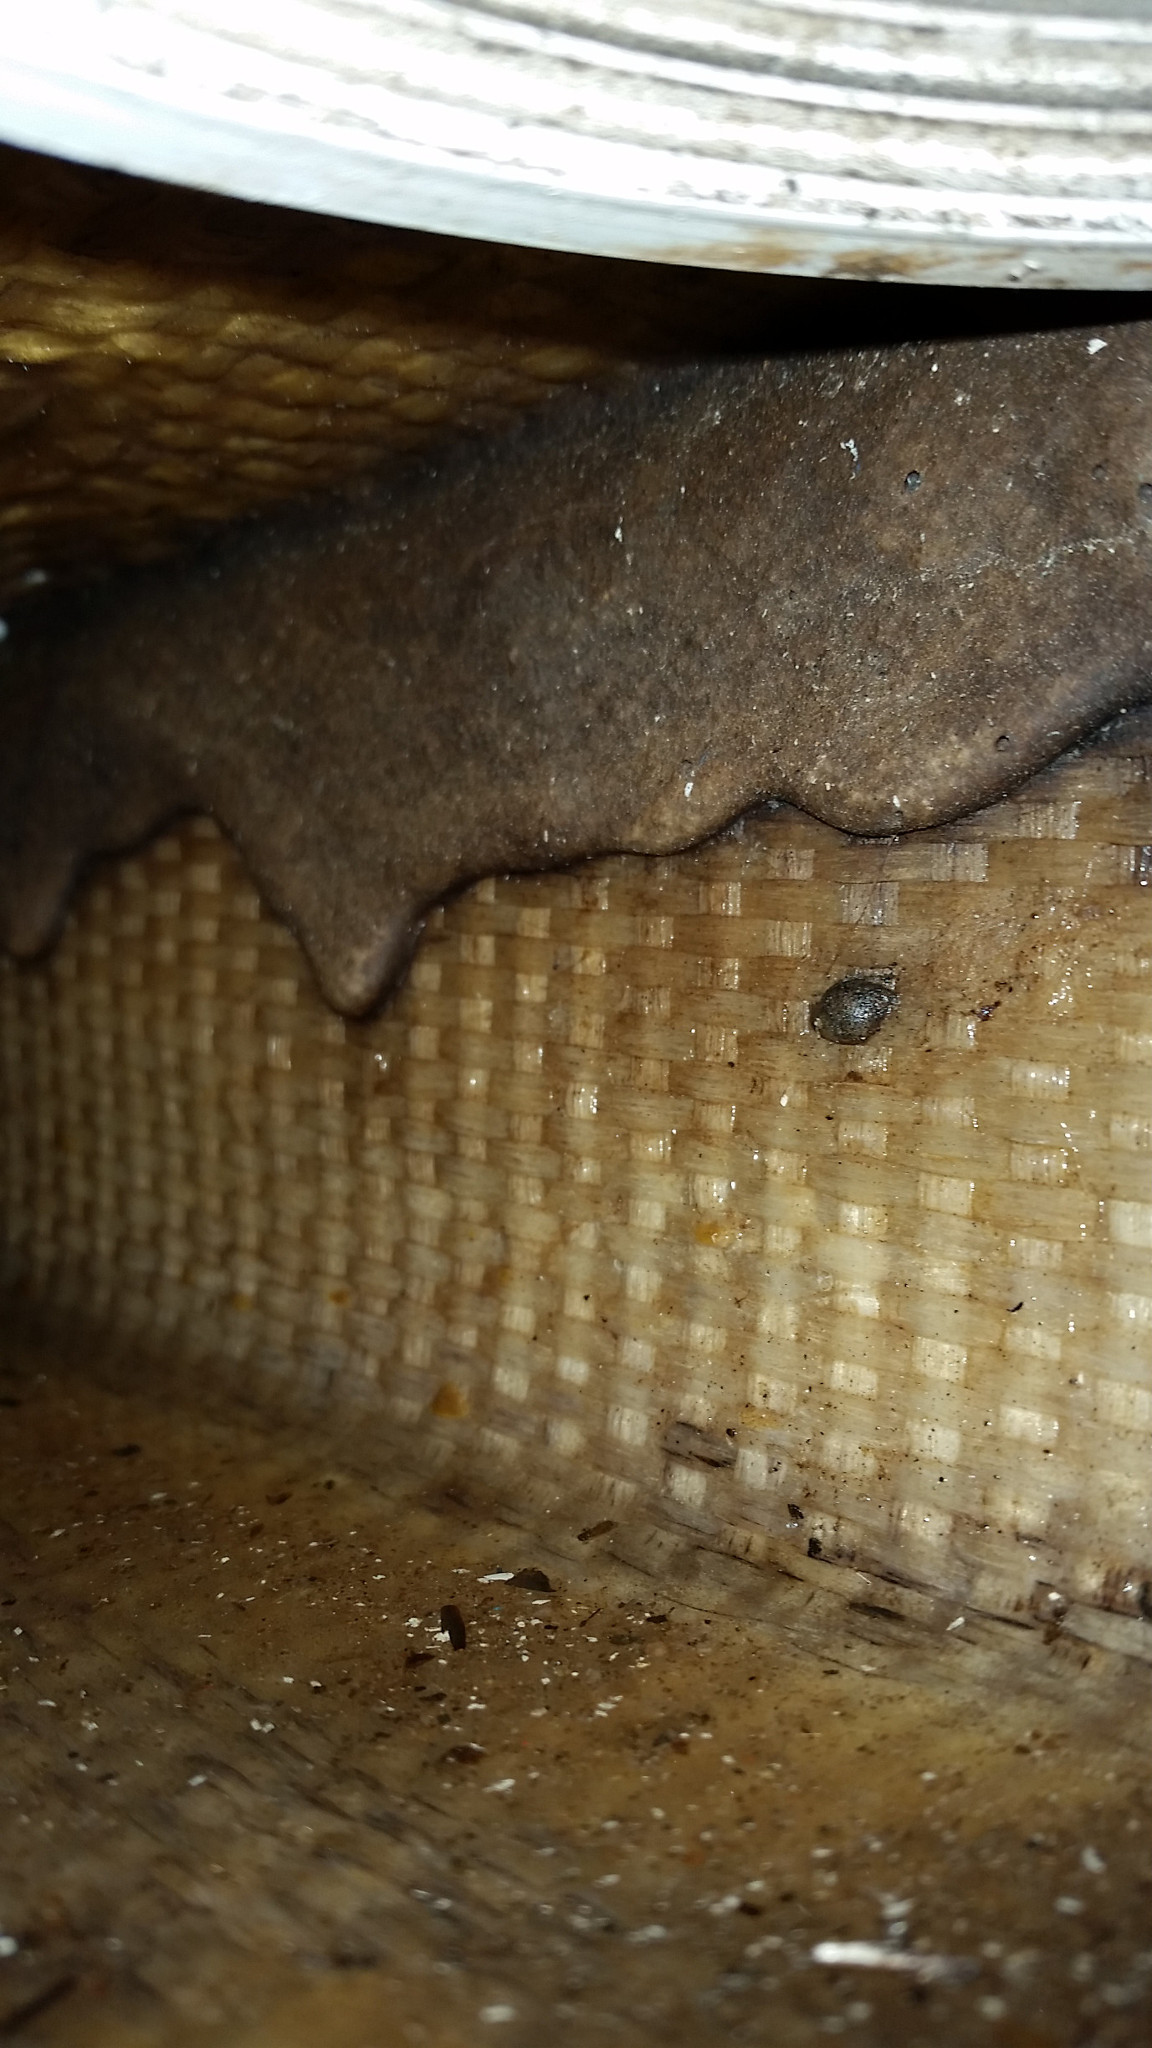
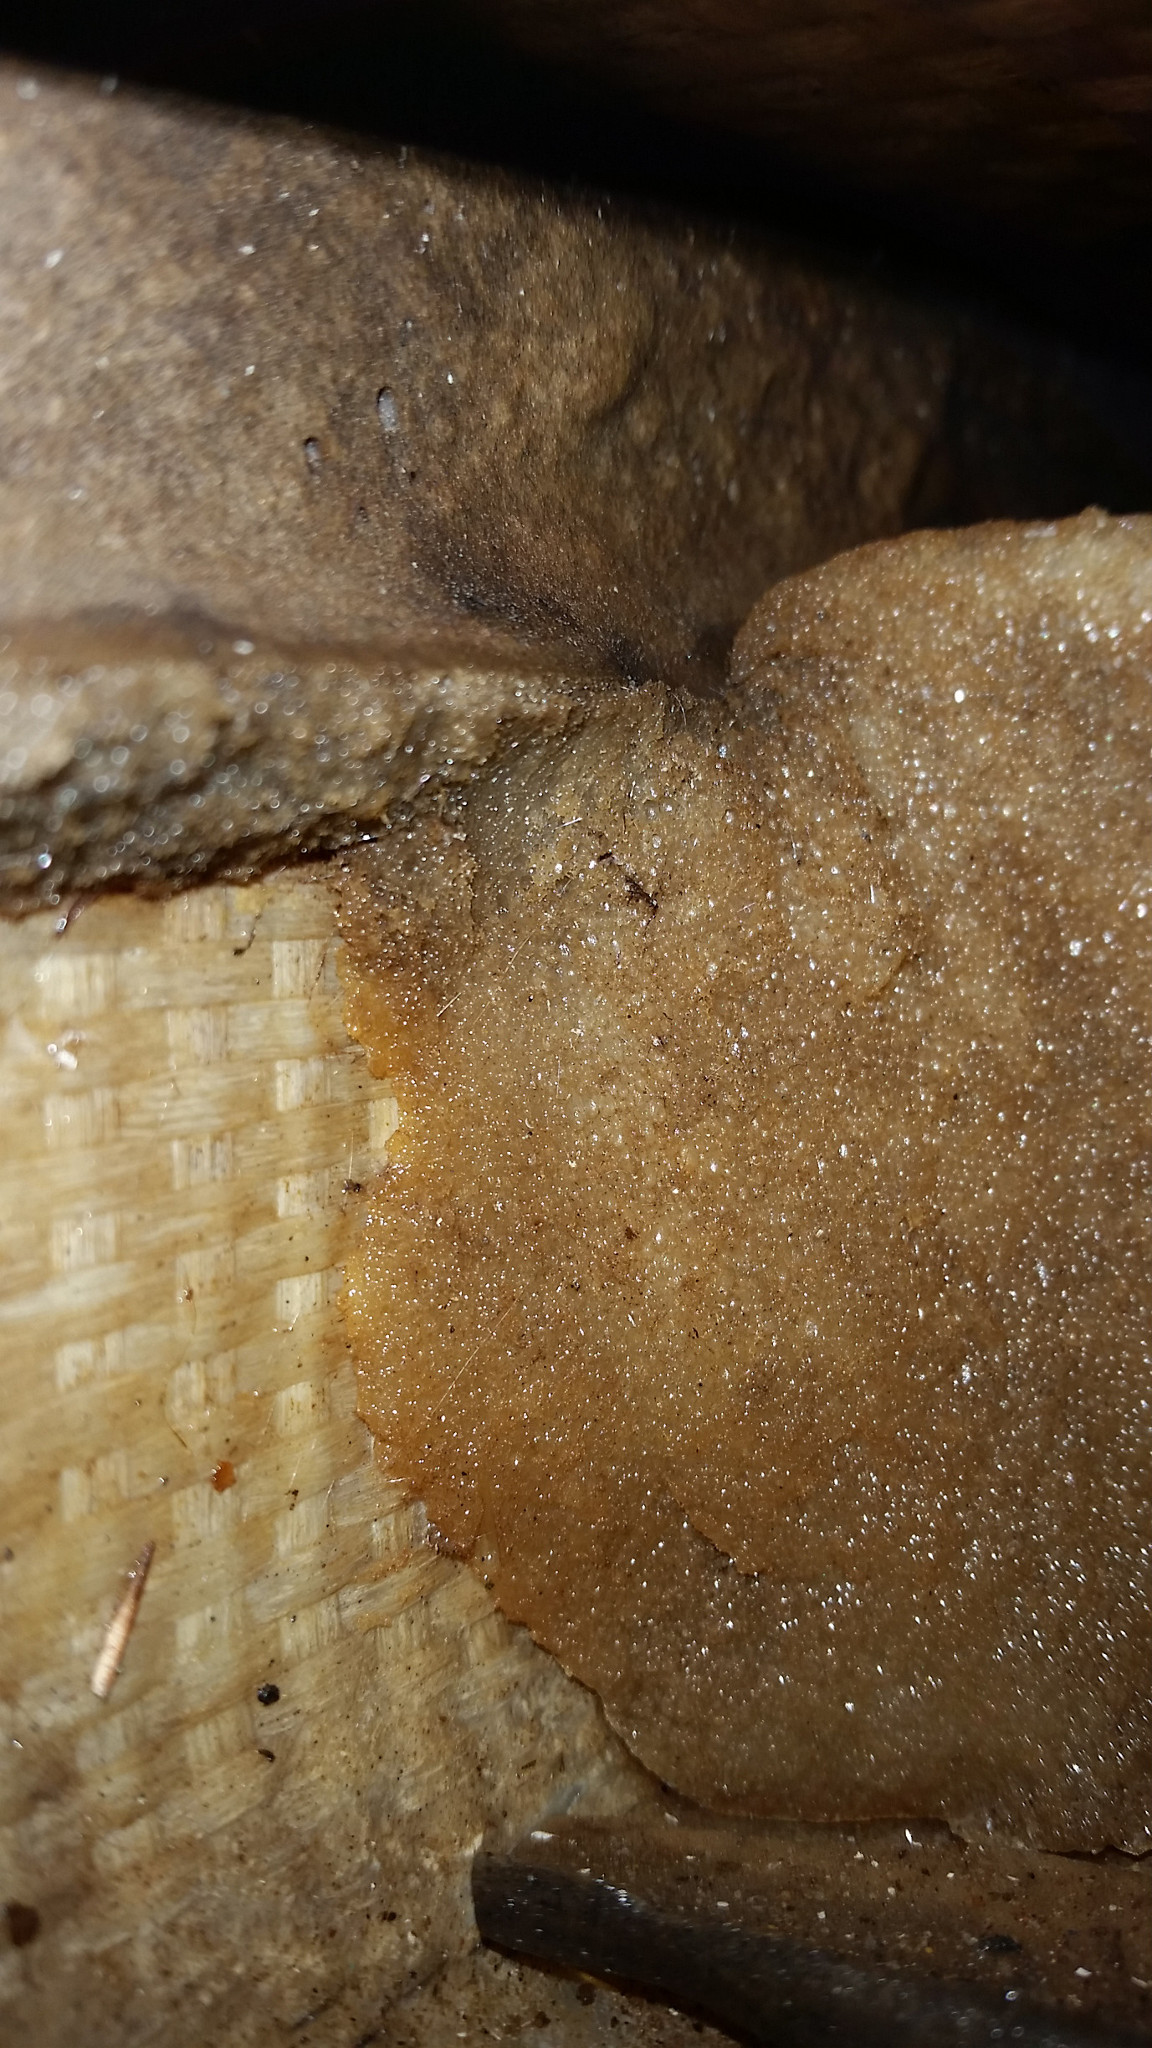
On the Westfield I just picked up, one of the prior owners put two 6" inspection ports (flanged screw in type). One just in front of the drain well and one under teh bow. I opened the rear one yesterday. It looks like the stringers are glued to the floor with something similar to a construction adhesive.

I'll see if I can get a picture of it tonight. I should be able to stick my camera inside and get a picture up underneath.

Good luck!

Please Log in or Create an account to join the conversation.

Re:1963 MFG Edinboro Floor 9 years 1 month ago #115299

Thanks kofkorn, if nothing else, I'm curious about what it looks like under there. Say, does anyone know how far forward the foam goes? Does it fill the entire floor front-to-back, or does it start at the stern and go forward a certain distance?

Please Log in or Create an account to join the conversation.

Re:1963 MFG Edinboro Floor 9 years 1 month ago #115305

I was able to get in quickly, but due to the foam, I couldn't see too far back. Also, now I know I need to clear out my foam too. Anyway, it appears the stringers are built into the exterior hull and then glued/bonded to the floor above.


Good luck and post pictures to help the rest of us!
Attachments:

Please Log in or Create an account to join the conversation.

Re:1963 MFG Edinboro Floor 9 years 1 month ago #115320

Thanks for posting the pictures, that helps a lot!

Please Log in or Create an account to join the conversation.

Re:1963 MFG Edinboro Floor 9 years 1 month ago #116141

Well, I cut into the floor and found some interesting things I didn't know!

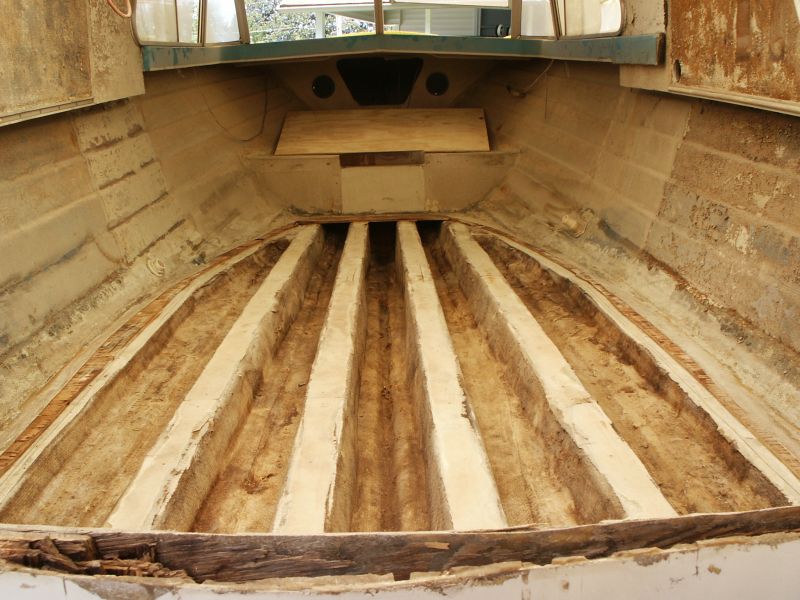
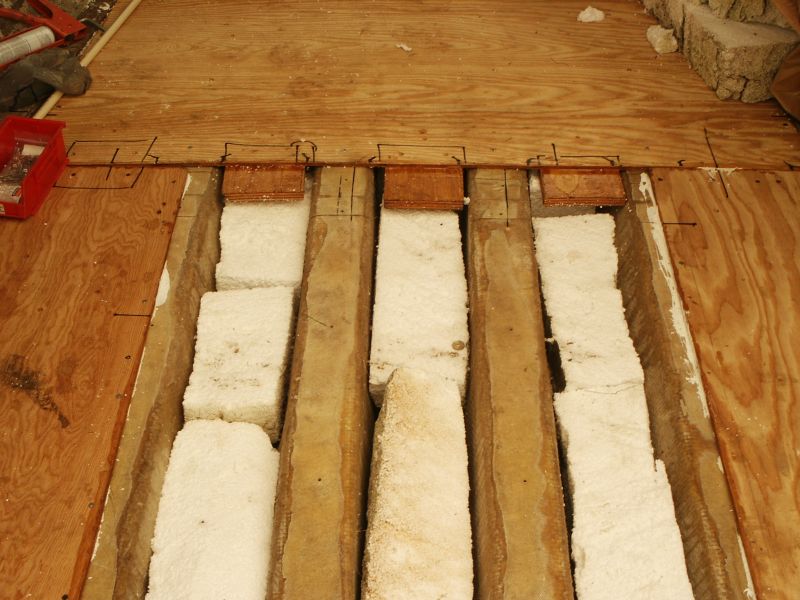
I had assumed the stringers were glassed into the hull, and, based on the pictures kofkorn posted, glued to the floor. Turns out the stringers are actually one large piece of currugated fiberglass, sandwiched between the hull and floor, so a cross section is just like curugated card board, two outer layers, with a wavy layer in between. Both sides are glued together with whatever the adhesive is. The result is a structure which is three components thick everywhere (floor, currugated layer, hull) rather than three layers in some areas (floor, stringer, hull), but only two layers between the stringers.

Seems like it would be a design that could give great rigidity to the floor (yay,) but would be certain to trap water (boo). Explains the dual drain plugs. Foam under floor seems to be an excellent sponge. But with small access holes cut in the floor near the transom, it might be possible to "snake" the foam out. Thanks again for the pictures kofkorn, that helped. Turns out the layer on the bottom, where it looks like the stringer is glassed to the hull, is simply the lower layer of the same piece of fiberglass. The adhesive holding it down is hidden between it and the hull.

Please Log in or Create an account to join the conversation.

Re:1963 MFG Edinboro Floor 9 years 4 weeks ago #116342

  • 63g3
  • Offline
  • Contributing Member
  • Contributing Member
  • Posts: 465
  • Karma: 62
  • Thank you received: 2
Hi,
Well I never back away from a challenge I'm on boat resto #9 right now but, I agree on the wet foam as a possible show stopper on these.
Ironicly the bottom/ floor/ stringers are built too well to be easily removed as the structure is usually fine it's just the foam. Too bad they did that, it does make the boat quiet though. Glasspar also used the corrugated stringers but did not foam fill so they don't suffer from water logging. I live in New England too, Massachusetts, I would also be concerned what that freezing water has done over many winters. You can still find cream puff MFG's out there but it might take a year or so to find one. I'm sure transom core is junk too.
If you do the boat I don't see how you can remove the floor but you could save most of the stringers. Circ saw through floor and the stringer top cutting strips above the stringers so you have channels to dig the foam out.
Foam is only on the corrogation between the hull and stringer top not between stringer bottom and floor, at least that's what catalog shows in the cut away.
Once it's all out its up to you to refoam or not but there should be new glass used to reinforce the now exposed stringer edges. I would either try to tab back the floor strips and glass over the whole floor or bond plywood sheet down and glass over.
Plywood should be glassed before bonding it in, I would think 3/8's or 1/4 would be fine it will be well supported.
Anyways my 2 cents.
MFG's are great riding solid boats from the 60's. I restored an Edinboro a few years back, dry foam, partially rotted transom, mint gel so it didn't take a lot to get it sorted out. In looking for the correct stern light I found a mint Erie, like showroom, so I sold the Edinboro and picked that up. They are not fetching much $$$ I sold the 64 Edinboro and trailer for 1000 no motor and scored the 65 I Erie with trailer and 1000 Merc for 2000.
I'd look around some before spending time and money on yours. Look everywhere, Uship has been a decent way to ship, at least in my experience.
Good luck!!!
Randy

Please Log in or Create an account to join the conversation.

Re:1963 MFG Edinboro Floor 9 years 4 weeks ago #116383

Yep, I would love a nice dry floor, but alas, have not found one. The foam is remarkably soft with all the water in it. I'm going to play around with ways to remove it without cutting up the floor. I will post the things I try. The boat was darn near free, and so far I have just put some time into it. So it has not become financially expensive (yet).

I think you are correct that the foam is only in the spaces "between" the stringers. I am estimating its around 3 cf of foam, which would be just shy of 200 pounds. Lots of weight in a 750 pound hull.

Please Log in or Create an account to join the conversation.

Re:1963 MFG Edinboro Floor 8 years 6 months ago #122436

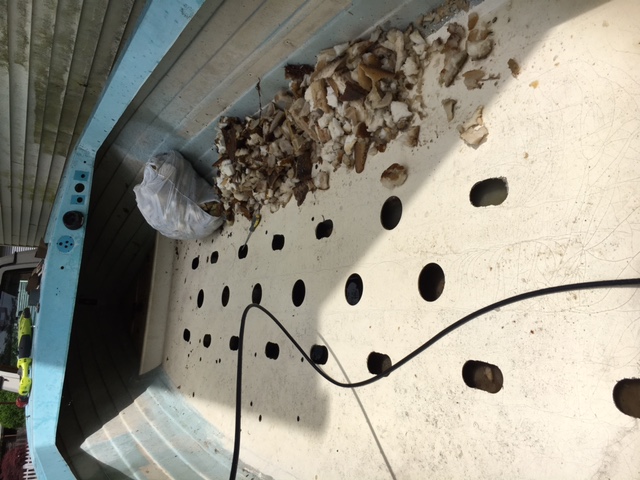
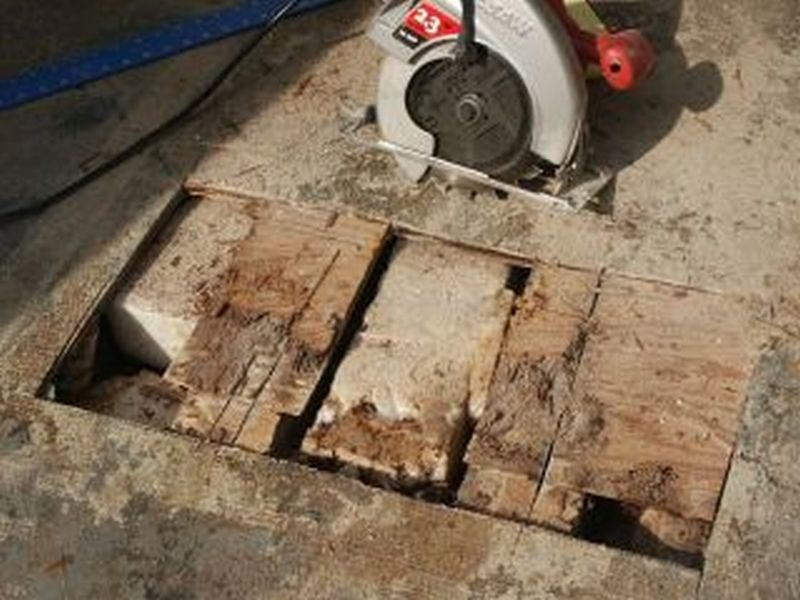
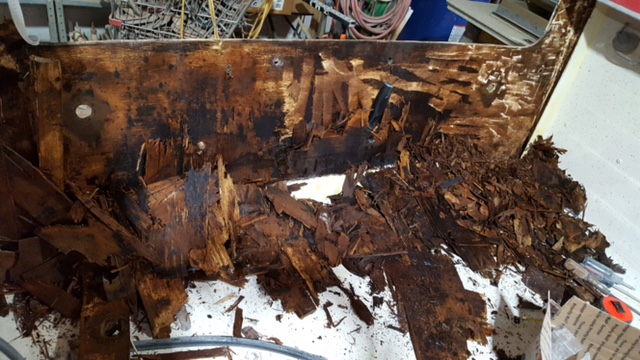
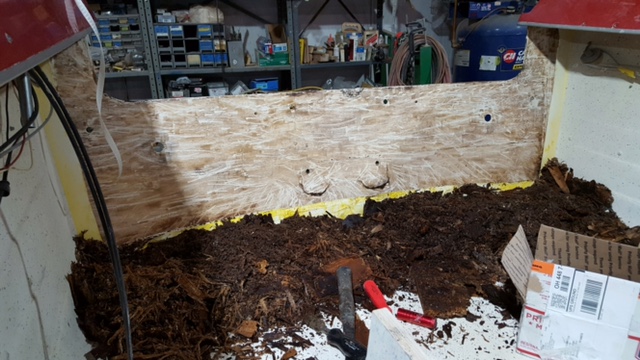
A quick update on the floor foam. As I mentioned in another thread, I came up with a plan the get the old foam out. I took a pressure washer, and fed it through a hole I cut in the floor near the transom with the intent of using the sprayer as an auger or router to chew through the foam. The good news is, it works, the foam does come out, but the bad news is it's tough to tell where you are cutting, it's very slow, and seems to make a mess! After blowing up a couple of hoses on my little 1600 psi pressure washer I decided my hurry rigged hoses (which I used to make the corner into the bilge) was not tough enough, and the job would probably work better with a 3000 psi sprayer. So I want with a different plan. I have cut a series of 4" holes in the floor between the stringers and am taking the foam out that way. With the holes cut toward the transom I can sometimes get 12-18 inch long intact pieces of foam loose, then slide them to the back and take them out. Now I have several pieces of foam that look like 10 pound loaves of wet stale bread. There is a lot of water down there. Even when the top of the foam feels dry, it's typically saturated by the bilge. My best guess is that the center section of foam is about 100 pounds. This is a picture of the holes I cut. Uh, picture is not posting.

Please Log in or Create an account to join the conversation.

Re:1963 MFG Edinboro Floor 8 years 5 months ago #122474

Wow, you're a better man than me. I think what you are trying will probably work, once you sort out the details. I just hate to mess with things I can't see very well. And you are right - it's getting very hard to find a good MFG Niagara/Westfield/Edinboro that does not have saturated foam from sitting outside, or even from condensation.

It's making me think of removing the inner drain plug from my Niagara on a hot dry day and just letting it just sit in the sun to bake. There is no visible water running out, but it may help with condensation. I'll try it anyway. I have not weighed it, but based on the condition of the rest of the boat, I think I'm OK.

BTW, the 60's Erie and Seaway models were not pressure molded. Rather they used hand traditional molds and were hand laid up. I've also read that they have wood stringers, but a fiberglass floor. I suspect it was just too expensive to make the stainless steel matched metal dies for those bigger boats, and they were sold in much smaller numbers to justify the cost. Old Niagaras are everywhere around Cleveland, fewer Westfields and Edinboros, and you hardly ever see an Erie or Seaway for sale. Also, if you you look at an Erie or Seaway hull, they are shiny like the deck, whereas the smaller three have more of a semi-gloss matte finish, due to the pressure molding of the hull. That process changes the finish of the gelcoat. I've only ever seen one Erie in my life on the water, and that was back in 1966 - they were only made for 1 1/2 years. Still trying to explain that to ACBS judges - they are used to shiny hulls on any fiberglass boat. I usually lose two points because of that, even though my Niagara hull is pristine.

Eventually I plan to sell my Arrow Glass when I find a good Edinboro. Have not found one yet. I plan to keep the Niagara for the rest of my life.

Good luck with your work and keep posting!

Please Log in or Create an account to join the conversation.

Dave Nau - 1966 MFG Niagara with 1963 Mercury 350 (35hp) outboard and 1966 Tee Nee trailer. Second boat is a 1962 MFG Edinboro with a 1984 Evinrude 70hp and Holsclaw trailer.

Re:1963 MFG Edinboro Floor 8 years 5 months ago #122478

Definitly not better, and if I was smarter I might find a different way! I also played with trying to find a way to dry the foam but have have run into some things that made me go with removing the foam instead. When I got the boat 8 months ago I jacked the bow up high and opened everything up, and a bit of water came out but it stopped dripping. Left it that way for months, then got into the foam and found it was saturated. I have some big pieces now that I am keeping to find out how long it takes them to dry with decent exposure. My guess is that out in the open, rather than down in the hull, it might take months. But I'll give it a try and post updates. I wondered if it would dry out in the sun in Phoenix, but I am suspecting it might take years even under those conditions. Adding circulation would likely speed things along. The foam seems to really hold onto the water.

I came across this, and the boat is really familiar, doesn't it belong to someone on this forum? boats-from-usa.com/mfg/mfg-edinboro-39355

Looks great and a great price, I would be very interested if it's still available!

Cheers

Please Log in or Create an account to join the conversation.

Re:1963 MFG Edinboro Floor 8 years 5 months ago #122716

  • 63g3
  • Offline
  • Contributing Member
  • Contributing Member
  • Posts: 465
  • Karma: 62
  • Thank you received: 2
I think you need to slice the floor off above the channels with the foam, this will leave the areas without intact to which new floor could go on. Granted original floor was fiberglass but plywood could be used if glassed on either side then bonded onto the floor strips remaining. That would be the easiest although not easy! Look in the catalog section under MFG some of the catalogs show a cross section of the boats to help understand how foam is located in alternate channels.
Randy

Please Log in or Create an account to join the conversation.

Re:1963 MFG Edinboro Floor 8 years 5 months ago #122717

  • 63g3
  • Offline
  • Contributing Member
  • Contributing Member
  • Posts: 465
  • Karma: 62
  • Thank you received: 2
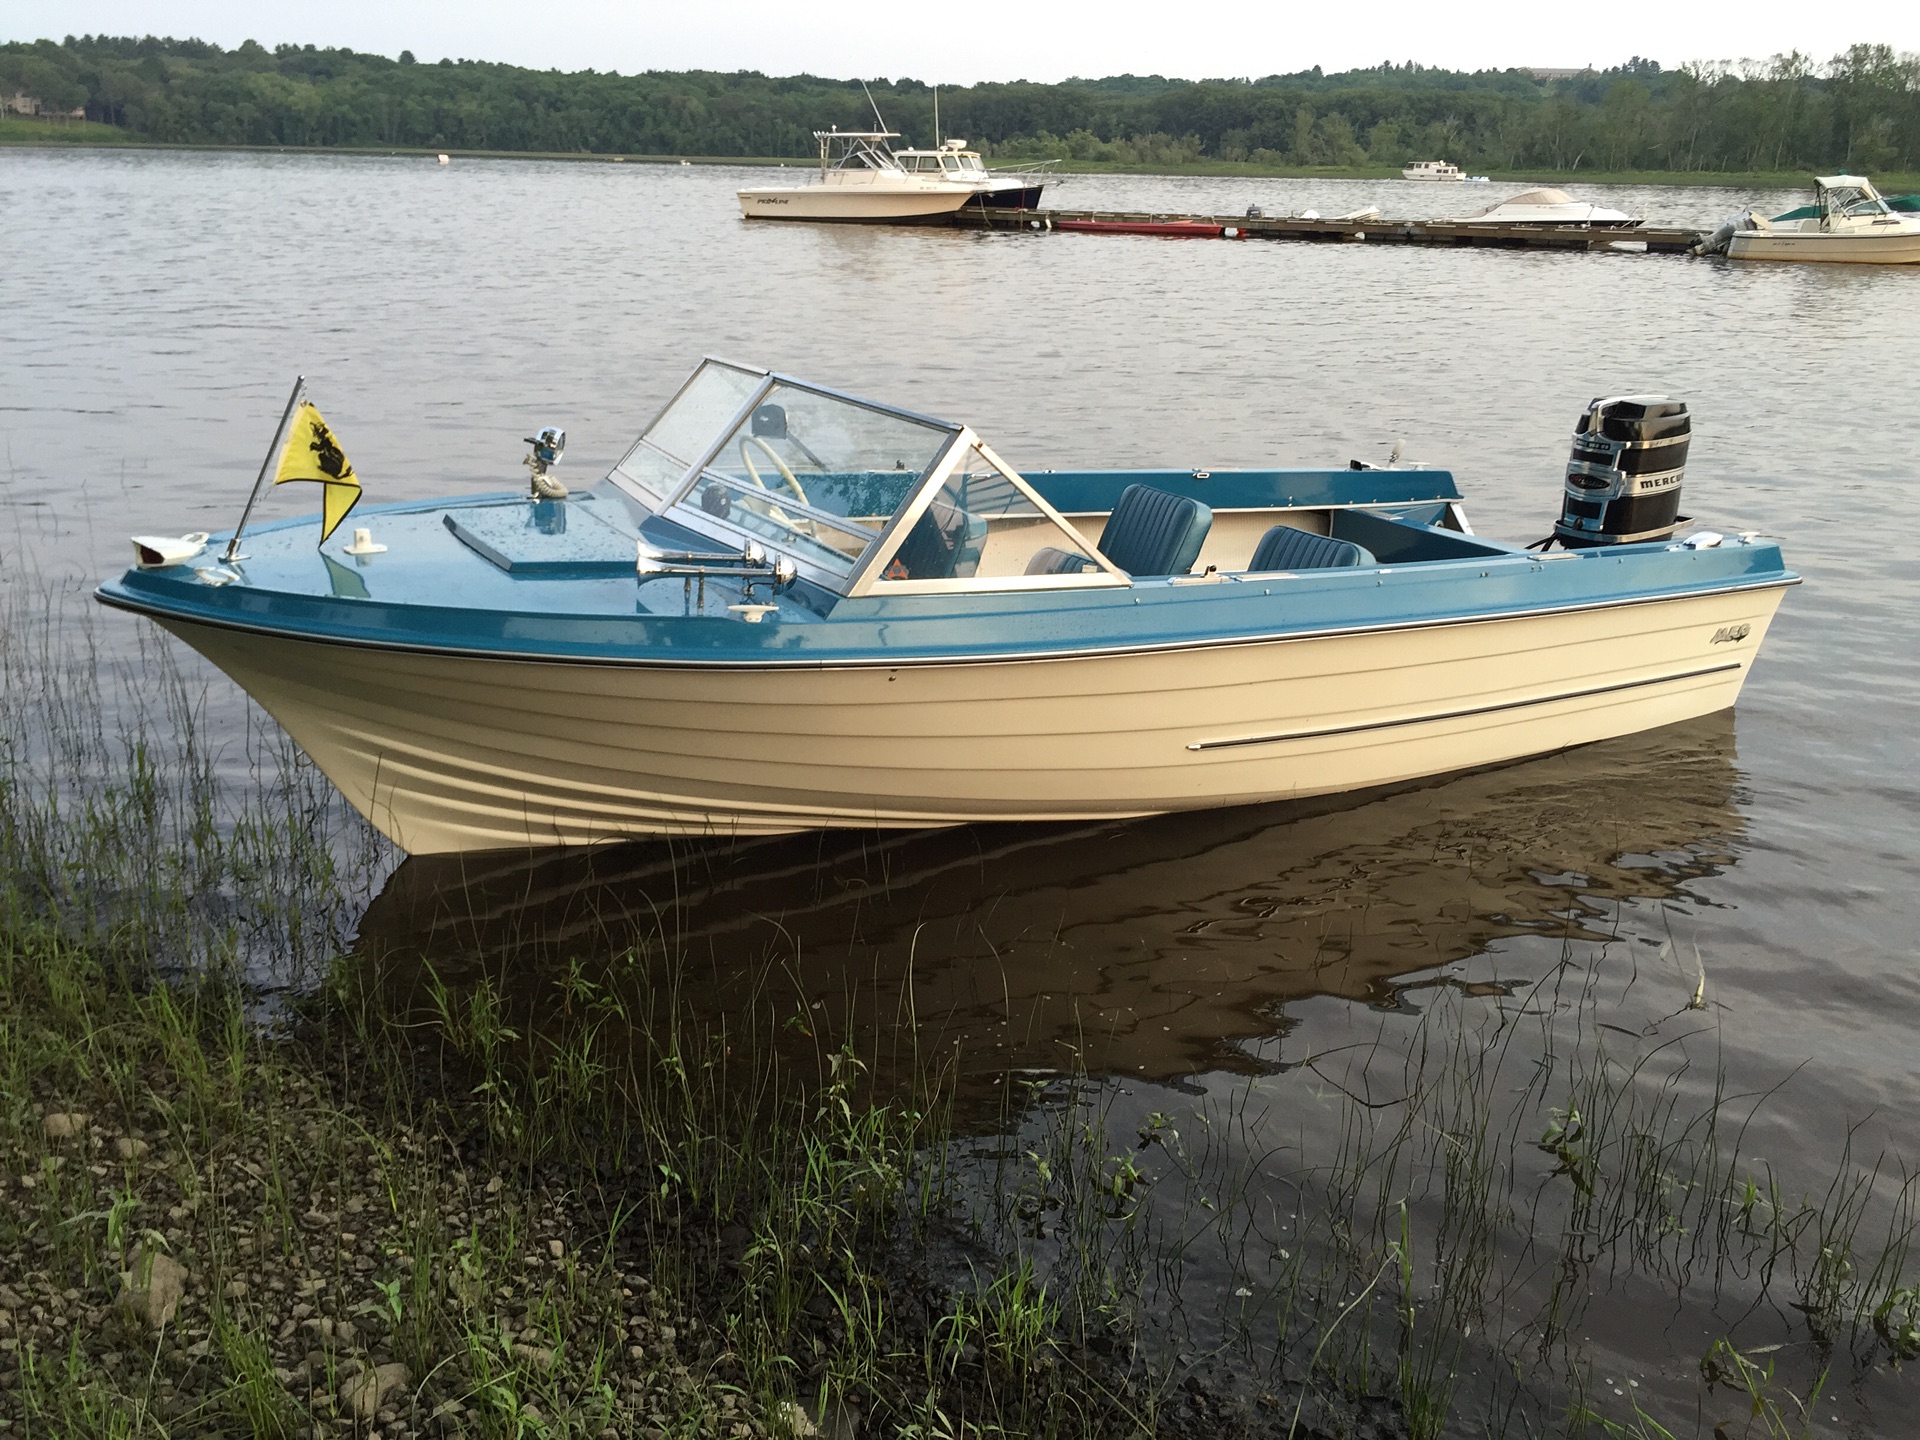
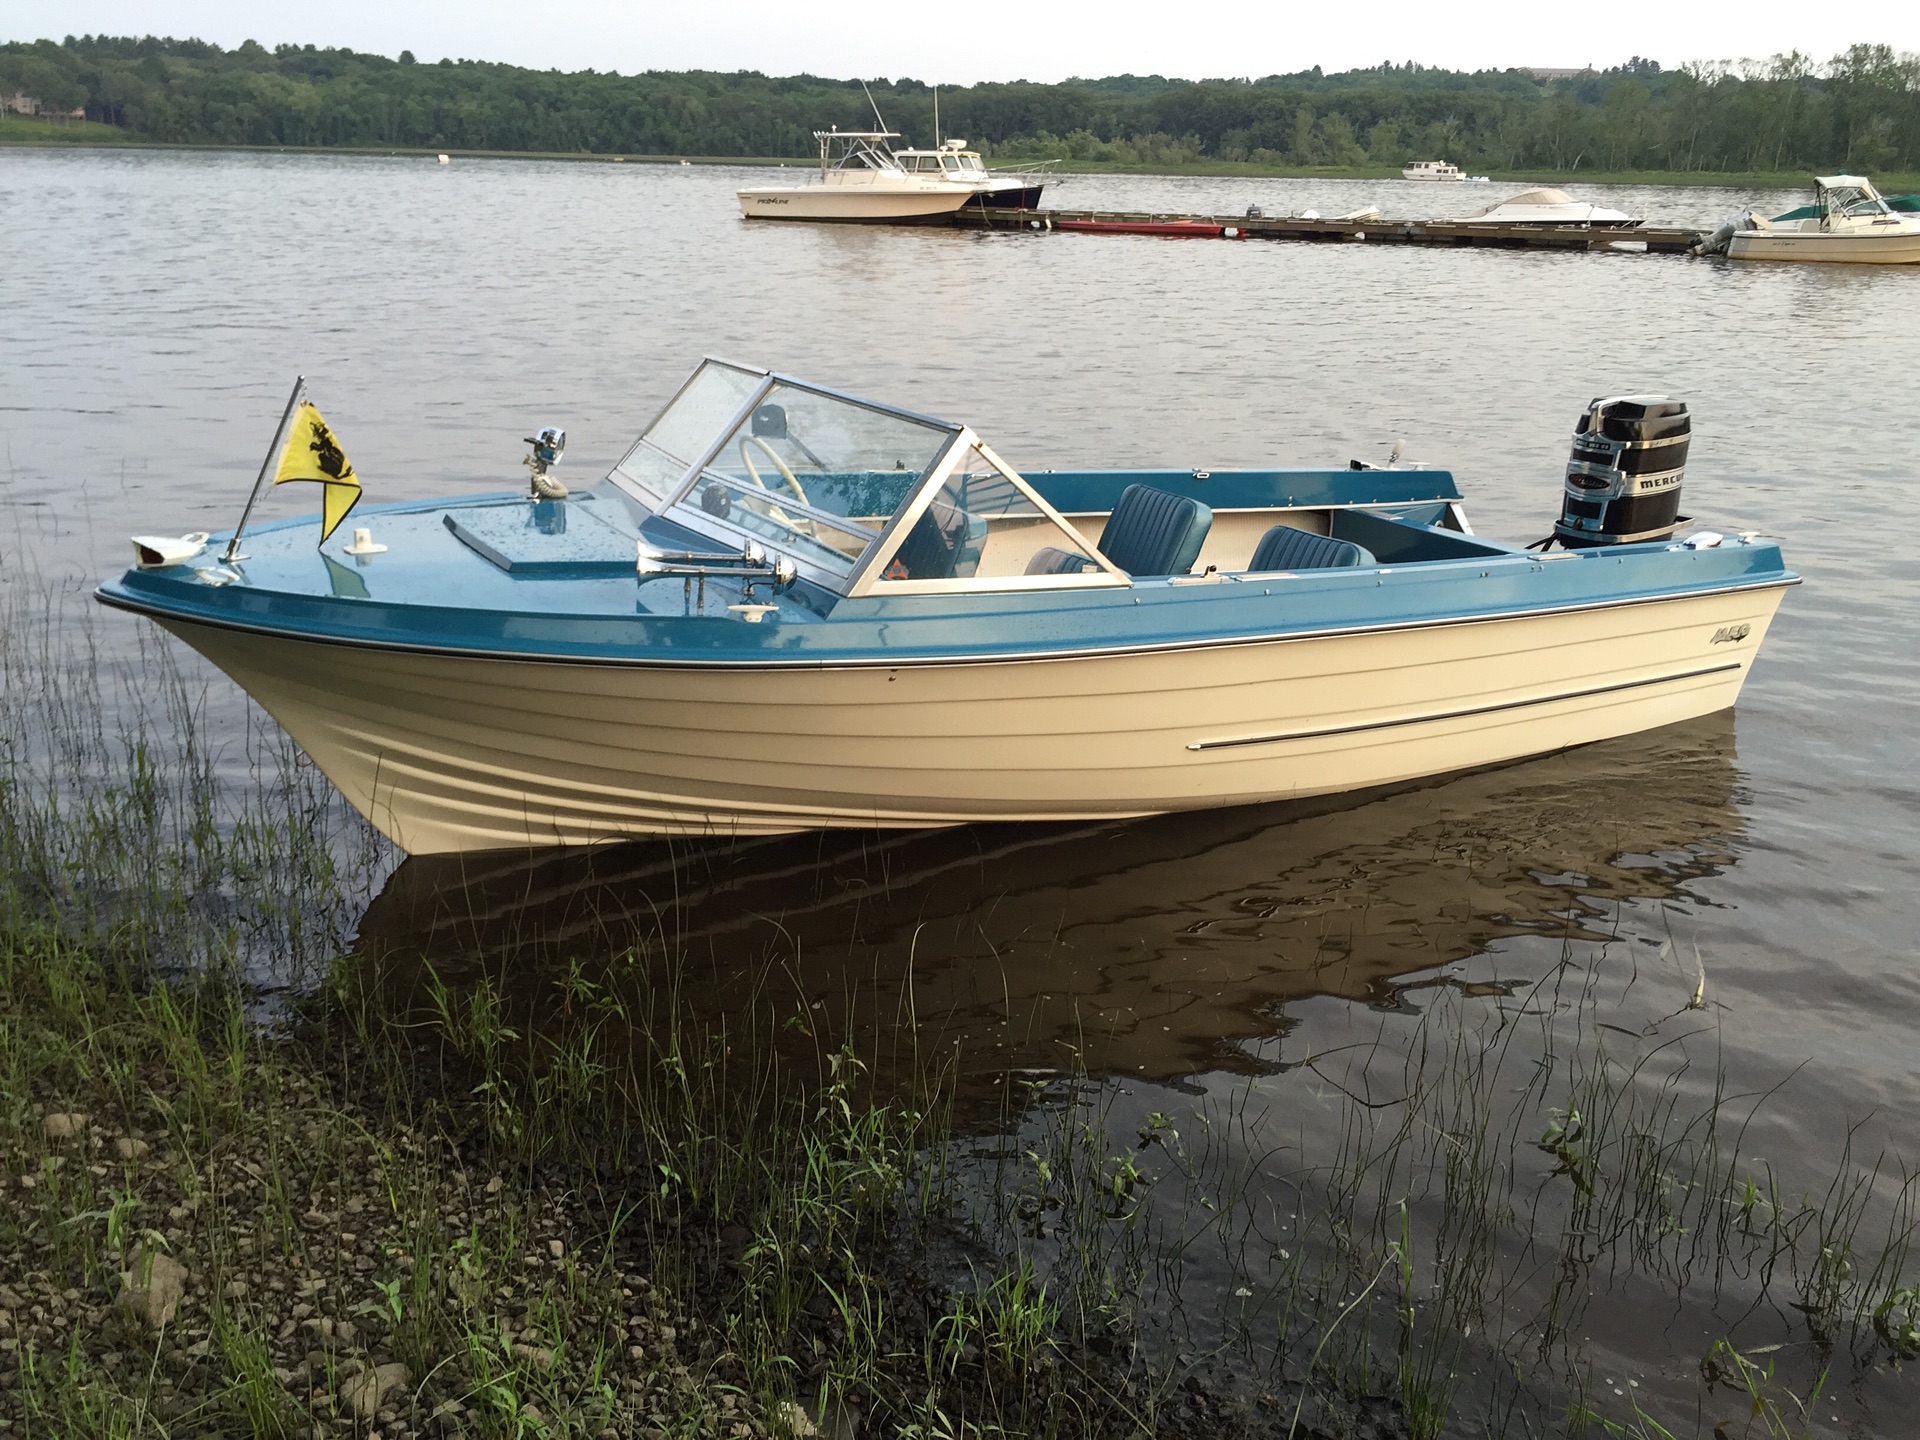
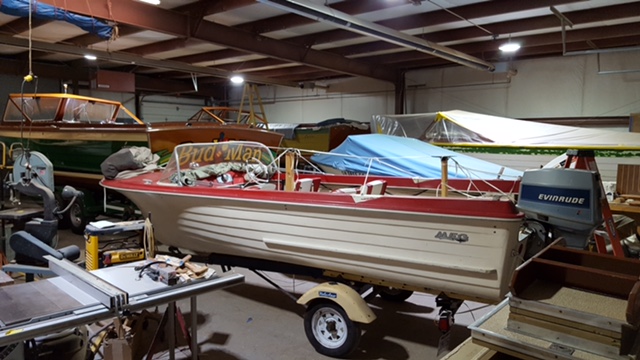
Ha that's my Edinboro! Sold it fire sale to make room for the MFG Erie picture attached, I just had to have, otherwise I would have never parted with it. You will see I post here on occasion. I live in Massachusetts and boat went down South. It sold on eBay, that listing you saw must be a site that gathers stuff from everywhere and agragates it. I never get any messages even though it looks like people are adding questions.
There are two perfect MFG's I've found forget if west fields or niagras but are mint original, one is in the glassifieds. If looking to ship try Uship.com I've used them quite a bit, things don't always go to schedule but in the end it always worked out.
Good luck on the foam.
Attachments:

Please Log in or Create an account to join the conversation.

Re:1963 MFG Edinboro Floor 8 years 5 months ago #122718

  • 63g3
  • Offline
  • Contributing Member
  • Contributing Member
  • Posts: 465
  • Karma: 62
  • Thank you received: 2
The foam won't dry not enough evaporation going on through the available surface area exposed, for has to come out. In the end it's the only way.
Attachments:

Please Log in or Create an account to join the conversation.

Re:1963 MFG Edinboro Floor 8 years 5 months ago #122755

That is one very nice Erie. Those are really hard to find - a blue one in that shape next to impossible.

I can see why you had to have it!

Please Log in or Create an account to join the conversation.

Dave Nau - 1966 MFG Niagara with 1963 Mercury 350 (35hp) outboard and 1966 Tee Nee trailer. Second boat is a 1962 MFG Edinboro with a 1984 Evinrude 70hp and Holsclaw trailer.

Re:1963 MFG Edinboro Floor 8 years 5 months ago #122782

The foam is out! That foam holds a LOT of water. I cut holes in the floor between the stringers, in the three channels that have foam. Then used a screwdriver and a pressure washer.

That Edinboro looked great!

Please Log in or Create an account to join the conversation.

Re:1963 MFG Edinboro Floor 8 years 5 months ago #122881

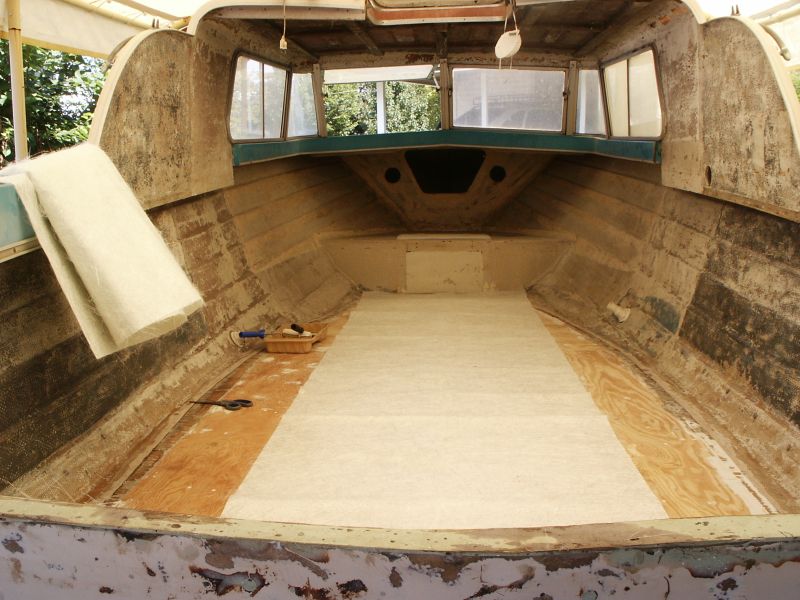
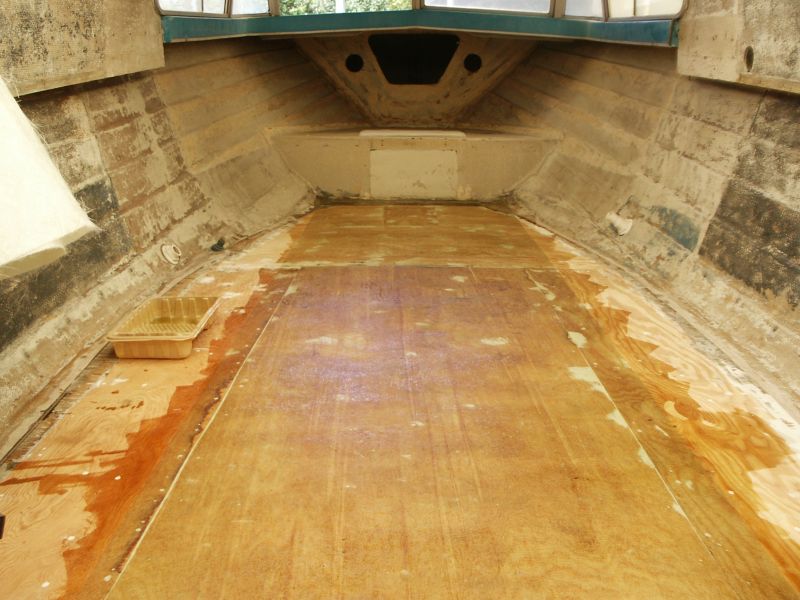
OK, finally found a way to get my photos on here. This shows the holes in the floor for the foam-ectomy
Attachments:
The following user(s) said Thank You: charlieross

Please Log in or Create an account to join the conversation.

Re:1963 MFG Edinboro Floor 8 years 5 months ago #122882

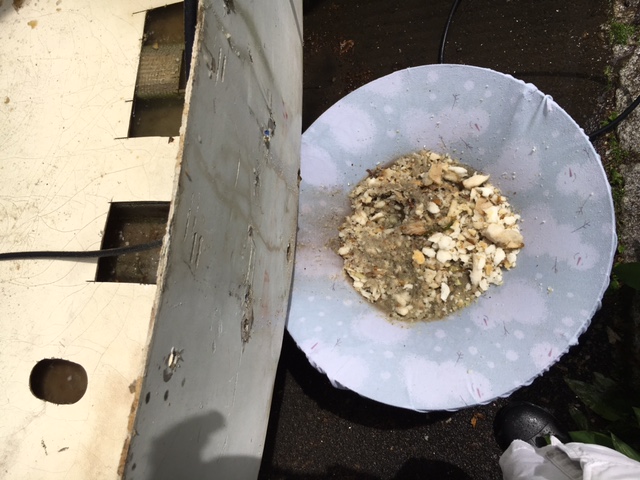
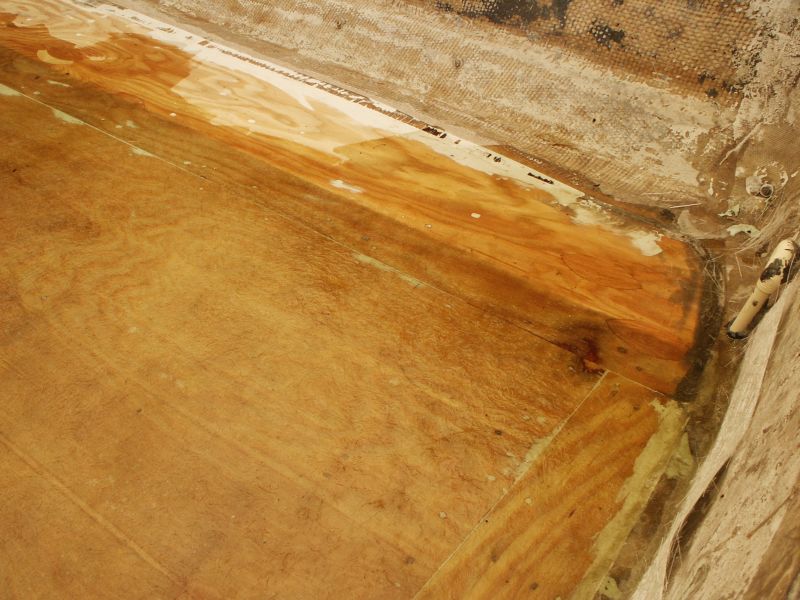
I was able to get a lot of the foam out in chunks, but I also used a pressure washer, which chewed through it. I put a towel on a rack at the stern to catch the shredded (practically powdered) foam as it drained out. A slushy mess. One of the things I found that I was surprised at was how much the foam was blocking drainage. Even if the foam was not saturated, it would seem to keep a lot of water from draining.
Attachments:

Please Log in or Create an account to join the conversation.

Re:1963 MFG Edinboro Floor 8 years 1 month ago #128086

How is this project progressing? I may be facing a similar challenge with my 1962 Edinboro.
Attachments:

Please Log in or Create an account to join the conversation.

Dave Nau - 1966 MFG Niagara with 1963 Mercury 350 (35hp) outboard and 1966 Tee Nee trailer. Second boat is a 1962 MFG Edinboro with a 1984 Evinrude 70hp and Holsclaw trailer.

Re:1963 MFG Edinboro Floor 7 years 11 months ago #129090

Hi Dave, sorry for the very long delay in my responding. So the project is coming along very nicely! I am actually pretty happy with how the removal of the foam went. After that, I don't think I would hesitate to buy another MFG with a saturated floor, I would just plan to remove it. I think if I were to do it again, I could extend the distances between the holes I cut by another foot, which means fewer holes. But by cutting between the stringers, and cutting round holes, I suspect the structural integrity of the floor is still quite good. I have not yet decided how I am going to close the holes. I will cover them with fiberglass, but I have not decided if I want to spend a lot of time on it to make it look nice, or just add a cover over the floor.

Your '62 looks great! I like the red!

How is your windscreen? A few months ago, I drove out to Buffalo NY to meet with Dave (cc1000) and picked up a brand new old stock windscreen. It was still wrapped in the factory packaging, and when I opened it, it had all of the hardware and its crystal clear! It even had the original installation instructions, and the rubber gasket along the bottom was amazingly soft and supple. Dave still has quite a few of these. I am amazed at what a difference clear plexiglass makes. I'll post pictures in a bit. Let me know how your Edinboro goes. Does yours still have the original deck hardware? I am missing the bow light.

Cheers,

Talbot
The following user(s) said Thank You: charlieross

Please Log in or Create an account to join the conversation.

Re:1963 MFG Edinboro Floor 7 years 11 months ago #129115

My windshield is bent in one spot where the previous owner lost his balance in waves and fell on it, bending the frame. I'm going to try to bend it back, but if not, I'll try your route and get a new one.

Right now it's in a restoration shop getting a new transom, fixing the cracked motor well, plus getting some repairs done to the keel. I plan to do the deck, windshield, seats, and redo the white plastic-coated hardware.

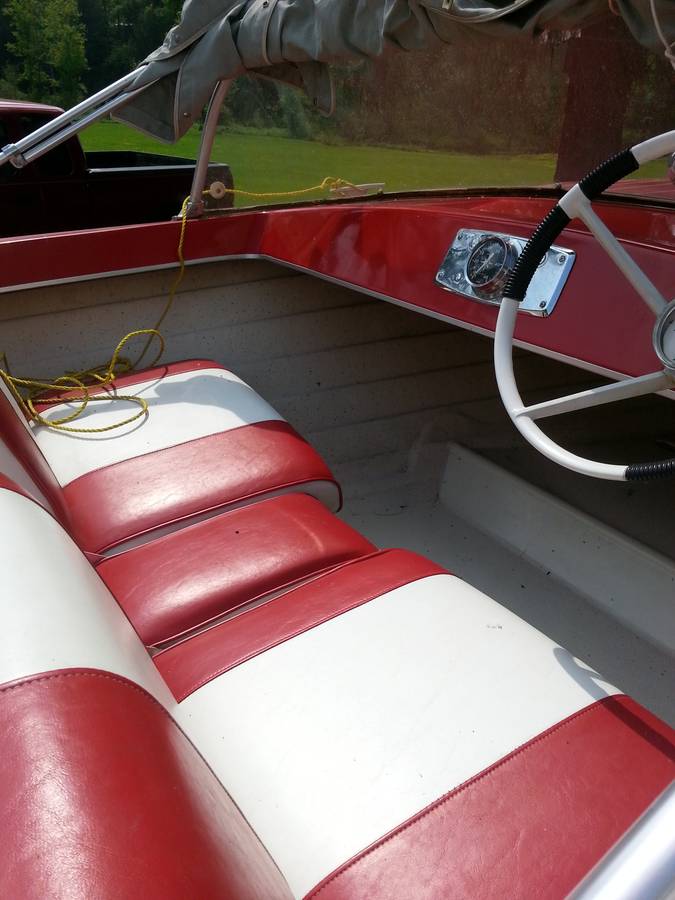
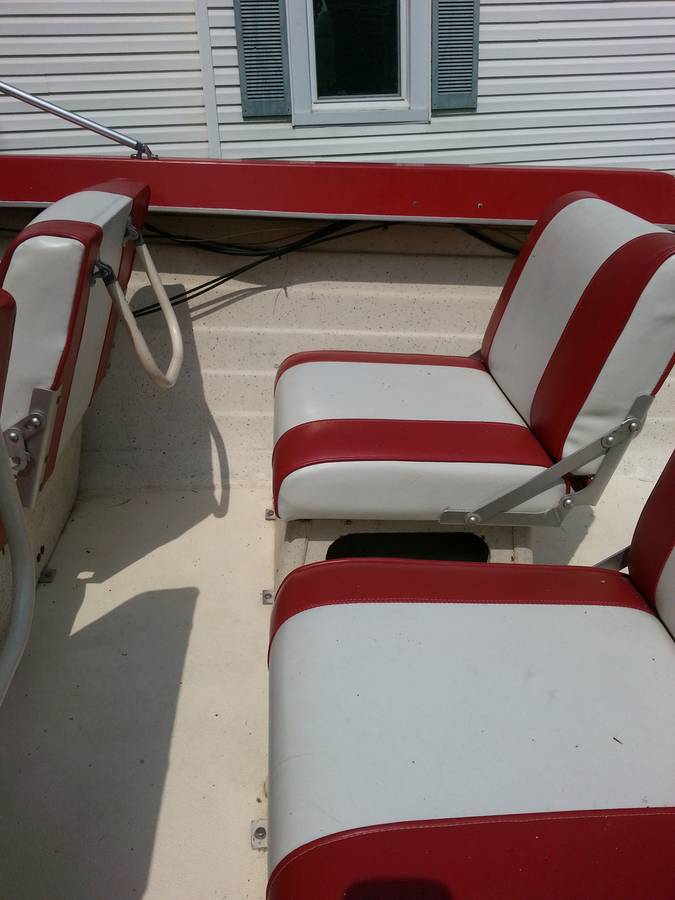
I have all the hardware, plus the complete Sun 'n Fun seats. It was really hard to find a red Edinboro that still had the original seats. My Dad bought his first boat in 1963, a new red Westfield, and I always liked that boat. It had the white and charcoal seats used that year, but I like the red and white seats in this one even better. This is the only Edinboro I found with a red deck after looking for three years, so I got it, even with the significant repair and restoration it needs.

We'll find out soon if the floor foam is saturated once the inside of the transom comes off. Going to use Carbon-Core CarbonBond (like Nidacore) for a new transom - you mix then poor it.

Here's some pictures of how the seats look now:
Attachments:

Please Log in or Create an account to join the conversation.

Dave Nau - 1966 MFG Niagara with 1963 Mercury 350 (35hp) outboard and 1966 Tee Nee trailer. Second boat is a 1962 MFG Edinboro with a 1984 Evinrude 70hp and Holsclaw trailer.

Re:1963 MFG Edinboro Floor 7 years 11 months ago #129145

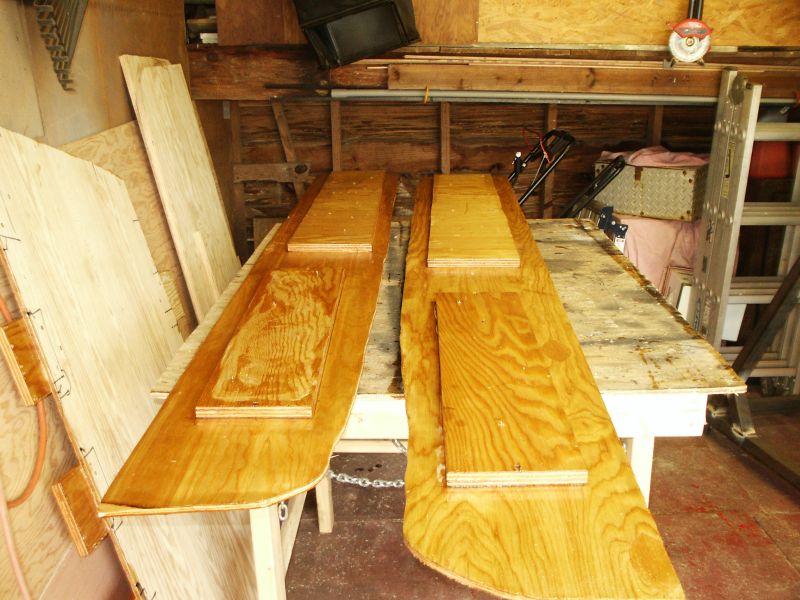
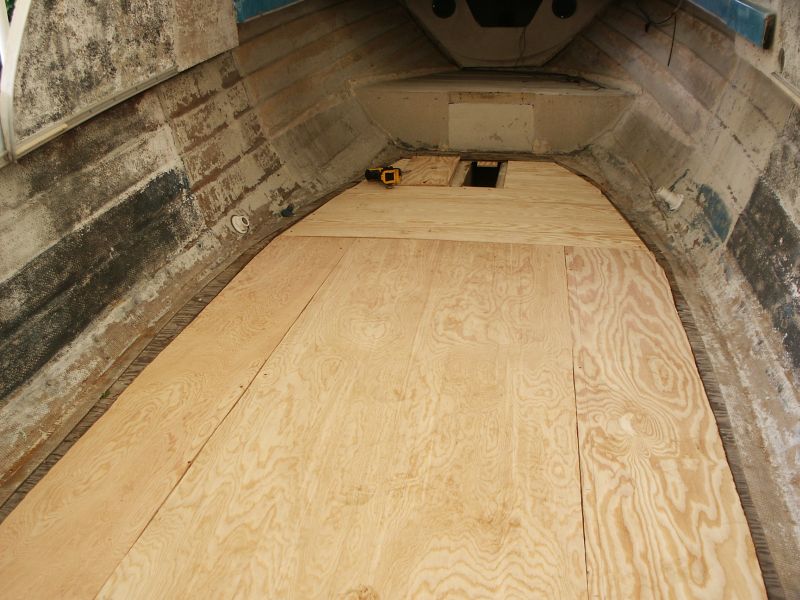
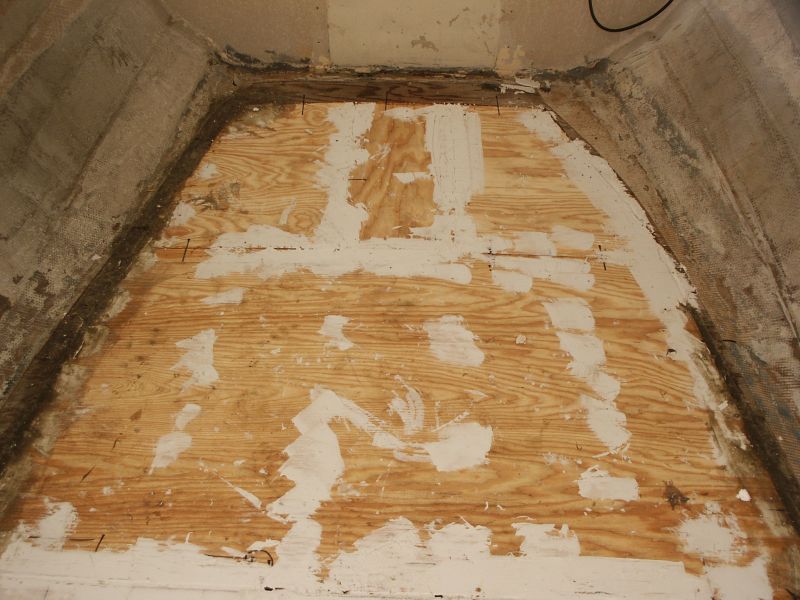
replacing the floor, well from what i learned here i attacked the floor and foam problem. new at it but confident with the help here i could make it. first of all set your saw a little less or at 3/8" to cut just through the floor but not into the stringers cut across from port to starboard just two or three inches wide. this will mark your stringers pop a chalk line and cut in between the stringers they are hollow fiberglass .. so if you damage one you can fix it with no problem. mine had screws i dont know if that was factory or after but i pried the rest off the stringers . bought a belt sander and dressed up the stringers . i left a lip down to blend the edges back . i bought 3/8" marine grade plywood. and i took a compass and drew the edges to match what i had left. i flipped the plywood over and anywhere i might screw something down , seats cabin walls batteries , anything i laid a piece of 3/4" marine plywood .. to build a plate to screw through ... then i coated it with resin. top bottom sides. now some say leave the foam out some say pour foam. i had gotten some dock foam to lay the boat on off the trailer. i tested it and then cut it up and filled the bilge back with it. for sound deadening and flotation. then i added backing boards where the sheets overlapped . laid a good line of 5200 down and dropped the floor down screwed it to hold it to the 5200, but i know some who use resin to coat the stringers and put weights down to keep screws out. * note when i took the floor up it had a layer of glass on the bottom side too. i just coated mine. some say seal the bilge up some say you cant i cut an inspection plate into to keep an eye on it. after the floor was down i went back and filled the cracks in with gorilla glass and filler putty . then i laid two layers of roven back down. that is what was there before , i saved a piece of floor to go by . i ran the glass up the sides about 6 inches . i have a lot of pictures but i wont post but a few, if you want more let me know my love for photography overtook the love for boats. here are the basics. hope you can benefit from the rant. * note one thing i would do now is i would paint the bilge area with some bilge paint just to clean it up but also to keep whatever gets in there moving instead of sticking to bear fiberglass .. just a thought.

billy
The following user(s) said Thank You: charlieross

Please Log in or Create an account to join the conversation.

Re:1963 MFG Edinboro Floor 7 years 11 months ago #129212

  • 63g3
  • Offline
  • Contributing Member
  • Contributing Member
  • Posts: 465
  • Karma: 62
  • Thank you received: 2
Fantastic Billy!!!! Your idea of the inspection plate is a good one. I've had a few MFG's and put one up under the bow on the raised floor area. I do this on all my resto's now, almost all the boats I've done have this similar raised area under the bow, or I make one.
Cautionary: Something to consider is a small diameter vent pipe to let the underside air pressure equalize as temperature changes as air expands and contracts with temp. MFG did this with a small rubber tube glassed in somewhere. I've seen it in the transom corner and along the v of the bow. I use small dia pvc conduit so you can bond to it to seal when duplicating the vent pipe. Another possibility is to simply drill a small hole in your inspection cover if it's up high where water won't sit? That's why I mounted my inspection cover up high in the bow. I used the screw in type cover so It can be a little loose so the o ring does not seal but eventually I drilled a small breather hole in the cover so I could snug it in place and still provide a measure of breathing. You don't need a big hole to vent, mine is only 1/4 inch which is a tad larger than the inside diameter of the original rubber vent hose I eliminated during my transom resto's.
Randy

Please Log in or Create an account to join the conversation.

Re:1963 MFG Edinboro Floor 7 years 11 months ago #129213

  • 63g3
  • Offline
  • Contributing Member
  • Contributing Member
  • Posts: 465
  • Karma: 62
  • Thank you received: 2
Dave get a heat gun to warm the plexi as you try to bend back the frame, it'll reduce the likely hood of cracking it when it has to bend back with the frame.
Randy

Please Log in or Create an account to join the conversation.

Re:1963 MFG Edinboro Floor 7 years 9 months ago #129996

So my transom has been cut on my 1962 Edinboro and all the old plywood (a curious mix of mahogany and other woods) is gone. I'm paying a professional boat restorer to do this, the splash well and the keel. I plan to do the rest of the work. We cut the interior skin to create good access, removed all the wood, will tab and glass it back, then pour in a CarbonCore CarbonBond (like NidaCore) transom into the empty form of the skins.

The keel and splash well are straightforward repairs. The big issue is the water saturated foam under the floor. The original seats are with the boat, intact, so I thought I was good on the floor. However, the previous owner at some point drilled a hole into the floor at the stern and water got in that way, something I missed before buying. Going to weigh the boat after the transom is done, and figure out how much the whole thing weighs vs. what it should be - about 750 pounds, then will decide from there. If not too much weight, this may be a repair for another time, if ever.

Here's pix to date:
Attachments:

Please Log in or Create an account to join the conversation.

Dave Nau - 1966 MFG Niagara with 1963 Mercury 350 (35hp) outboard and 1966 Tee Nee trailer. Second boat is a 1962 MFG Edinboro with a 1984 Evinrude 70hp and Holsclaw trailer.

1963 MFG Edinboro Floor 3 years 3 months ago #145074

Hope it's OK to dig up this ancient thread. I inherited a 63 Westfield that I thought was pretty cherry, having lived its whole life inside a boathouse, and being lightly used the last 3 decades at least. However, now that I've finished dealing with all of Dad's other stuff (including selling his house on Canandaigua Lake in NY to buy a lake house in Maine), I'm learning more of the ugly truth. The bottom line is that I have water under the cockpit floor, and I guess I can just assume I have saturated foam as well?

The water seems to be asymmetrical, as the boat lists to starboard when floating. I hadn't noticed it until now because the boat was always put onto a cradle and hauled out when not in use (one of those inclined railway systems). Now that it's floating at the dock here all day, it's listing pretty substantially. The seat fastenings were shot, with badly corroded aluminum brackets and aluminum machine screws. When I pulled out both rear seats I could see pooling water reflecting back at me through the starboard holes of the starboard rear seat (only those two holes for some reason). Some of the well nuts aren't great either, especially the front starboard drivers seat pair, which may be part of how the water got into the starboard side. I've managed to suck some of it out with a gas siphon tube/bulb, but it would take a lifetime to get all of it. And even then, I gather the foam will still be holding plenty more water that can't be sucked out.

One question I have: The pictures above of someone's cockpit floor seem to imply there is foam only in the center channel (between "corrugations") and on two side channels adjacent to the center. The starboard seat mount holes where I see water are well to starboard of that starboard channel with foam. Is there no foam in the far-starboard channel? Am I naive to think that maybe I only have water in that channel, without it having reached and saturated the foam?

I'm not sure where I'll go from here. If I could find someone, I would happily pay a pro to fix everything, although writing that check would be painful I'm sure. I have many other projects in the works, and fiberglass work is definitely not my preferred way to spend leisure time. Nor does it match my skill set. In the very short term, I expect to refasten the seats, use the boat as is for another couple months, and then decide in the Fall what to do longer term.

As an aside, I believe my transom is good, but I don't feel at all good about the boat sitting in the water for weeks, no doubt allowing water in around those drain plugs, as I hear they were not properly sealed at the factory. I should probably haul the boat and at least try to seal them.

Dan
The following user(s) said Thank You: charlieross

Please Log in or Create an account to join the conversation.

  • Page:
  • 1
Time to create page: 0.325 seconds

Donate

Please consider supporting our efforts.

Glassified Ads

1967 23 ft powercat flybridge
( / Boats)

noimage
11-17-2024

Mercury outboard
( / Engines)

noimage
11-03-2024

Classic Mercury Outboard Motors
( / Engines)

Classic Mercury Outboard Motors
10-18-2024

FG Login

FiberGoogle

Who's Online

We have 10233 guests and no members online