Welcome, Guest
Username: Password: Remember me
  • Page:
  • 1

TOPIC: Gelcoat removal /repair

Gelcoat removal /repair 12 years 10 months ago #51512

  • thetudor
  • thetudor's Avatar Topic Author
  • Offline
  • Platinum Boarder
  • Platinum Boarder
  • Posts: 1204
  • Karma: 33
  • Thank you received: 2
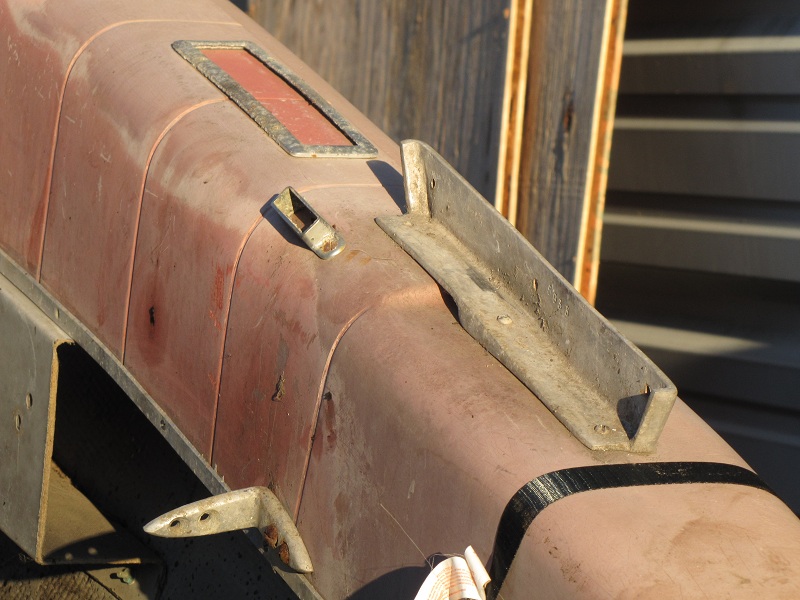
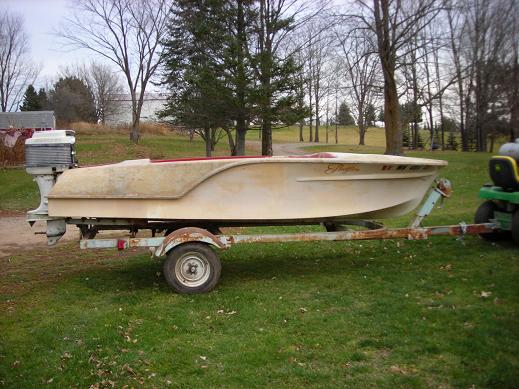
I am going to have to remove a lot of he gelcoat on the topsides of the Glastron. There are many spider and other cracks throughout the hull. I have done some repairs but nothing this extensive. I have a few questions; 1) What are the best tools to use for the job? 2) How do I do areas with small details, such as the "ribs" shown in the picture? 3) What precautions should I take to keep from making big mistakes? 4) What should I do to control dust for health reasons and not coating everything else in the building. and last, but not least, 5) what is the easiest and quickest way to do this?

I have taken some small sections down with a random orbital sander and 40 and 60 grit paper and the cracks go all the way down to the fiberglass.

Thanks in advance for your input.
Attachments:

Please Log in or Create an account to join the conversation.

Todd (aka thetudor)
1964 Custom Craft Aqua Ray
1959 Glastron Seaflite
1959 Tomahawk Spirit

Re:Gelcoat removal /repair 12 years 10 months ago #51521

  • frog
  • frog's Avatar
  • Offline
  • Platinum Boarder
  • Platinum Boarder
  • Posts: 1431
  • Karma: 59
  • Thank you received: 3
i used a 4 inch angle grinder with 36 grit metal cutting disc's. still took alot of time. i was able to do it out side, used a big fan behind me to blow dust away and had a paint resperater mask on. still gouged up the fiberglass a bit. i had the same problem with cracks going down to the glass, as this boat was in a garage that a car burned up in. just the deck and top side got hurt. what i would do different is wear a thin plastic suit, even with the fan alot of it came back and got on me. frog
Attachments:

Please Log in or Create an account to join the conversation.

Re:Gelcoat removal /repair 12 years 10 months ago #51522

  • Andgott
  • Andgott's Avatar
  • Offline
  • Contributing Member
  • Contributing Member
  • Posts: 1243
  • Karma: 72
  • Thank you received: 0
Oh, Man- Are you in for some FUN! I've been doing this on my Lake N Sea...

First of all, be VERY careful. It's highly likely that a lot of the details- like the 'ribs'- are ONLY in the Gel Coat. If you remove it, they will go along with it, and you'll have to replicate the details somehow. The Gel on my Lake N Sea was in terrible shape- No spider cracks, but it was powdery and flaking off in places, so it ALL had to come off. Is yours that bad, other than the cracks? You might be able to get by with a good sanding.

On my Glasspar, I had a lot of spider cracking in some areas, but a good sanding helped that. Some of the deeper cracks I gouged out, filled, and then faired. I used a high build primer, which filled them, then faired, then painted. There are a few spots that they have reappeared, but unfortunately that's the nature of the beast, spider cracks are tough, if not impossible, to get rid of!!

As you've found, using an orbital sander is a tough job. That's how I used to do it, until I tried abrasive pads on my angle grinder. I was using Gator brand, which Lowes stocks, but they run about $8.00 for two, and you go through them FAST. I switched to these-

solutions.3m.com/wps/portal/3M/en_US/Paint/Application_Systems/Products/Product_Catalog/?PC_7_RJH9U5230079D02R7QH2A20CJ7000000_nid=03758SDQQ6gsQ15LPGNZZQglS1QXKNJNV5bl

3m Doesnt make them, but you can still get them on E-Bay. You need the 'special' backing pad that they sell for them, too. They are MUCH cheaper than the Gator brand, and they seem to last a lot longer as well. I just bought a case!

The reason that I like them better is they are strong enough to take the gelcoat off quickly, BUT not very aggressive on the fiberglass underneath. They leave a nice, smooth finish. They are also GREAT for stripping metals.

As for the dust- Good luck. It is going to get EVERYWHERE. Do it outside if you can. Wear a respirator. I 'tented' the area that I'm working in my basement, with plastic sheeting, and it helps a lot, but dust still gets everywhere. You'll be rinsing red dust out of your hair for a LONG time to come :)

You can see on one side what the pads do- and on the other the DUST.... I take this outside to sand it- I bet the neighbors love that...

Please Log in or Create an account to join the conversation.

Re:Gelcoat removal /repair 12 years 10 months ago #51526

how cum whenever I get the sander and boat out in the driveway, my neighbor(God luv em) decides it's time to wash the cars? Arghhhh!

Please Log in or Create an account to join the conversation.

Re:Gelcoat removal /repair 12 years 10 months ago #51534

  • slo-mo
  • slo-mo's Avatar
  • Offline
  • Fresh Boarder
  • Fresh Boarder
  • Posts: 25
  • Karma: 7
  • Thank you received: 0
Hey Tudor, great to see that your Seaflite is going to get some TLC.

We all dislike the "itch", but there are a few great tools that can help when the gelcoat absolutely has to come off. For most part-time glassaholics, professional equipment isn't in the budget, but there are some good tools that are well worth the cost in labor saving alone.

Whether repairing or customizing your favorite vintage hull, the best money I've spent - was to purchase a dust collecting grinder, like the SanderVac Pro. Hooked to a shop vac with dust filter, the easily changed sanding discs, with vision holes allow for precise removal of boat paint, gelcoat or glass roughing. You can purchase the complete set-up for $279, or just the dust collector attachment for selected grinders @ $129.


If you are really serious the same company offers an awesome tool that shaves the gelcoat off, www.paintshaver.com/marineshaver.html .
The tool is pretty expensive, but can be rented for $50 a day.


The question of whether the gelcoat needs to be removed at all is another discussion...

Please Log in or Create an account to join the conversation.

Re:Gelcoat removal /repair 12 years 10 months ago #51547

  • thetudor
  • thetudor's Avatar Topic Author
  • Offline
  • Platinum Boarder
  • Platinum Boarder
  • Posts: 1204
  • Karma: 33
  • Thank you received: 2
Thanks for the input, guys.

Most, if not all of the gelcoat is going to have to be removed. The boat was last registered in 1969 around Los Angeles and then went missing until it turned up in a lot in Danbury, CT last year. It's had a lot of neglect and my guess sat out in the hot sun for a long time. The finish on the deck and hardtop is shot and needs to be replaced. The hull may not be as bad and could just need to be sanded.

Andy, you are right about the details being only in the gelcoat. They appear to be semi-circular (or close). I'll make a Play Doh mold and see what I can determine. My thought was to use a round file and cut something at least partially into the fiberglass. They only occur on top of the fins, where the stern light(s) go and along side the front seats. I would put a couple of layers of fiberglass behind them when I take the deck off to reinforce what I have removed.

I think I am going to have to add the SanderVac or something similar to my collection. Being somewhat of a tree hugger and an asthmatic, I am very conscious of this stuff. I can easily jury rig a system with my random orbital and belt sanders to work with my shop vac. I'm also going to try the pads at Lowes and see what happens.

Please Log in or Create an account to join the conversation.

Todd (aka thetudor)
1964 Custom Craft Aqua Ray
1959 Glastron Seaflite
1959 Tomahawk Spirit

Re:Gelcoat removal /repair 12 years 10 months ago #51597

tudor,these guys are giving great advise,which i will also follow.
there is a trick that i learned a long time ago to put back a ridge line,that has been sanded off for one reason or another.
1st lay up masking tape on one side only of the spot where the ridge is to be replaced,then keep laying one layer of tape on top of another until you are just a bit higher then you need,then lay down the filler of your choice, before its totaly hard gently lift off all of the layers of tape,it should give you a straight even line of filler,so half of your ridge is done.

then after its all dry,you just lay down your filler on the other side,and there is your ridge,its hard to explain by typing it,i hope its not too hard to understand what i just wrote,lol,it hard for me even.
when i am able to work in the garage again,ill do a picture layup of what im talking about,lol.john

Please Log in or Create an account to join the conversation.

\"too soon old,too late smart\" my pap

Twenty years from now you will be more disappointed by the things that you didn’t do than by the ones you did do. So throw off the bowlines. Sail away from the safe harbor. Catch the trade winds in your sails. Explore. Dream. Discover.“

---Mark Twain
  • Page:
  • 1
Time to create page: 0.177 seconds

Donate

Please consider supporting our efforts.

Glassified Ads

TEE NEE TRAILER W/BEE BOAT
( / Boats)

TEE NEE TRAILER W/BEE BOAT
09-11-2024

FG Login

FiberGoogle

Who's Online

We have 7019 guests and one member online