Welcome, Guest
Username: Password: Remember me
  • Page:
  • 1

TOPIC: Taking the deck off.
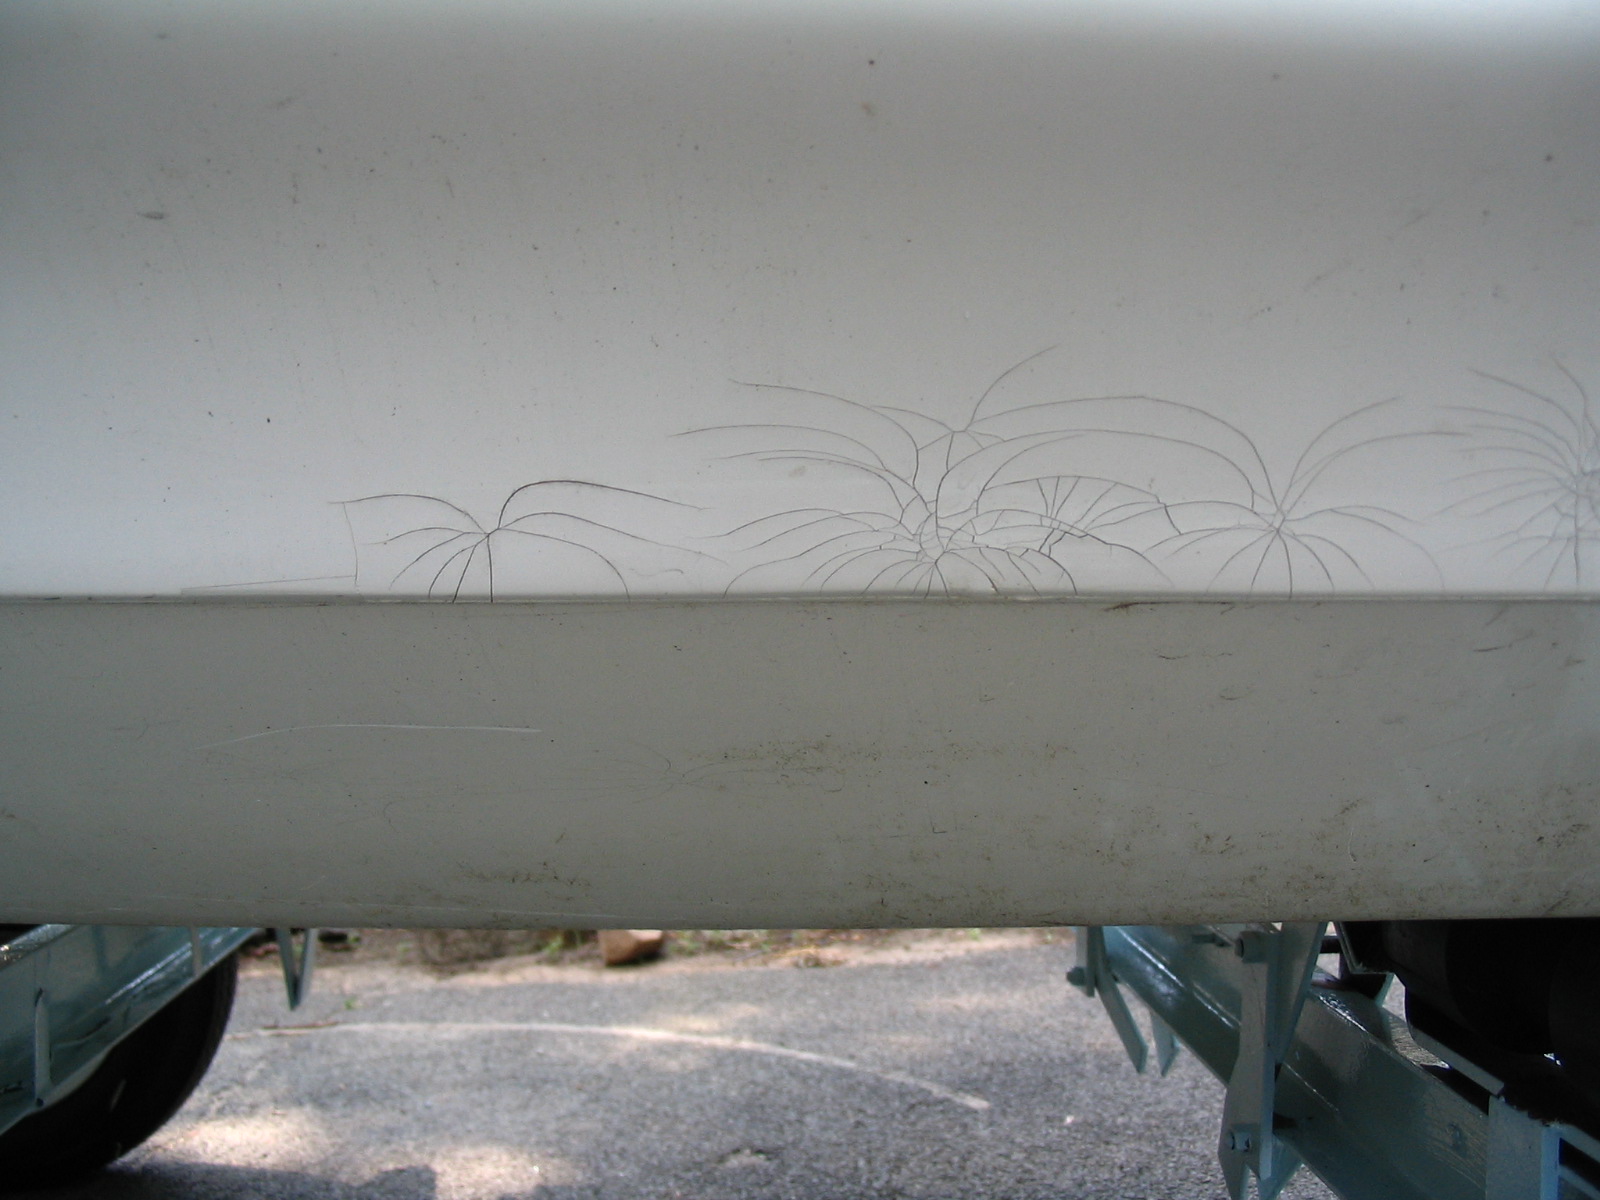
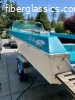
Taking the deck off. 13 years 6 months ago #26925

  • joenawlins
  • joenawlins's Avatar Topic Author
  • Offline
  • Contributing Member
  • Contributing Member
  • Posts: 554
  • Karma: 6
  • Thank you received: 0
I'm starting to tear down my Invader and i'm wondering if it's ok to just use a sawsall to separate the deck from the hull I've seen on this sight plenty of chiseling and prying and the sort. Just seems logical to me but This is my first glass project.
Attachments:

Please Log in or Create an account to join the conversation.

Re:Taking the deck off. 13 years 6 months ago #26930

if your going to go that route i would suggest a small air body saw,its like a small sawzall,but i have found be careful the little bugger can get out of control because at least mine is hard to see where your sawing,and its very fast,john

Please Log in or Create an account to join the conversation.

\"too soon old,too late smart\" my pap

Twenty years from now you will be more disappointed by the things that you didn’t do than by the ones you did do. So throw off the bowlines. Sail away from the safe harbor. Catch the trade winds in your sails. Explore. Dream. Discover.“

---Mark Twain

Re:Taking the deck off. 13 years 6 months ago #26932

wait,im on dial up and didnt see your pic,it looks like a shoebox joint,i wouldnt use the saw,there is probably a lip that goes up inside your seam,you will cut that off .but i cant tell for sure from the pic.john

Please Log in or Create an account to join the conversation.

\"too soon old,too late smart\" my pap

Twenty years from now you will be more disappointed by the things that you didn’t do than by the ones you did do. So throw off the bowlines. Sail away from the safe harbor. Catch the trade winds in your sails. Explore. Dream. Discover.“

---Mark Twain

Re:Taking the deck off. 13 years 6 months ago #26934

  • joenawlins
  • joenawlins's Avatar Topic Author
  • Offline
  • Contributing Member
  • Contributing Member
  • Posts: 554
  • Karma: 6
  • Thank you received: 0
If it is a shoebox how do you separate the deck?

Please Log in or Create an account to join the conversation.

Re:Taking the deck off. 13 years 6 months ago #26957

Take a small 1" puddy knife, the most flexible one you can find and try to push it up between the deck and hull. If it does not go up try pushing it down between the deck and hull. If you look inside the hull you should be able to see how the deck sits on the hull. There may be some sort of sealer between the 2 parts. You will most likely have too drag the puddy knife along the seam to break the bond.If you have to do this it will be easyer if you sharpen the side edge of the knife. I had to do one simillar to yours acouple of yrs back and it was not easy nor fast. Just take your time so you dont break the fiberglass as it is usally pretty thin around this area of the boat. Maybe someone hear will have an easyer way and chime in so good luck and let us know how it goes. Skip

Please Log in or Create an account to join the conversation.

Re:Taking the deck off. 13 years 6 months ago #26964

  • joenawlins
  • joenawlins's Avatar Topic Author
  • Offline
  • Contributing Member
  • Contributing Member
  • Posts: 554
  • Karma: 6
  • Thank you received: 0
From what I can tell it seems like a 2in strip of tape that joins the 2. I drilled out all the rivets and not sure what the their purpose was, but it seems to me that cutting it and then re-doing the glass strip when installing would be easier??? Hell if I know,trying to keep it simple..

Please Log in or Create an account to join the conversation.

Re:Taking the deck off. 13 years 6 months ago #26968

sorry for the late reply,but skipp did it for me,if its not a shoe box,then i would cut as much of it as i could into just the 2 inch strip on the inside,you can try a razor knife,or rotary tool with a cutoff wheel,if you have one of those multitools you might want to buy one ,it would work too,and then you can also use it for sanding too,and they are great at that.
can you post pics of the inside where it joins together,because if it had rivits that didnt seem to be doing anything,then it might indeed be a shoe box joint and the tape was just to keep out water.

here is what i THINK you have,i could be wrong,john
for some reason im having trouble posting my drawing,ill look fot the post i saw not too long ago with the drawings of boat joints,john

Please Log in or Create an account to join the conversation.

\"too soon old,too late smart\" my pap

Twenty years from now you will be more disappointed by the things that you didn’t do than by the ones you did do. So throw off the bowlines. Sail away from the safe harbor. Catch the trade winds in your sails. Explore. Dream. Discover.“

---Mark Twain

Re:Taking the deck off. 13 years 6 months ago #26972

here is what i was looking for it was poted by jamil
If there is a rub rail, remove the insert to get access to the fasteners. If riveted, drill them out. If screwed or bolted together, remove them mechanically.

The joint on most boats will be either a shoebox construction or a sandwich joint


If the inside of the seam is glassed over, it is most likely a singly ply of cloth "tape". It will probably peel right off if you can get it started.

In the event the hull and deck are bonded together at the seam with polyurethane goo, a heat gun and a stiff putty knife can break the seal effectively (but tediously)

If you attach a close up of the joint, it'll be helpful.
Please note: although no board code and smiley buttons are shown, they are still usable.

Please Log in or Create an account to join the conversation.

\"too soon old,too late smart\" my pap

Twenty years from now you will be more disappointed by the things that you didn’t do than by the ones you did do. So throw off the bowlines. Sail away from the safe harbor. Catch the trade winds in your sails. Explore. Dream. Discover.“

---Mark Twain

Re:Taking the deck off. 13 years 6 months ago #26975

File Attachment:

File Name: scan0002.pdf
File Size:220 KB

you might have just the oppisite of this drawing,because your rivets are in the bottom(hull)and not in the top.
yours might have the lip attached to the deckand it fits down inside,its hard to tell without the inside pics,maybe someone else will chime in ,i hope lol,john
Attachments:

Please Log in or Create an account to join the conversation.

\"too soon old,too late smart\" my pap

Twenty years from now you will be more disappointed by the things that you didn’t do than by the ones you did do. So throw off the bowlines. Sail away from the safe harbor. Catch the trade winds in your sails. Explore. Dream. Discover.“

---Mark Twain

Re:Taking the deck off. 13 years 6 months ago #26981

You may have nailed it on the head there John. That is just like the one I did only it had tape and goo inside it. If you use a heat gun do not use too much heat or you will not be happy. You will have to experiment and just find a way that you are most comfortable with. Goodluck, Skip.

Please Log in or Create an account to join the conversation.

Re:Taking the deck off. 13 years 6 months ago #26994

  • joenawlins
  • joenawlins's Avatar Topic Author
  • Offline
  • Contributing Member
  • Contributing Member
  • Posts: 554
  • Karma: 6
  • Thank you received: 0
OK I have some pics. The first 1 is what looks like old house nails where the floor was put down. The next 1 with the lines drawn are of the inside. I'm thinking it might be easier to keep it together. The last couple are of the chicken feet all over the deck after hitting it with 60g paper. How should I tackle that problem??? :unsure: PS Want to know how to take those nai lookin' things out.
Attachments:

Please Log in or Create an account to join the conversation.

Re:Taking the deck off. 13 years 6 months ago #27003

as for the nails if that stringer is still solid,lay down a scrap piece of thin plywood,or something like that and use a cats paw to pull them out,keep the plywood under the catspaw,to keep from damaging the stringer,and for extra pry.
then fiberglass the holes.
or you can cut them off with a cutoff wheel then fiberglass,but the nails will still rust.
as for the seam,i would try jamils meathod and lightly hit it with a heatgun,and try prying up under the bottom of the tape line with a putty knife.
and for the crazing,as long as its not stress cracks,some will say grind it off its pretty bad,but you can try sanding,then blowing out the crazing with a blowgun on your compressor,then use filler primer,sand,primer,sand,primer,sand,useing higher grit,(220,320,then 2000 grit),between coats,make sure to use the blow gun after every sanding
so that the primer goes down in the cracks.then finish with the primer you are going to use before paint.
there are other ways and i hope some more folks chime in on this,some of the bigger cracks are going to hve to be ground out to a v.john,p.s. i dont recomend spot putty it shrinks over time ,but thats jusy my opinion.

Please Log in or Create an account to join the conversation.

\"too soon old,too late smart\" my pap

Twenty years from now you will be more disappointed by the things that you didn’t do than by the ones you did do. So throw off the bowlines. Sail away from the safe harbor. Catch the trade winds in your sails. Explore. Dream. Discover.“

---Mark Twain

Re:Taking the deck off. 13 years 6 months ago #27004

  • joenawlins
  • joenawlins's Avatar Topic Author
  • Offline
  • Contributing Member
  • Contributing Member
  • Posts: 554
  • Karma: 6
  • Thank you received: 0
Thx John.

Please Log in or Create an account to join the conversation.

Re:Taking the deck off. 13 years 6 months ago #27066

  • jtw37
  • jtw37's Avatar
  • Offline
  • Fresh Boarder
  • Fresh Boarder
  • Posts: 34
  • Karma: 1
  • Thank you received: 0
I've did a lot of car body repair over the years and have used products by Evercoat. They have some pretty good stuff. I don't use anything else when restoring my cars bodies. I have included a link to one of the new products that may be the ticket for filling the small cracks. Also salt spry durable for 500 hrs.
Check it out. www.evercoat.com/productDetail.aspx?pID=293

Here is some more of their products. Look at the bottom one. But any of those should do the trick.
www.evercoat.com/productCategory.aspx?cat=1

Please Log in or Create an account to join the conversation.

Re:Taking the deck off. 13 years 6 months ago #27072

The "chicken feet" is crazing. Older Gel-Coat gets hard and brittle. When the fiberglass expands and contracts with temperature, the Gel no-longer does. The only cure is to completely remove the old Gel-Coat. If you don't it will just keep crazing.

Please Log in or Create an account to join the conversation.

Re:Taking the deck off. 13 years 6 months ago #27074

jerry, i wish i would have known that before i bought my mantaray. i would of never paid the price i did.
this area hasn't reappeared YET.
Attachments:

Please Log in or Create an account to join the conversation.

Re:Taking the deck off. 13 years 6 months ago #27076

Ron,

The area in your photo isn't crazing, it's impact damage. When cracks have an epicenter from which they radiate away, that's evidence of a point of contact.

Crazing is the effect of UV damage braking down the binders in the gelcoat's resin. Like Jerry mentioned, the result is a brittle and unstable surface. As the boat flexes, either underway or by thermal expansion, the gelcoat loses its ability to move with the substrate and the result is evenly dispersed cracks across the damaged area (Usually where exposure to the sun is greatest).

The impact damage in your photo may eventually come back if the cracks were not ground out and filled properly, but even if they do, any future repair will still be confined to those small areas and aren't indicative of a larger problem.

So I guess that's good news.

Please Log in or Create an account to join the conversation.

Re:Taking the deck off. 13 years 6 months ago #27078

"and for the crazing,as long as its not stress cracks,some will say grind it off its pretty bad"
yeah jerry like i said its pretty bad,i was just giving him a opption,if he isnt going to use it as a show boat,i probably should have said that above,but if they are not bad i think the method of priming and sanding will work on some crazing,john

Please Log in or Create an account to join the conversation.

\"too soon old,too late smart\" my pap

Twenty years from now you will be more disappointed by the things that you didn’t do than by the ones you did do. So throw off the bowlines. Sail away from the safe harbor. Catch the trade winds in your sails. Explore. Dream. Discover.“

---Mark Twain

Re:Taking the deck off. 13 years 6 months ago #27083

Ron's stress cracks are on a lot of boats, and an easy spot repair, but crazing you can't stop by covering it over. It keeps cracking and sooner or later it will show up. I stripped my Glastron FireFlite down to the glass everywhere, except a small area right around the bung hole, because I got lazy and didn't want to replace the bung. well I have cracks there now. It's a lot of work removing all the old gel. I sanded mine. I know guys that had theirs soda-blasted which was easy (just wright the check.) but like my daddy always said, "A job worth doing, is worth doing right"

Please Log in or Create an account to join the conversation.

Re:Taking the deck off. 13 years 6 months ago #27089

  • joenawlins
  • joenawlins's Avatar Topic Author
  • Offline
  • Contributing Member
  • Contributing Member
  • Posts: 554
  • Karma: 6
  • Thank you received: 0
OK so how do I get it off? Grinding brush on my grinder? Take it down till I see glass? The worst of it is on the bow.

PS Happy Mardi Gras!!!!

Please Log in or Create an account to join the conversation.

Re:Taking the deck off. 13 years 6 months ago #27091

Have fun tonight Joe!

Removing dead gelcoat can be difficult or easy depending on how you go about it. Unfortunately, easy removal usually means a more difficult fairing process down the road.

Boat yards dealing with blister repair have to remove gelcoat and they use an electric planer modified to deal with curves.

Any abrasive will remove the gelcoat, whether it's a grinding wheel, a flap disc, or just plane old sandpaper. The thing you have to be careful about is removing the gelcoat without damaging the fiberglass below.

If the gelcoat is so thin that you can see fibers below, aggressive sandpaper on a block (40 grit) will remove it efficiently without altering the profile of the boat or (with care) damaging the fiberglass.

If the gelcoat is thicker, a DA sander will get the job done, but you won't have as much control over the profile of the boat.

I don't recommend a wire wheel because the wheel will leave stray wire fibers that will eventually bleed rust. No matter how meticulous you are about cleaning them up, some will inevitably get missed.

Jerry was right about media blasting the gelcoat away. It's efficient, it's gentle to the fiberglass, and it's quick. The downside is the cost.

In the end, it's an abrasive procedure no matter what. Not knowing what tools are available to you or how much your willing to spend to remove the dead gelcoat, you are the person whose most equipped to answer your own question. (I didn't mean that to sound smarmy).

Of course, everyone else here is willing to help out if you get stuck along the way.

Please Log in or Create an account to join the conversation.

Re:Taking the deck off. 13 years 6 months ago #27094

I have also seen guys take a heat-gun and scrapper to remove it. Wish I had a magic wand for you Joe.

Please Log in or Create an account to join the conversation.

  • Page:
  • 1
Time to create page: 0.313 seconds

Donate

Please consider supporting our efforts.

Glassified Ads

Fenders - Tee Nee trailer
( / Parts / Miscellaneous)

noimage
09-30-2024

1958 Skagit Sportster
( / Boats)

1958 Skagit Sportster
09-25-2024

Winner Marauder - the classic 1970 runabout!
( / Boats)

Winner Marauder - the classic 1970 runabout!
09-16-2024

FG Login

FiberGoogle

Who's Online

We have 5975 guests and 2 members online