Welcome, Guest
Username: Password: Remember me
  • Page:
  • 1

TOPIC: **UPDATE** Transom inner structure Lake N Sea

**UPDATE** Transom inner structure Lake N Sea 13 years 10 months ago #20020

  • retro54
  • retro54's Avatar Topic Author
  • Offline
  • Senior Boarder
  • Senior Boarder
  • Posts: 222
  • Karma: 6
  • Thank you received: 0
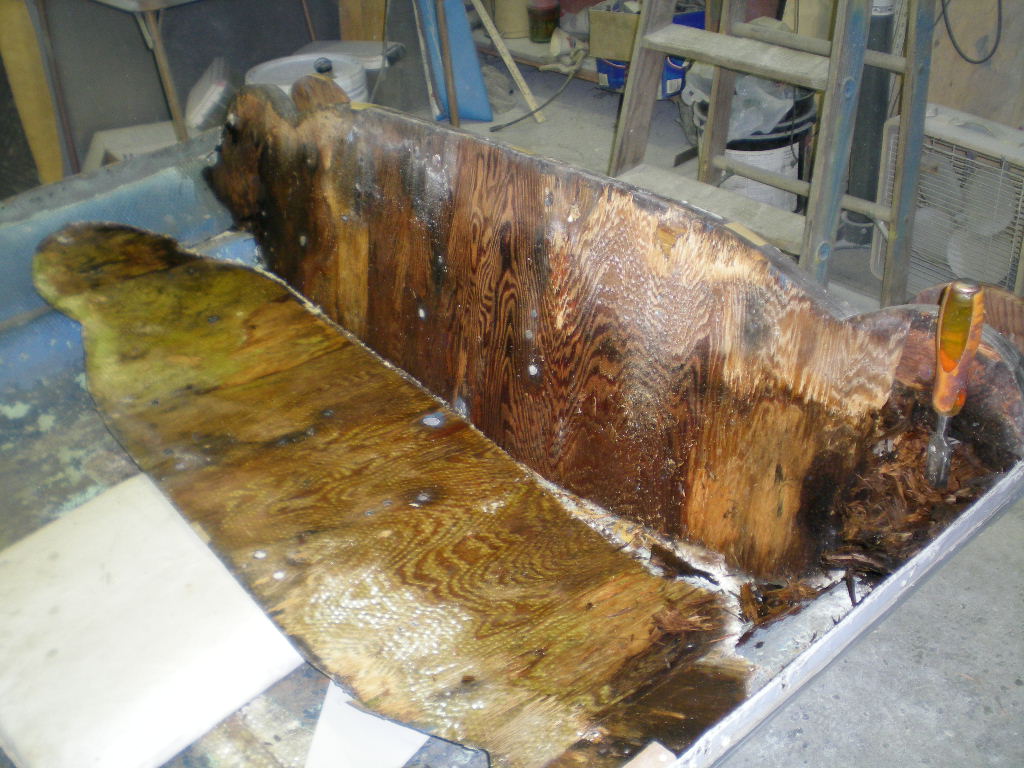
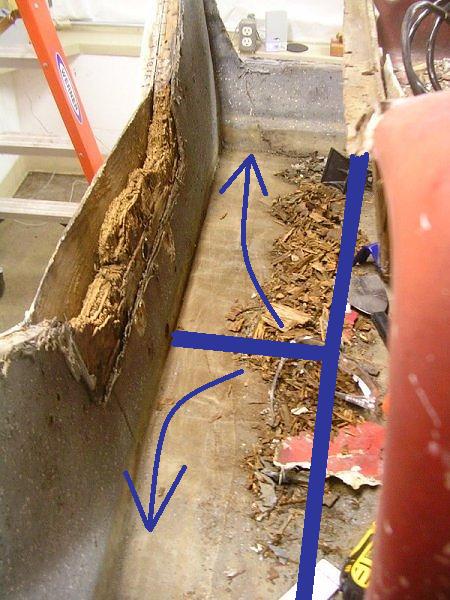
So, I have finally got the time tonight to head out and work on the Lake N Sea, but I find myself at a fork in the road so to speak... I want to take my transom out, and have removed the fiber glass cap and the dried resin around the top of the transom, and was hoping to pull out the old transom to use as a patern... my hope is then to inspect the cavity, see how things are and most likely cut out withe the inside (what i am leaning towards) or outside fiberglass transom skin so as to replace the transom properly... my problem is, the transom just won't budge.. you can see that the central portion is completly rotten and has the consistancy of a wasp nest... but the outer two thirds of the transom is rock solid..


My assumption is that the transom must be attached to some sort of stringers or floor inner structure. Is this so? HAs anyone ever had a Lake N Sea completely apart and may you have photos or be able to draw a diagram of what a lake n sea inner-structure is like?

I know that for the more experienced, I may be way too cautious... but I will be learning fiber glass repair on this project, and am a big fan of inspecting fully, and cutting once. I also want to make sure I do not effect the heavy resin and fiberglass gussets on either side of the transom, as I believe this is where the transom gets its strength...


I really feel like I should be sutting out the complete inner skin of the transom, and taking the plywood out that way.. but do not want to cut too little or too much...

Anyways.. this is where I am at... any good guidance, or photos, experience would be much appreciated so that I will be confident moving forward. Thank you in advance for photos, comments, advice, etc.

Cheers
Andy

I tried to pull out the transom by using ratched straps, a joist, and the boat's weight.. nothing budged!

Please Log in or Create an account to join the conversation.

Re: Transom inner structure Lake N Sea 13 years 10 months ago #20032

it's 4 AM so this is not going to be a detailed answer, just a quickie. You most likely wont be able to pull the transom out in one piece. It's glassed to the rear skin of the hull. You will need to cut the innner panel and then pry it out, cut it out, cuss it out, etc... The way to know what to cut out is to sit back and look at it and say.... Ok, this was built into the hull first, then this, then this, & then this.. If the transom was the 2nd thing to go in, the 3rd and 4th thing must come out to get to it.
Doug

Please Log in or Create an account to join the conversation.

Some people are like slinkies... Not much good for anything, but they sure are fun to push down the stairs.

Re:Transom inner structure Lake N Sea 13 years 10 months ago #20033

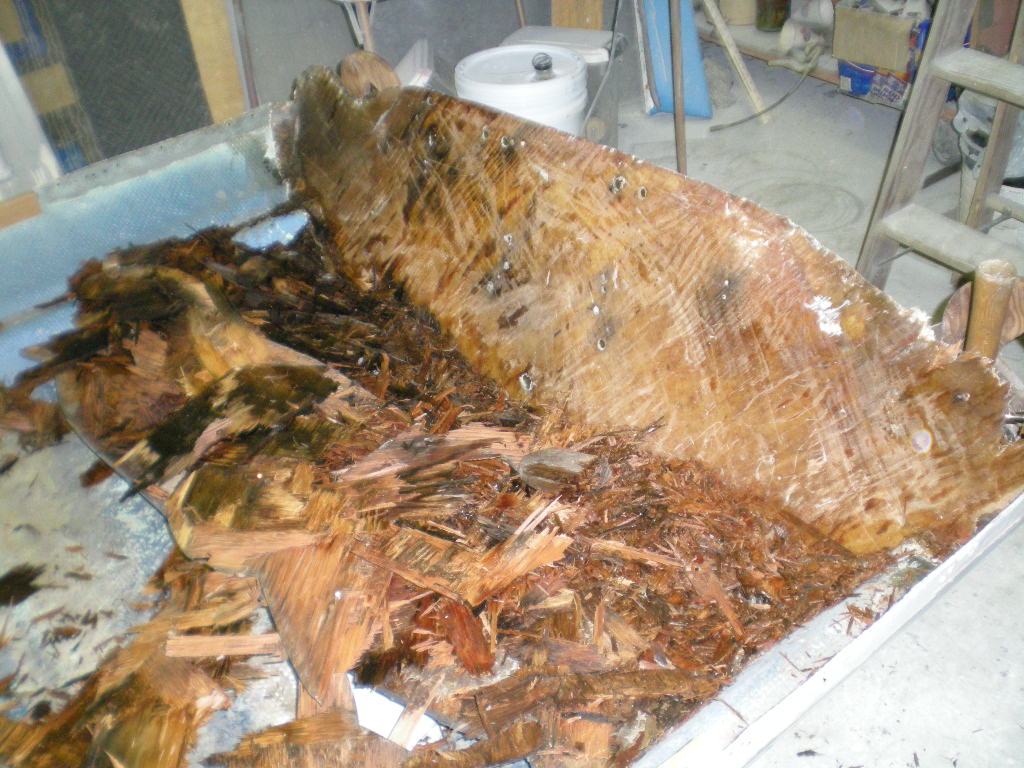
Doug has nailed it ya just have to keep at it until you have all the old wood out. A couple things that may make it a lot easier. Take a skill saw and set it to cut thru most of the wood. Measure your transom it will be about an inch and a half. Set the saw at one inch cut some lines in the old trasnsom. Then use a wood chisel to remove what will come. You must remove all the old wood. Couple other tools that work are a sawsall, air chisel.
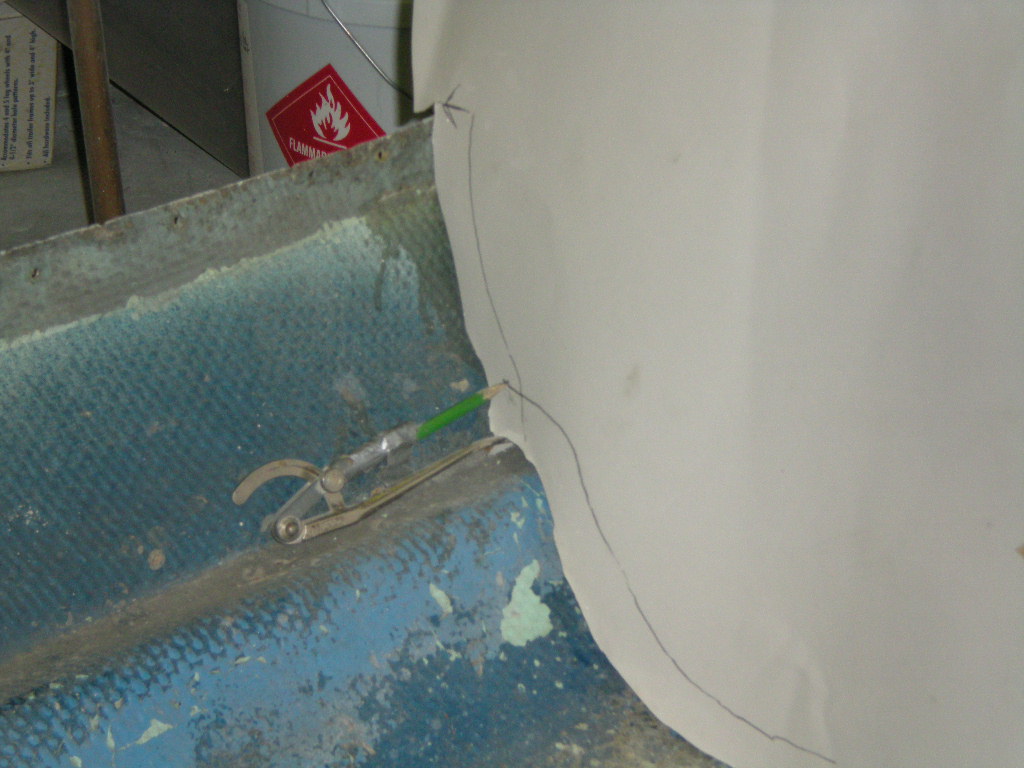
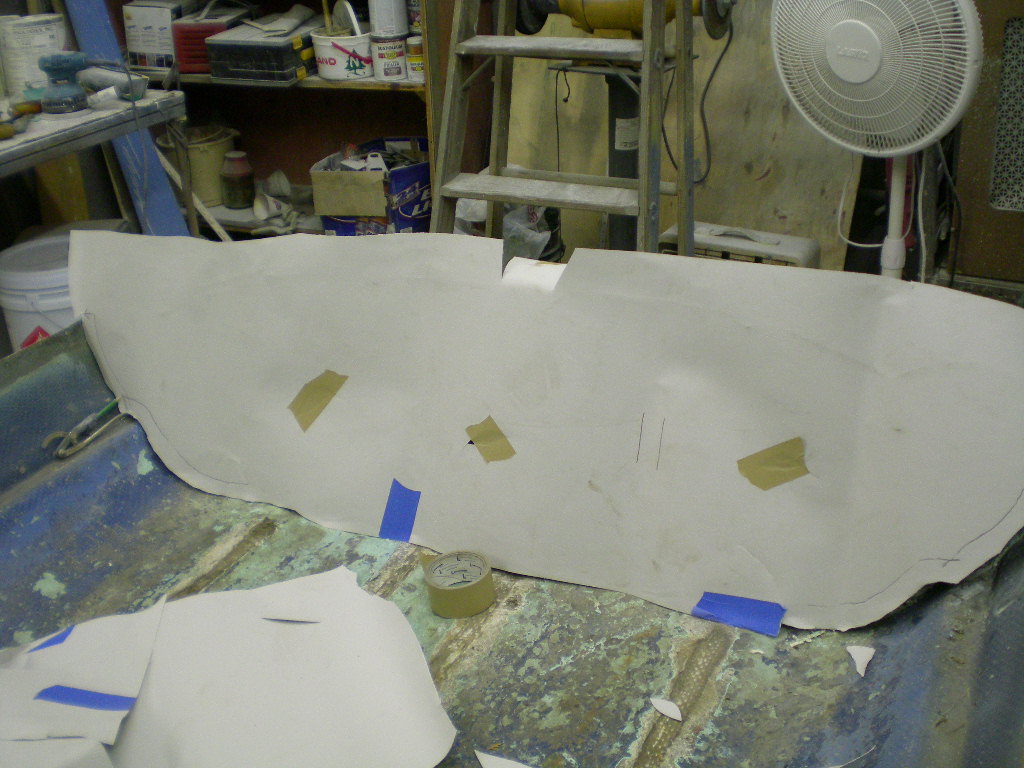
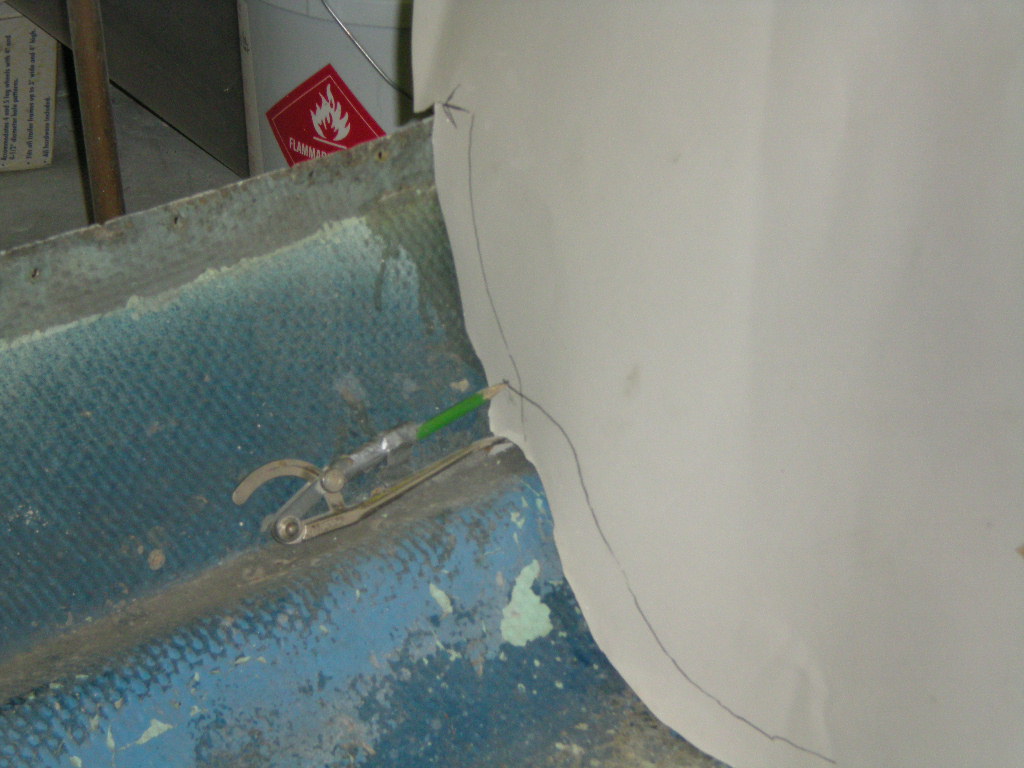
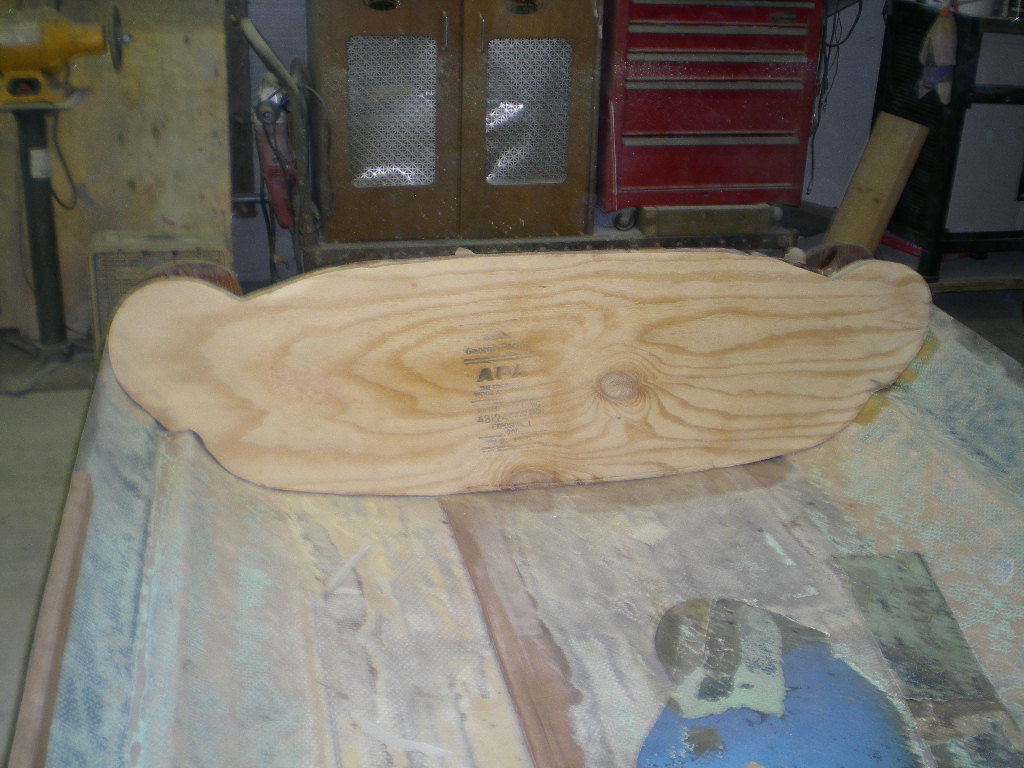
Do not worry about the pattern cut some cardboard and tape it in where the old transom was scribe the out line you want on the paper or cardboard then transfer that to you new wood.

D
Couple pictures.

Please Log in or Create an account to join the conversation.

Re:Transom inner structure Lake N Sea 13 years 10 months ago #20035

  • retro54
  • retro54's Avatar Topic Author
  • Offline
  • Senior Boarder
  • Senior Boarder
  • Posts: 222
  • Karma: 6
  • Thank you received: 0
THANK YOU GUYS FOR THE QUICK Responses! I did not add to the post, as it was late when I posted as well.. haha.. I do have the plywood separated from the inner and outer skins using a combination of flat-bars and a good hand-saw... that is why I thought I might be able to pop it out...

This is why I now think that the transom must be attached to some kind of inner floor/hull structure.. so we shall see..

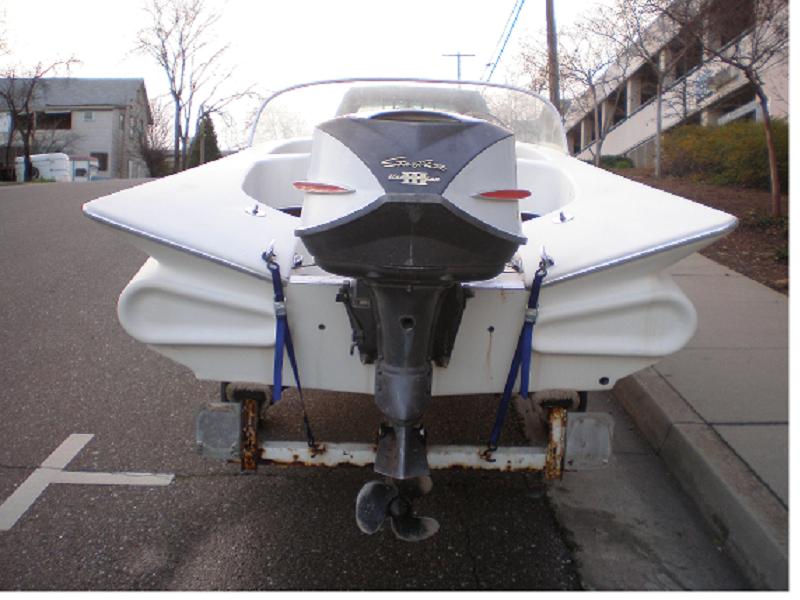
OHH and big revelation I had a few weeks ago... THE LAKE N SEA louveers in the rear... they are hollow! as in, the louvers waffle in and out on the inside of the transom, just like they do on the outside.. leaving horizontal voids between the louvers and the transom wood... pretty interesting! I would have thought that the louvers were solid resin pieces... NOT SO!

Please Log in or Create an account to join the conversation.

Re:Transom inner structure Lake N Sea 13 years 10 months ago #20045

retro one of the pour in transom manufactuers recomend that you use an electric chain saw ,being very careful,cut straight down into the rotted wood,between the inner and outer skins,it works i tried it on the glaspar lido,but i had to stop,i was inside my garage and it flew everywhere,lol,but it looks like your out side.and like i siad its flys eveywhere so wear safety glasses.
i will try to find the info i just told you here.john

Please Log in or Create an account to join the conversation.

\"too soon old,too late smart\" my pap

Twenty years from now you will be more disappointed by the things that you didn’t do than by the ones you did do. So throw off the bowlines. Sail away from the safe harbor. Catch the trade winds in your sails. Explore. Dream. Discover.“

---Mark Twain

Re:Transom inner structure Lake N Sea 13 years 10 months ago #20046

I'd fill thiose voids if it were mine so that there would be a solid base for the wood the attach to. Not sure what I would used, probably a mixture of resin and chopped mat fibers, or something there like. Del would probably have the best recipe for a filler.

From the pics I see your boat has a raised subfloor. That means your transom is going to go all the way down past the floor and to the bottom of the hull. Then the stringers are going to be glass to the transom, plus the floor is also. You'll have to remove the floor, or at least a section of it to acess the transom.

Please Log in or Create an account to join the conversation.

Some people are like slinkies... Not much good for anything, but they sure are fun to push down the stairs.

Re:Transom inner structure Lake N Sea 13 years 10 months ago #20047

here is one,look under transom preperation,they also ay to use long wood drill bits,this all if you want to save the inner skin.
the other guys are giving you GREAT advise i would follow it.
www.transomrepair.com/catalog/pages.php?pID=12

Please Log in or Create an account to join the conversation.

\"too soon old,too late smart\" my pap

Twenty years from now you will be more disappointed by the things that you didn’t do than by the ones you did do. So throw off the bowlines. Sail away from the safe harbor. Catch the trade winds in your sails. Explore. Dream. Discover.“

---Mark Twain

Re:Transom inner structure Lake N Sea 13 years 10 months ago #20065

Retro,

I'm with Doug & Del on this one. Complete removal of the old trasnom core will require that you cut the floor away from the transom base. Take a circular saw (skill saw) and set the cut depth to just 5/8". Mark a straight line across the flooring paralell to the transom. I would put the line about 6 to 12 inches forward of the transom wall. You will have to start the saw in the middle of the line and make a plunge-cut. Be very careful when you make the cut to stop the saw before you get too close to the gunwalls of the boat. You don't want to accidently cut through the bottom of the hull. The shoe of the saw will probably prevent you from getting too close. Then mark a line down the center of the cut piece of floor - from the transom forward to the line where you made the first cut. Then use the saw again to cut the floor section into to pieces. Then take a sharp wood chisel and break through the glass tabbing that bonds the floor to the base of the transom. Put a crowbar in the saw cuts and start to pry up the two cut sections of floor. From the cut in the center of the floor, pry up the 2 cut sections from the center - then tilt thim upward toward the outside of the boat. Sort of like opening up a hatch. This will break the tabbing along the gunwalls in a nice neat fashion. Then as del said, make a series of crisscross cuts into the remaining transom wood - just short of cutting into the outer skin of the hull. Shoot for having little 4" square sections when you are done cutting. They don't have to be perfectly square - don't worry about the cuts being crooked. Then take the wood chisel and knock out the little sections left from the saw cuts.

My Reinell has fake tail lights that are hollow - just like the louvers on your boat. I plan to fill the hollow sections on my Reinell with Sea Cast. I will then install a tradional plywood & glass transom. Since your boat has such radical cuts out of the gunwalls, I encourage you to rebuild it with a traditional wood core.

Have fun
Attachments:

Please Log in or Create an account to join the conversation.

Re:Transom inner structure Lake N Sea 13 years 10 months ago #20071

  • retro54
  • retro54's Avatar Topic Author
  • Offline
  • Senior Boarder
  • Senior Boarder
  • Posts: 222
  • Karma: 6
  • Thank you received: 0
Everyone... thank you so very much! with all of you, who's opinions I respect, with all of your combined experience.. I will get ready for the cuts! I feel confident that this is the way to go.

I will take good detailed pictures and plan on making some diagrams of the Lake N Sea structure, so that future folks will ahve a good idea what they are getting into.. thanks again... not sur ef I will get to it this weekend.. but will certainly make some progress in the comming weeks!

Please Log in or Create an account to join the conversation.

Re:Transom inner structure Lake N Sea 13 years 10 months ago #20076

How did the transom go? I am in the process of putting mine back together right now. Had to cut the floor out, as mentioned above the transom was the first or second thing put together, Its my first fiber glass project as well hope it went well. If you have any tips you would like to pass on about glassing over the wood and tying the hull back in would be great

Please Log in or Create an account to join the conversation.

Re:Transom inner structure Lake N Sea 13 years 10 months ago #20077

  • Andgott
  • Andgott's Avatar
  • Offline
  • Contributing Member
  • Contributing Member
  • Posts: 1243
  • Karma: 72
  • Thank you received: 0
I'll be following this thread closely- It will be helpful when I get in to my Lake N Sea.

I think my transom is solid- except for a few small areas around the drains, and I think I can repair that.

I'm interested in seeing what's under the floor- Especially the stringers. I know that the floor is solid fiberglass, I'm interested in seeing what the stringers are made of.

-Andrew

Please Log in or Create an account to join the conversation.

Re:Transom inner structure Lake N Sea 13 years 10 months ago #20079

  • retro54
  • retro54's Avatar Topic Author
  • Offline
  • Senior Boarder
  • Senior Boarder
  • Posts: 222
  • Karma: 6
  • Thank you received: 0
hahaha Andrew.. (myname is Andy by the way)... that is what I was hoping! someone to postsome good pictures... hh well.. I will be sure to take some detailed shots and desciptions... I hope to get to it a little this weekend.

Please Log in or Create an account to join the conversation.

Re:Transom inner structure Lake N Sea 13 years 10 months ago #20174

  • retro54
  • retro54's Avatar Topic Author
  • Offline
  • Senior Boarder
  • Senior Boarder
  • Posts: 222
  • Karma: 6
  • Thank you received: 0
well. i have started the cuting.. marked a line 7 inches back on the floor from the transom and went to work.. first with a circular saw for the floor, and then with an air-powered cutoff wheel... the old fiberglass wears the cutoff wheel down pretty quick... and ruined the cutoff set-screw in changing out the disk... so we'll get back to the cutting maybe wednesday night...

Some finding thus far..

the floor is thick! about 3/8" to 5/15" thick, and while I can't tell quite yet, there do not appear to be many stringers... more to follow later in the week!


Please Log in or Create an account to join the conversation.

Re:Transom inner structure Lake N Sea 13 years 10 months ago #20180

  • Andgott
  • Andgott's Avatar
  • Offline
  • Contributing Member
  • Contributing Member
  • Posts: 1243
  • Karma: 72
  • Thank you received: 0
Looks like it's coming along!

The floor in mine seems to be solid fiberglass- is that what you're finding on yours?

I have been able to check out a bit of the inside of the hull through the drain plug hole in the transom. When it's outside in the sunlight, PLENTY of light comes through the floor, and I can 'peek' in there and see a little. I can see some stringers, etc. I just can't tell if they are solid fiberglass or wood.

-Andrew

Please Log in or Create an account to join the conversation.

Re:Transom inner structure Lake N Sea 13 years 10 months ago #20184

  • retro54
  • retro54's Avatar Topic Author
  • Offline
  • Senior Boarder
  • Senior Boarder
  • Posts: 222
  • Karma: 6
  • Thank you received: 0
Andrew...

Not sure on the stringers yet... but I think there are only 2 or so.. not many.. and yes, the floor IS solid fiberglass... 5/16 to 3/8 of an inch thick... my floor is very solid, so will not have to meet the challenge of replacing that!

My goal is to carfully remove this piece of fiberglass and then feather it back in, so i save time and have some economy when replacing the fiberglass...

Please Log in or Create an account to join the conversation.

Re:**UPDATE** Transom inner structure Lake N Sea 13 years 10 months ago #20547

  • retro54
  • retro54's Avatar Topic Author
  • Offline
  • Senior Boarder
  • Senior Boarder
  • Posts: 222
  • Karma: 6
  • Thank you received: 0
So..... I uncovered the transom!


Measure twice.. cut once?


pneumatic cut-of wheel, circular saw, and regular handsaw were used to make the cuts!


The inner skin is broken free..what will we find?


6 stringers! fiberglassed into the hull... 5/16" to 3/8" thick fiberglass deck over top... it appears the decking is fastened to the stringers via a few small nails, whose heads were then glassed over..


more to come...

Please Log in or Create an account to join the conversation.

Re:**UPDATE** Transom inner structure Lake N Sea 13 years 10 months ago #20548

  • retro54
  • retro54's Avatar Topic Author
  • Offline
  • Senior Boarder
  • Senior Boarder
  • Posts: 222
  • Karma: 6
  • Thank you received: 0
stringers are roughly 7 inches on center... and 2 inches wide...


Note the 1-by piece of blocking spaning three stringers on each side, between the transom core and the stringers..this is atached to the stringers via only one nail, through the 1-by and into the stringer end... not attached to the transom by any mechanical means..


this image shows the two 1-by spacers at the end of the stringers.. the open space is right above the keel...


showing the depth of the stringer... yes, most of the fiberglass encapsolating the stringers are cracked at this end... will just seal it back up the best I can..


photo of one of the complete stringer spacers removed...

Please Log in or Create an account to join the conversation.

Re:**UPDATE** Transom inner structure Lake N Sea 13 years 10 months ago #20549

  • retro54
  • retro54's Avatar Topic Author
  • Offline
  • Senior Boarder
  • Senior Boarder
  • Posts: 222
  • Karma: 6
  • Thank you received: 0
spacers removed and everything vaccumed out.. I still need to remove the plywood transom next.


view of side of transom where inner hull meets the deck.. the white lines are from slight scuff marks left by my handsaw... no damage.. much easier to use the handsaw here than to risk cutting through the outer hull with a power saw.


up NEXT... removing the transom core... comming up this week.

Please Log in or Create an account to join the conversation.

Re:**UPDATE** Transom inner structure Lake N Sea 13 years 10 months ago #20558

andy,very nice work,your doing great. i have a suggestion though,if you leave the old strigers in,you might want to add some sister stringers beside the old ons and glass them together and into the new transom ,it should strengthen them up,the ends of any lumber tend to rot quicker then the sides,the new stigers dont have to go all the way just long eough to get under the floor as far as you can without cutting the floor further back,i did it with my camper floor too.

Please Log in or Create an account to join the conversation.

\"too soon old,too late smart\" my pap

Twenty years from now you will be more disappointed by the things that you didn’t do than by the ones you did do. So throw off the bowlines. Sail away from the safe harbor. Catch the trade winds in your sails. Explore. Dream. Discover.“

---Mark Twain

Re:**UPDATE** Transom inner structure Lake N Sea 13 years 10 months ago #20569

  • Andgott
  • Andgott's Avatar
  • Offline
  • Contributing Member
  • Contributing Member
  • Posts: 1243
  • Karma: 72
  • Thank you received: 0
Coming along!

I had suspected that there were a couple of stringers down there- Based on what I could see through the drain plug.... I had hoped that they were solid fiberglass, like the floor, but apparently they aren't... I guess I am going to have to do a little 'exploration' on mine to make sure there is no major rot. I'd REALLY like to do this one without tearing the floor out, if I can!

-Andrew

Please Log in or Create an account to join the conversation.

Re:**UPDATE** Transom inner structure Lake N Sea 13 years 10 months ago #20603

  • retro54
  • retro54's Avatar Topic Author
  • Offline
  • Senior Boarder
  • Senior Boarder
  • Posts: 222
  • Karma: 6
  • Thank you received: 0
Thanks guys! I'm gonna keep chipping away at it!... little bit at a time... I have been thinking about doing something about the ends of those stringers... but as the floor is very solid under my large frame, I will not worry about taking it all the way up!

Please Log in or Create an account to join the conversation.

Re:**UPDATE** Transom inner structure Lake N Sea 13 years 10 months ago #20687

retro54, WOW,what a great window into what we have
in these great little boats.I'm greatful for the knowledge
in how they were put together. Keep the pics comming!

Rick
Attachments:

Please Log in or Create an account to join the conversation.

Re:**UPDATE** Transom inner structure Lake N Sea 13 years 10 months ago #20695

The progress looks good. All of the old boats from this era appeared to have been sort of tossed together, so getting it back as exactly as original isn't really crucial. If improvements are made where they won't be revealed, make them. Keep in mind that these boats were cranked out as fast and cheaply as possible. That's really how they were done. I mean, who uses nails in boat construction? Well, these guys did, Wizard did to, and countless others. Make it better than new. I would forget the wood spacer & add another layer of 3/4 plywood all the way up to the underside of the deck. No body will ever know the difference, but the boat will be stronger. That transom could use some beefing up anyway. Lastly, be very certain that the stringers are indeed good. What a nightmare it would be to do all that work & to have them go "soft" on you. Wood stringers and transoms can appear to be in good shape, because they have not been put under stress in a long, long time. But when pressed back into use, they can soften rather quickly. Just be sure they are sound before you put it back together

Please Log in or Create an account to join the conversation.

Re:**UPDATE** Transom inner structure Lake N Sea 13 years 10 months ago #20719

  • retro54
  • retro54's Avatar Topic Author
  • Offline
  • Senior Boarder
  • Senior Boarder
  • Posts: 222
  • Karma: 6
  • Thank you received: 0
Great suggestions bruce! I agree and will be taking my time in making sure all is well and solid!

Rick glad I am giving you some insight! I don't think anyone has published pictures such as these... so I am trying my best to make things clear for those who might try this after me.. I am sure I'll do some things wrong.. but hey, it's my firt time! haha...

Doesn't look like I will actually get the transom out before the weekend... busy time of year, plus I just got engaged! haha...

I believe I will be removing the center section of the transom firt in order to see hot the thing meets the bottom of the hull and then will endevor to keep the two ends intact as paterns. This is my hope since they are so darn solid anyways.

Cheers guys! AND MAKE SURE YOU SAVE THESE PICTURES IF YOU THINK YOU WILL NEED THEM! haha

Andy

Please Log in or Create an account to join the conversation.

Re:**UPDATE** Transom inner structure Lake N Sea 13 years 10 months ago #20725

Andy - I forgot to ask: How difficult was it to pry up the cut floor section? To be very specific - how well was the floor panel bonded to the stringers, and what was the method of attaching it? Nails alone? Nails & fiberglass tabbing? Screws alone? Screws and tabbing????

Unless the entire floor membrane is completely bonded to the stringer tops, (which I doubt it is) the hull strength will be compromised. If the floor is solid fiberglass, it could be cut out, removed, and re installed after making repairs. If you use the cut off wheel or saw to carefully cut around the perimeter, the floor could be tabbed and glassed back in quite easily. If it were mine, that is what I'd do. I'm doing the same thing on my Skagit. The floor was solid, but it had become detached from the stringer tops in many places. Skagit used fiberglass strips on the stringer tops, and screwed the floor down with brass screws. Very high quality - but over 50 years - it started to fail. If the floor is not completely bonded to the stringers, the boat hull will tend to twist - especially in rough water. The best way to attach a floor to stringer tops is to glue them with marine construction adhesive. No fiberglass tabbing, no nails, no screws. I will use 3M 5200 slow cure. The stuff is amazingly strong, but it isn't brittle. This allows the floor to stringer joint to act like a solid connection, but has just enough elasticity to withstand tremendous torsional loads without breaking away like fiberglass would. Just run a big fat bead of 5200 down the stringer tops - drop the floor in place - put some sand bags or bricks on the floor to keep it weighted down 'till the 5200 cures. In cool weather - the 5200 can take up to a couple weeks or more to fully cure, so don't be in a hurry. Because no fasteners are needed - there are no pathways through the floor for water to penetrate through it. The boat would be bomb proof if this was done to it. It is really not that tough to do, especially since you have the boat so far torn down already. Here is a pic of my Skagit. It has all fiberglass stringers - but does use a plywood & glass floor. We can compare notes on how the refit goes, though I'm sure yours will be done before mine, as I have too much going on right now to work on the Skagit
Attachments:

Please Log in or Create an account to join the conversation.

Re:**UPDATE** Transom inner structure Lake N Sea 13 years 10 months ago #20727

andrew CONGRADULATIONS!!!!!,on your engagement,your a great guy,you both lucky,and your doing a great job,john

Please Log in or Create an account to join the conversation.

\"too soon old,too late smart\" my pap

Twenty years from now you will be more disappointed by the things that you didn’t do than by the ones you did do. So throw off the bowlines. Sail away from the safe harbor. Catch the trade winds in your sails. Explore. Dream. Discover.“

---Mark Twain

Re:**UPDATE** Transom inner structure Lake N Sea 13 years 6 months ago #27977

Thank you for the very detailed pictures of underneath the floor. I have recently acuired a 59' Lake n' Sea Caribean, it sank. It has a crack all the way along the bottom back corner of the boat. I'm 16 and this is my first project and I need help! Any suggestions? I also know very little about this boat, I am only guessing it is a 59' but it could be a 60' so any info on it would be great. provided the pictures deside to show up...
Attachments:

Please Log in or Create an account to join the conversation.

Re:**UPDATE** Transom inner structure Lake N Sea 13 years 6 months ago #27979

  • retro54
  • retro54's Avatar Topic Author
  • Offline
  • Senior Boarder
  • Senior Boarder
  • Posts: 222
  • Karma: 6
  • Thank you received: 0
Strat.. looks great man! I'm only about 10 year older than you.. this is my first project as well, so no worries, there are lots of good guys on this board who will be happy to help you out. If you would like to figure out the exact year of manufacture, you need the hull number which is located on a plate with the 'Parsons Corperation' name on it, this is located on the left side of the front seat, hopefully it is there.. then e-mail the guy who runs this website.

www.lakensea.org/IdentifyingaLakenSea.html

and actally, check out this page shown above, this will show you the plate location... and give you some history on the boat, if you e-mail the gentleman who runs the website, he will give you the exact year.. good luck and feel free to e-mail me. This email address is being protected from spambots. You need JavaScript enabled to view it. cheers!

Andy

Please Log in or Create an account to join the conversation.

Re:**UPDATE** Transom inner structure Lake N Sea 13 years 6 months ago #27982

Thanks!, I've looked for that plate but could not find it, I do however know it is under Parsons Corporation. I found another kind of plate on the back of the boat, took a picture of it and sent it to the man at the website and he said that he has never seen a plate like it before...and one more question, how would I tell if the transom plywood need to be replaced like on yours?

Clay
Attachments:

Please Log in or Create an account to join the conversation.

Re:**UPDATE** Transom inner structure Lake N Sea 13 years 6 months ago #27994

  • retro54
  • retro54's Avatar Topic Author
  • Offline
  • Senior Boarder
  • Senior Boarder
  • Posts: 222
  • Karma: 6
  • Thank you received: 0
My transom, the fiberglass was completly cracked on the top, with a butcher job transom extension. ONce the fiberglass was removed, the center of the transom had the consistancy of a wasp's nest. not very good! If you look and search for other posts on this board, I beleive most of the guys tell ya to hang on the transom, put your full weight on it and bounce it, and if it flexes, it might need replaced... mine also had cracks down at the bottom of the hull where freeze and thaw had pushed it... this is how I know that I needed it replaced. so... take those suggestions for what they are, I would not take the boat appart to do this, unless there is clear cracking in the fiberglass (from the transom flexing) or if you ahve other reasons to believe the transom is no good.. I would enjoy the boat, if you can, before doing all of this... haha...

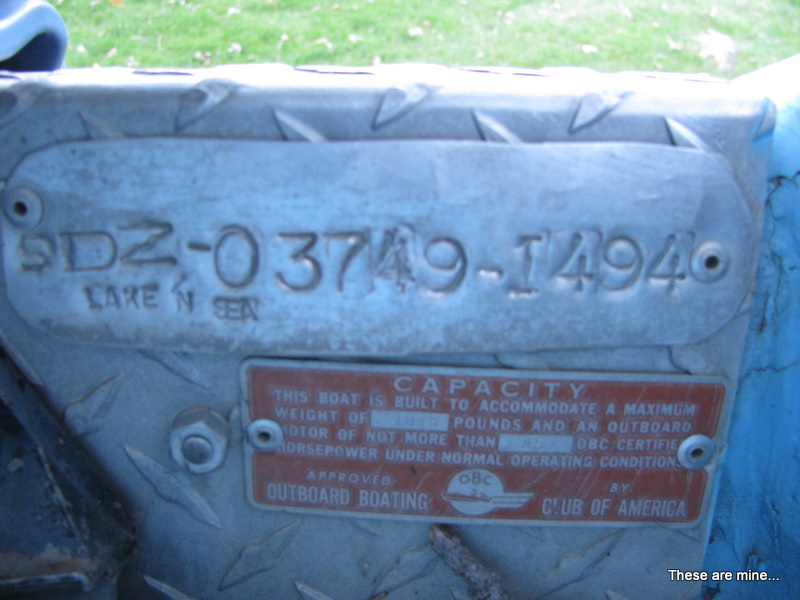
I believe what you see there is a state ID plate and capacity plate, has nothing to do with the manufacture of the boat, but most likely corresponds with your registration number and boat liscensing for the state the boat was registered in, I have a similar "Pennsylvania" tag on the driver's side of my boat, keeping me to a capacity and no more than I bieve 65 hp. on the boat, although this is just PA rules.. haha
hope that helps.. I would start a new thread and post your transom question there... although I would really steer clear of taking this thing apart, unless you absolutly have to.. as a new guy in the hobby, having a boat apart, that doesn't float, can really kill your enthusiasm quickly.. use it, imporove it, enjoy it, those are my suggestions!

Andy

Please Log in or Create an account to join the conversation.

Re:**UPDATE** Transom inner structure Lake N Sea 13 years 6 months ago #28078

How did you go about removing the top section of the boat?

Please Log in or Create an account to join the conversation.

Re:**UPDATE** Transom inner structure Lake N Sea 13 years 6 months ago #28085

Hi,

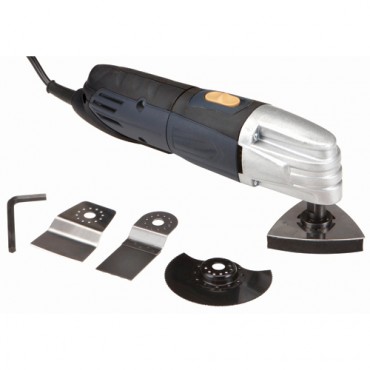
I think you should look at the transom repair from the right tool point of view. I have found this tool amazingly project friendly. Take a look at this variable speed multi-function tool.

Description of Chicago Electric Power Tools 67537
There's no need to buy several power tools when this one tackles all sorts of cutting, scraping and sanding tasks by itself. Our easily affordable, variable-speed multi-function tool from Chicago Electric Power Tools works at 10,000 to 20,000 oscillations per minute to give you control and power over every job, and it’s easy to switch attachments depending on the task. Multi-tool cuts through cable, downspouts, air ducts, plasterboard and pipes, sands down cement, concrete, plaster, stone, tile adhesive, paint and wood...even saws through wood up to 2-1/4” thick.
Includes 3" triangular sanding pad (with 2 sanding sheets), half-moon cutting blade, angle scraper blade and angle cutter blade
Variable speed: oscillates at 10,000 to 20,000 strokes/minute
Compare to MultiMaster that costs several times as much
Die cast aluminum gear housing
Sealed bearings for durability


You can get the tool and some attachments for around $100 at HF.

Good luck!
Attachments:

Please Log in or Create an account to join the conversation.

Re:**UPDATE** Transom inner structure Lake N Sea 13 years 6 months ago #28096

i agree i bought the variable speed model for 44 bucks at harbor frieght and use the crap out of it,it really sands very well too,and you can get finger sanders for it,you can also cut very close to the sides of things.

and strat welcome its great to see the younger folks getting into the fg hobby,we are all hereto help,john

Please Log in or Create an account to join the conversation.

\"too soon old,too late smart\" my pap

Twenty years from now you will be more disappointed by the things that you didn’t do than by the ones you did do. So throw off the bowlines. Sail away from the safe harbor. Catch the trade winds in your sails. Explore. Dream. Discover.“

---Mark Twain
  • Page:
  • 1
Time to create page: 0.305 seconds

Donate

Please consider supporting our efforts.

Glassified Ads

Fenders - Tee Nee trailer
( / Parts / Miscellaneous)

noimage
09-30-2024

1958 Skagit Sportster
( / Boats)

1958 Skagit Sportster
09-25-2024

Winner Marauder - the classic 1970 runabout!
( / Boats)

Winner Marauder - the classic 1970 runabout!
09-16-2024

FG Login

FiberGoogle

Who's Online

We have 7408 guests and one member online