Welcome, Guest
Username: Password: Remember me
  • Page:
  • 1
  • 2

TOPIC: Hot Rodding a Fat Fifty, a lesson

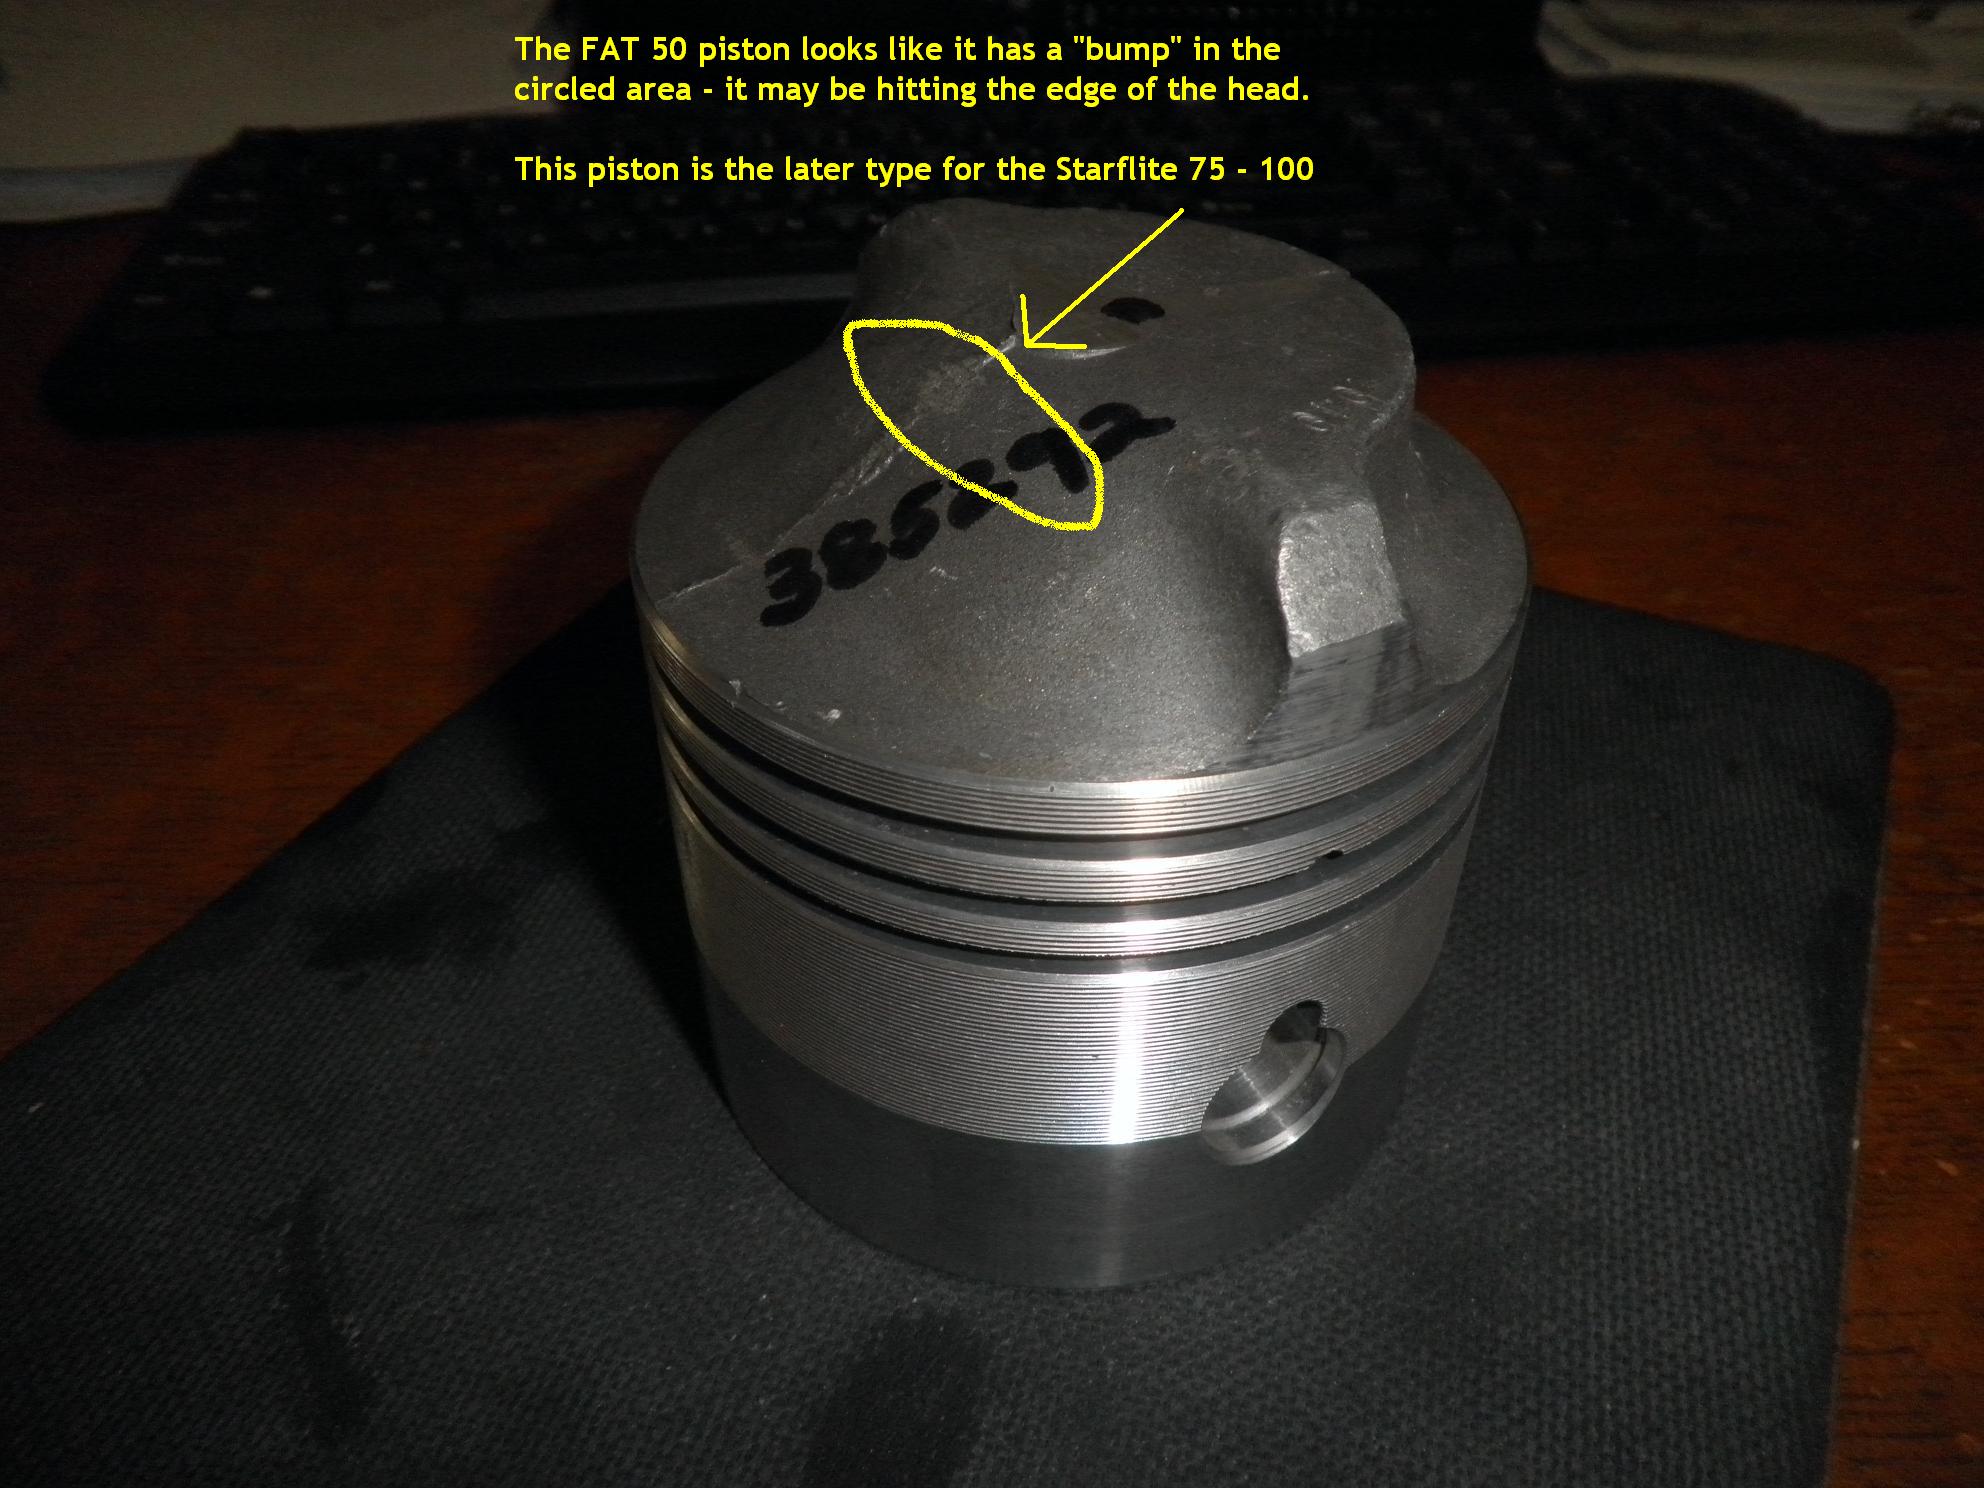
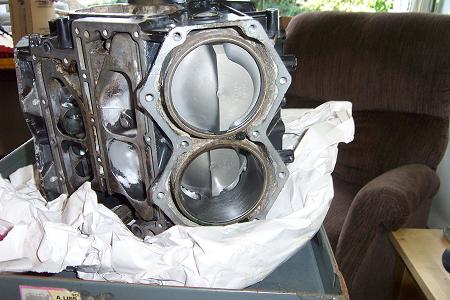
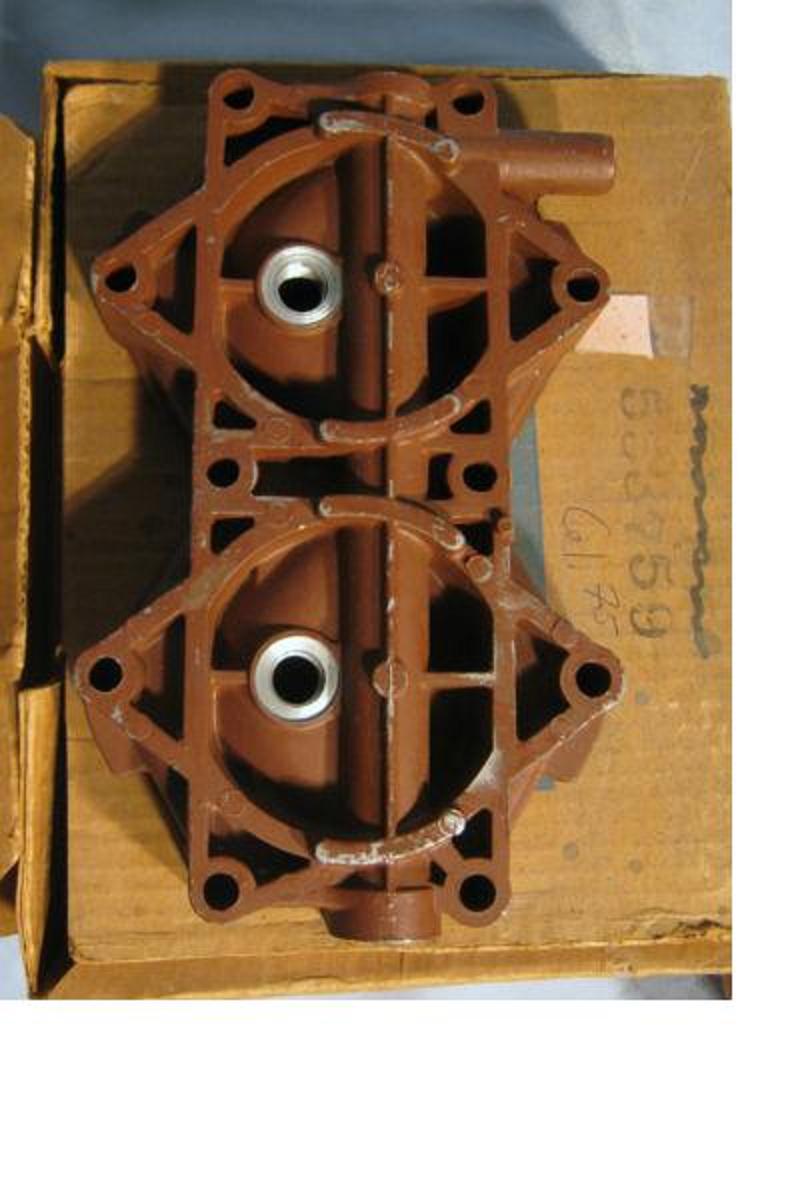
Hot Rodding a Fat Fifty, a lesson 12 years 11 months ago #48438

  • Waterwings
  • Waterwings's Avatar Topic Author
  • Offline
  • Contributing Member
  • Contributing Member
  • Posts: 4887
  • Karma: 107
  • Thank you received: 100
Well here it is finally. Sorry it's taken so long but Honey Do's and trips put a real dent in the progress. This thread is to help the adventurous in making there Fat Fifty breath better and be a little more fuel efficient with a HP boost. It's also a lesson learned. ;) I expect I'll get comments good and bad so bring them on, please bare in mind that this is my first How To thread so be gentle. :) I expect Mr. Gerard will probably jump in here too, I hope, since it was with his help I did this.

Ok first things first. This should work on any JohnnyRude or Gale Fat Fifty V4 at least the '58 & '59 models. Bruce can confirm what other years will work.

To help our motor breath better you'll need to get a newer reed valve assembly from a mid '60's 60hp to 75hp motor. Again Bruce or someone can chime in on which motors will work for the reed assembly. Make sure you get new gaskets and some number 2 Permatex, the brown goopy stuff.

Here are the procedures quoted from Bruce, (give credit where credit is due), with my pics.
"The reeds and plate should not be disturbed - do not take them apart. Do not push on the reeds with your fingers, or any other object. If you want, you can flush them out with some ChemTool carb spray & let them air dry. DO NOT blow them out with an air hose."
First lesson learned: take pics of everything including the reed assembly with the new gaskets and thin amount of Permatex on it, dummy!

"Remove the large slotted screw, spacers and washers from the throttle cam that is attached to the carburator. Observe the order of the parts. Detach the throttle cam from the carburator by swinging the throttle cam and rod out & away from the carburator. replaceplace the screw and washers on the carb for safekeeping."


"Remove the wire from the electric choke solenoid & move the wire aside."


"Remove the fuel pump. If the lines attached to the pump are supple, they may allow the pump to move out of the way enough so they don't need to be removed from the pump. Check all lines for cracking - if in doubt, replace them."
Pics of the fuel lines to remove.


"Loosen all of the intake manifold bolts & back them out slightly. (1/4" or a little less)
If the intake manifold does not start to drop away from the block, place a wood block against the carburator (where it will not damage exposed parts) and give a couple smacks with a hammer. Don't get carried away. The manifold should pop loose, unless you have missed a bolt, or someone has previously used silicone on the gasket. The goal here is to pop the manifold loose without ruining the gasket, otherwise you will have to replace it."
Other lesson learned, take picture of carb/intake assembly with fuel pump off so you can see the two hidden bols behind it.


"Remove the previously loosened manifold bolts & carefully move the manifold and carburator assembly to the side."


"At this point, you should be looking at the front side of the reed plate assembly, unless it came off with the manifold. Place a sharp edge of a wood block against the outside edge of the reed plate where it meets the engine block. Give it a sharp blow with a hammer to loosen it. Remove the old reed assembly. Check the crank case flange for any old gasket or sealer & clean it."

Pic of the old reed assembly before removal. Notice the two arrows to show the bolt holes from the hidden bolts behind the fuel pump.


"Smear a light film of Permatex on the mating surface of the crank case & place the new reed assembly into the intake cavity. If the original intake manifold gasket looks OK, smear a light film of Permatex on the mating surfaces and re attach the intake manifold and carb assy. DO NOT over tighten the manifold bolts."


I also have a layer of Permatex on the gasket in the reed valve assembly so don't be too concerned with the gaps in Permatex you see on the intake manifold.

"Re-assemble the engine parts in the reverse of the above. Test run engine."


You can test run the engine now if your only doing the reed valve change or if your doing the heads too wait until that part is complete. I will submit that portion tomorrow hopefully. If you only do this portion you should notice and improvement on how she breaths and maybe a little more speed. To be honest I haven't had a chance to get her back on the water yet since I did this before my cruise trip and haven't had a chance yet. Expect to take her out this weekend and tweak her.

That's all for tonight. Hope your enjoying this thread.

Cheers,
Bob

Please Log in or Create an account to join the conversation.

Re:Hot Rodding a Fat Fifty, a lesson 12 years 11 months ago #48493

  • MarkS
  • MarkS's Avatar
  • Offline
  • Moderator
  • Moderator
  • Posts: 5348
  • Karma: 118
  • Thank you received: 5
Great to see you finally getting to work on the "Fatty" Bob, keep the updates and pics coming. ;)

Please Log in or Create an account to join the conversation.

Mark

Re:Hot Rodding a Fat Fifty, a lesson 12 years 11 months ago #48552

  • Waterwings
  • Waterwings's Avatar Topic Author
  • Offline
  • Contributing Member
  • Contributing Member
  • Posts: 4887
  • Karma: 107
  • Thank you received: 100
Thanks Mark, will try and post the cylinder head job/lesson later.

Bob

Please Log in or Create an account to join the conversation.

Re:Hot Rodding a Fat Fifty, a lesson 12 years 11 months ago #48571

  • Waterwings
  • Waterwings's Avatar Topic Author
  • Offline
  • Contributing Member
  • Contributing Member
  • Posts: 4887
  • Karma: 107
  • Thank you received: 100
OK, here's the head info.

First you need to get a set of Mid 60's 60hp or 65hp JohhnyRude or Gale heads.

These heads have water jacket covers and will stay much cooler due to the improved cooling as seen by the pics below.

Remove the water jacket covers, remove the old gasket material and make sure your down to the metal since the heads will have to be milled while resting on the water jacket side.

Take the heads to a "reputable" machine shop and have them milled down .125". Lesson learned: Make sure they can mill the head with a single cutter big enough to mill the head in one pass. Mine were not and I had to hone them to get rid of some ridges and scrape a lip off that was pushed over into the combustion chamber side. Also make sure you measure the heads before and after the milling job to make sure they only milled of .125" See the pic.

After honing

Now would be a good time to repaint the heads if your so inclined. Also while your head are getting milled, get new water jacket cover gaskets and new head gaskets.

Now that the heads are milled and you have new gaskets, put the water jasket covers on with the new jasket cover gaskets. Use the Permatex RTV for this gasket. I coated both sides with a thin bead and installed the bolts. Don't over tighten them they will break easily. You also may want to put some Permatex number 2 on the bolt threads to prevent corrosion. Sorry didn't take any pics of this part, got on a roll and forgot.

Now you should be ready to go to install the heads. Remove the spark plugs and the bolts on your existing heads. Make sure the cylinders are clean from the old gasket. Shouldn't really be any material sticking to it but if there is remove it. Be careful if you use a putty knife, make sure you don't gouge the aluminum!

Now take the new head gaskets and do the following:
"get a can of aluminum spray paint - not just silver, but the real aluminum stuff. Cut a wire coat hanger into an "S" shape and hook one gasket on the wire while holding the other end. Spray both sides of the head gasket 2 times. While the paint is still wet to tacky, remove the gasket from the wire and lay it flat on the milled face of the cylinder head. (the head should be laying on a flat surface-with the combustion chamber facing up) Now pick up the head & slip a couple head bolts from the bottom side of the head into position. The bolts will keep the gasket from falling off when the head is installed. Pick up the head, bolts, & gasket and position the head on the engine. Slip the remaining head bolts into position and thread them all in by hand, NOT tight yet. When all are bottomed by hand, get your socket & ratchet out. Start by snugging up the center two studs first, then work your way outward to the remaining studs in a spiral pattern (like a coiled rope) Just make them snug, NOT tight."

"NOW you can begin the actual torquing of the head.

Keep in mind that most torque values for outboard engines are given in INCH pounds not FOOT pounds. Confirm which the torque values are given before starting. Take the torque value & divide the number by 3. You will torque the entire head three times, starting with low pressure, and working your way to the full value. For example- if the stud requires 75 inch pounds, divide by 3. (75 / 3 = 25) So, this means 3 passes at 25 pound increments. 1st pass, 25in. lbs, 2nd pass 50in. lbs, 3rd pass 75in. lbs This process helps keep the head or block from getting distorted." The pic below has the number sequence but they're small sorry.

Make sure you follow the OMC pattern and the maximum torque values. The pattern as stated earlier is to snug down the center two studs then spiral outward. The whole process shouldn't take more then 10 minutes or so once the gaskets are painted and ready to install.

Put the spark plugs back in and be careful not to overtorque them also. Now turn the engine over by hand and make sure nothing is hitting or catching. Lesson learned: didn't do that and there was a problem to be explained later.


"After the engine has been run up to temp shut it off & let it fully cool. Re torque the heads using the top number (3 steps not needed this time) to be sure the heads are properly torqued after run-in. Do not be alarmed if tiny blisters or pills of silver paint appear at the gasket edge - this is typical.

The silver paint actually melts & makes a fantastic sealer without a gooey mess."

You should now be ready to go and take her out for a spin. You should notice a significant improvement in horsepower and speed. Should be close to what a 75hp will run. It will also be more efficient on the fuel burned but she will still be a gas guzzler but faster and burn more of the fuel in the cylinders than it did before.

Now for the other lesson learned as mentioned earlier. Make sure you turn the engine over by hand to make sure nothing is hitting. I didn't and didn't know there was a problem until I started the engine and heard a bbrrrdddd sound like something was hitting. Checked to make sure the spark plugs weren't too long, nope that wasn't it. Took the heads off and yep sure enough pistons were hitting the heads.


This is where I said you need to make sure you use a reputable machine shop. It appears the one I used took too much off and there was no clearance left. Guess I should have listened to the OMC dealer who said he sends all their heads to a chop in Arkansas!
Moral of the story is to do your research on machine shops and always double check to make sure they've done what you asked. By the way I have since put the old heads back on and the engine is fine, pretty bullet proof actually. I will try this again but for now I have found another way to get some more horsepower.


I hope this has been an informative thread and it gets more horsepower for you.

Cheers
Bob

Please Log in or Create an account to join the conversation.

Re:Hot Rodding a Fat Fifty, a lesson 12 years 11 months ago #48573

You really should be bolting a 66 -100 HP block in there, then you will surprise people.

Please Log in or Create an account to join the conversation.

Re:Hot Rodding a Fat Fifty, a lesson 12 years 11 months ago #48639

  • Shipster
  • Shipster's Avatar
  • Offline
  • Contributing Member
  • Contributing Member
  • Posts: 340
  • Karma: 20
  • Thank you received: 0
Bob, I don't know a thing about outboards or Fat 50's but I do know that based on presentation and clarity Someone will find your tutorial extremely helpful. Great job!!
Shipster

Please Log in or Create an account to join the conversation.

Re:Hot Rodding a Fat Fifty, a lesson 12 years 11 months ago #48711

Waterwings,

NEAT TUTORIAL! =======> THANKS!

yours, satx

Please Log in or Create an account to join the conversation.

Resistance to tyrants is obedience to Almighty God.
Thomas Jefferson, 1803

Re:Hot Rodding a Fat Fifty, a lesson 12 years 11 months ago #48728

Bob - To convert foot pounds to inch pounds, multiply by 12.
To convert inch pounds to foot pounds, divide by 12.

Please Log in or Create an account to join the conversation.

Re:Hot Rodding a Fat Fifty, a lesson 12 years 11 months ago #48794

  • Waterwings
  • Waterwings's Avatar Topic Author
  • Offline
  • Contributing Member
  • Contributing Member
  • Posts: 4887
  • Karma: 107
  • Thank you received: 100
Shipster and Satx thanks, I hope it helps folks.

Bruce, thanks for that input, didn't think to put that in there.

Bob

Please Log in or Create an account to join the conversation.

Re:Hot Rodding a Fat Fifty, a lesson 12 years 9 months ago #52816

  • w guy
  • w guy's Avatar
  • Offline
  • Fresh Boarder
  • Fresh Boarder
  • Posts: 49
  • Karma: 5
  • Thank you received: 0
What were your compression readings after milling the heads?

Please Log in or Create an account to join the conversation.

Re:Hot Rodding a Fat Fifty, a lesson 12 years 9 months ago #52875

  • Waterwings
  • Waterwings's Avatar Topic Author
  • Offline
  • Contributing Member
  • Contributing Member
  • Posts: 4887
  • Karma: 107
  • Thank you received: 100
W guy,
Didn't take any as the pistons ended up hitting the heads because they were milled down too much. Put the old ones back on and am now focusing on the '67 80hp I got a hold of. If I come across some 60hp heads real cheap I may try again, with a much more reputable machine shop of course. LOL

Bob

Please Log in or Create an account to join the conversation.

Re:Hot Rodding a Fat Fifty, a lesson 12 years 9 months ago #52877

  • w guy
  • w guy's Avatar
  • Offline
  • Fresh Boarder
  • Fresh Boarder
  • Posts: 49
  • Karma: 5
  • Thank you received: 0
I was kinda shocked when I read that you took off 1/8". That's a LOT. I don't have a library of part numbers, but I wouldn't be surprised if the 60hp heads you find are exactly the same as the 50hp heads.
With a graduated pipet, you can calculate the static CR by filling the bore with the piston at TDC and adding the cylinder head volume. (don't forget to add the head gasket thickness volume) Then calculate the swept volume using bore & stroke. Divide the smaller into the larger and you have your static CR. After that, you can calculate the decrease in TDC volume with a .020 or .030 head mill and see what would be gained before cutting the heads.

Verne :)

Please Log in or Create an account to join the conversation.

Re:Hot Rodding a Fat Fifty, a lesson 12 years 9 months ago #52892

  • Waterwings
  • Waterwings's Avatar Topic Author
  • Offline
  • Contributing Member
  • Contributing Member
  • Posts: 4887
  • Karma: 107
  • Thank you received: 100
Verne,
Thanks great info. Actually I got the idea from Bruce Gerard, he did it with a Gale. I'm thinking the Johnny/Rude heads might not be as thick as the Gale or its' as I suspect, the machine shop milled 1/4" off vice the 1/8" requested. Bruce milled a full 1/8" off the Gale heads and got quite an increase in hp and speed.

Bob

Please Log in or Create an account to join the conversation.

Re:Hot Rodding a Fat Fifty, a lesson 12 years 9 months ago #52904

Your not hitting that hard. Machine the piston in that area back a tenth of an inch or so and run it.

A file or dremel will do.

Conrad

Please Log in or Create an account to join the conversation.

Re:Hot Rodding a Fat Fifty, a lesson 12 years 9 months ago #52989

  • Waterwings
  • Waterwings's Avatar Topic Author
  • Offline
  • Contributing Member
  • Contributing Member
  • Posts: 4887
  • Karma: 107
  • Thank you received: 100
Conrad,
Thanks, hadn't thought of that. Is there enough meat at the top of those pistons, well side of the crown, to do that without screwing them up?

I guess another question would be do the '62 75hp heads fit the Fat Fifty? Maybe I have a reputable machine shop give another go at the 75 heads since the block is too scored.

Bob

Please Log in or Create an account to join the conversation.

Re:Hot Rodding a Fat Fifty, a lesson 12 years 9 months ago #53015

Please Log in or Create an account to join the conversation.

Re:Hot Rodding a Fat Fifty, a lesson 12 years 9 months ago #53017

  • ed-mc
  • Away
  • Platinum Boarder
  • Platinum Boarder
  • Posts: 1408
  • Karma: 232
  • Thank you received: 115
That deflector atop the piston is solid aluminum, so I'd expect a little filing won't hurt a bit. Don't think 75hp heads would fit right, since the bore on a 75hp V4 is larger.

You could use some modeling clay or Silly Putty to check clearances between piston & head, once the clay squashes you'll have a real good idea of how tight clearances are............ed

Please Log in or Create an account to join the conversation.

Re:Hot Rodding a Fat Fifty, a lesson 12 years 9 months ago #53094

  • Waterwings
  • Waterwings's Avatar Topic Author
  • Offline
  • Contributing Member
  • Contributing Member
  • Posts: 4887
  • Karma: 107
  • Thank you received: 100
Cool, thanks Ed, great idea. I'll just have to make sure I file the same amount on both sides so I don't get the pistons out of balance, I would assume.

Bob

Please Log in or Create an account to join the conversation.

Re:Hot Rodding a Fat Fifty, a lesson 12 years 9 months ago #53101

Yes there is tons of meat up there to move back. You can file appoximatly the same on each side to help balance. But honestly what your going to take off is not much to worry about. Ive never worked on a V-4. Only L6's Yep mercs. If the con rod lets you take that piston out easy on the V-4 just slide it out and put that piston up to a grinder . Before doing it score some marks a 1/10th of an inch lower on the piston deflector so you know how much youve taken off and where to stop. Do both sides and if the other pistions need it do them quick too. No sense having it knock at high RPM. If the pistons are hard to pull out. Then just hit it with a hand grinder or dremel. Put some axle grease on top of the piston just under where your working to catch the junk then wash off with solovent when done. I bet in about a half hour youll have it done and ready bolt up and go off to the races.
Conrad

Please Log in or Create an account to join the conversation.

Re:Hot Rodding a Fat Fifty, a lesson 12 years 9 months ago #53102

I just looked again. Those piston deflectors are easy to get at. A fairly aggressive hand file will get the job done in short order. If you have a shop vac have it running right where your filing and suck up the filings as you work.

Should be an easy fix.

Good work
Conrad

Please Log in or Create an account to join the conversation.

Re:Hot Rodding a Fat Fifty, a lesson 12 years 7 months ago #55586

I am going to do this to my fat fifty question is how many reed valves does it take, found some brand new ones just haven't opened the motor to see how many I may need

Please Log in or Create an account to join the conversation.

Re:Hot Rodding a Fat Fifty, a lesson 12 years 7 months ago #55629

  • Waterwings
  • Waterwings's Avatar Topic Author
  • Offline
  • Contributing Member
  • Contributing Member
  • Posts: 4887
  • Karma: 107
  • Thank you received: 100
Frank,
Glad to see you posted. You don't want to change out the valves individually, remove the whole plate from the 60hp you have and put the whole assembly into the Fat Fifty. If you remove it carefully you should be able to salvage the gasket on the carburetor/intake side of the reed assembly. You will probably have to replace the gasket on the other side of the valve assembly. Definitely don't take the reed valves apart as they are factory tuned you don't want to mess with that setup. Others can jump in here and correct me if I'm wrong.

Bob

Please Log in or Create an account to join the conversation.

Re:Hot Rodding a Fat Fifty, a lesson 12 years 7 months ago #55636

Bob,
All this info is great Thanks Again. I didn't have time today to tear apart that 60hp yet, hopefully by the weekend. As far as gaskets go I had bought some online from a website that had vintage boat parts, so have all new gaskets already, now as far as the reeds go, they have them brand new I am assuming the whole plate or assy. don't know exactly how they would word it. Might just give them a call and get them brand new. Also have you ever heard of making a fuel recirculation system for these Fat Fifty's, so the unburned fuel doesn't dump in the water?

Please Log in or Create an account to join the conversation.

Re:Hot Rodding a Fat Fifty, a lesson 12 years 7 months ago #55656

  • Waterwings
  • Waterwings's Avatar Topic Author
  • Offline
  • Contributing Member
  • Contributing Member
  • Posts: 4887
  • Karma: 107
  • Thank you received: 100
I have heard of it. I think I did a google search for it when I found it. I can't remember the site I found it on though, had a whole article, with pics. If I find it again, I'll try and post it here. Maybe some other folks already have it and can post it here.

Bob

Please Log in or Create an account to join the conversation.

Re:Hot Rodding a Fat Fifty, a lesson 12 years 7 months ago #55735

Yeah I tried a google search but to no prevail nothing, So Bob when you did all these mods to the ol' fatty did you notice a definate change in performance and fuel consumption?

Frank

Please Log in or Create an account to join the conversation.

Re:Hot Rodding a Fat Fifty, a lesson 12 years 7 months ago #55771

  • Waterwings
  • Waterwings's Avatar Topic Author
  • Offline
  • Contributing Member
  • Contributing Member
  • Posts: 4887
  • Karma: 107
  • Thank you received: 100
Well you probably missed it but it was never completed due to the pistons hitting the heads because it looks like the machine shop milld off more than 1/8". I put the old heads back on her but I plan on filling down the sides of the piston crowns, checking the clearance and permanently mounting the milled heads back on and see how it goes. I want to make sure I have a backup motor just in case so I'm working on the '67 80hp I got a hold of. It runs so I just have to put rebuild kits on the carb, fuel pump, water pump and change out the lower unit oil, than I can refocus on the Fatty.

I expect to get a lot more power out of the Fatty once I "mill" those pistons down some. Gas mileage will probably be the same, maybe a little better but much more power at the same throttle settings.

Bob

Please Log in or Create an account to join the conversation.

Re:Hot Rodding a Fat Fifty, a lesson 12 years 7 months ago #55857

well tore apart the 60hp today, but bad weather stopped me in mytracks. Hopefully can finish it up this week, then start her up see how she runs.

Please Log in or Create an account to join the conversation.

Re:Hot Rodding a Fat Fifty, a lesson 12 years 7 months ago #55864

  • Waterwings
  • Waterwings's Avatar Topic Author
  • Offline
  • Contributing Member
  • Contributing Member
  • Posts: 4887
  • Karma: 107
  • Thank you received: 100
Cool, keep us posted.

Please Log in or Create an account to join the conversation.

Re:Hot Rodding a Fat Fifty, a lesson 12 years 7 months ago #56202

Bob,

I'm sorry that this has been a problem for you. Puts a real damper on the anticipation of a rewarding project. In looking very closely at the 1958-1959 V-4 pistons, it appears that the deflectors are actually taller than the 1960 and later designs. This is because the '58 & '59 heads were "open chamber" and the deflector looks to have stuck up higher - to help trap the fresh fuel charge. The 1960 and later V4 engines all had "closed chamber" heads - the chambers were contured to accept the piston shape. If anyone is doing this head swap, I'd guess you should not cut the heads at all. I gave Bob bad advice based on the experience with my 1960 gale. The gale 60 came with the improved heads and reed valve arrangement. The piston profile seems to have been revamped as well. I cut the heads on my 1960 gale & it ran great. I eventually sold the engine, but had no problems for the 5+ years that I ran it. It never knocked or overheated.

There is a rubber hose under the crankcase that loops around to the adapter plate - under the power head. This is the lovely hose that dumps the unused gasoline & oil into the lake. You can remove the hose, cover the nipple that goes to the exhaust tower, and connect a new hose to the crank case nipple. Run the hose out of an opening in the bottom pan to a small tank in the boat. The hose must always flow downward - or it will not drain correctly. Figuire on a pint per hour of run time.

Please Log in or Create an account to join the conversation.

Re:Hot Rodding a Fat Fifty, a lesson 12 years 7 months ago #56205

Bruce,
I know you already answered this, but what your saying is that the heads from the 60hp can go right on the fat fifty without milling them? I just want to make sure before i put the fatty back together.

Frank

Please Log in or Create an account to join the conversation.

Re:Hot Rodding a Fat Fifty, a lesson 12 years 7 months ago #56224

  • Waterwings
  • Waterwings's Avatar Topic Author
  • Offline
  • Contributing Member
  • Contributing Member
  • Posts: 4887
  • Karma: 107
  • Thank you received: 100
Frank, yeah they should be fine just like they are. Mine barely hit after the milling so you should be just fine. What I would do just to make sure is keep the old gaskets on, put on the 60 heads, torque them down and turn the motor over by hand to make sure the pistons don't hit the heads any where. Once your sure they don't, take the heads back off and put the new gaskets on using the technique mentioned earlier in this thread, (the paint method), torque down the heads down, run the motor to warm it up, let it cool completely, then re-torque to make sure and you should be good to go.

Bruce, no worries, motors still good. No blood no foul. ;) What are your feelings on what Conrad suggested about filing the pistons down some to clear? I'm working on that '67 80hp as a back up motor in case something happens to the fatty. Needed a backup anyway.

Bob

Please Log in or Create an account to join the conversation.

Re:Hot Rodding a Fat Fifty, a lesson 12 years 7 months ago #56229

Best bet on checking piston clearance is to put the head from the "60" on the "50" WITHOUT the head gasket & then rotate the engine by hand to check for any clearance issues. Just put the heads on with a couple of bolts per head - just to hold them in place fot checking. Snug the bolts just enough to hold the heads in position. Note - Be sure the heads are on the correct side of engine . :unsure:

If the pistons clear with no gasket - they will surelt be fine when the gasket is installed.

Bob - I can't see a problem with trimming .075" or so off those deflector brows. Just be sure to not gouge the gasket surfaces.

Please Log in or Create an account to join the conversation.

Re:Hot Rodding a Fat Fifty, a lesson 12 years 7 months ago #56231

  • riceman
  • riceman's Avatar
  • Offline
  • Contributing Member
  • Contributing Member
  • Posts: 397
  • Karma: 12
  • Thank you received: 0
i haven't even verified mine runs and i'm already looking for heads for it. this thread definetly has my interest piqued.

I did have a question though: if the 60's models have a less roomy combustion chamber and that will produce the increased hp and whatnot without milling, why not just mill the original heads instead of replacing them? i saw that there was mention of better cooling capacityin the newer heads... better cooling is nice, but is it necessary? would the engine overheat otherwise?

also, after looking on ebay for a bit, i see there's a LOT of heads that look pretty dang similar to the ones pictured in this thread. is there anything that distinguishes the 60hp or 65hp mid 60's heads from the others that won't work? something that would be visible from just a picture. it seems like a lot of the folks that have the heads for sale just say "call to make sure the part will fit your motor." i'd rather not call 1,200 shops if i don't have to. something visual would be a big help.

Since i'm going to be looking for the heads and there's a range of sizes and years that could fit, is there a particular model that works best?

Please Log in or Create an account to join the conversation.

Re:Hot Rodding a Fat Fifty, a lesson 12 years 7 months ago #56251

  • Waterwings
  • Waterwings's Avatar Topic Author
  • Offline
  • Contributing Member
  • Contributing Member
  • Posts: 4887
  • Karma: 107
  • Thank you received: 100
Bruce, great stuff thanks.

Riceman, well I'm no expert and others here can chime in. The better cooling is a definite must as your cranking up the compression and those heads are going to get much hotter than originally designed. You don't want to take the chance of burning up the heads or the rest of the motor for that matter. As far as the head search is concerned I got the head part numbers off of marineengine.com and did the search that way. I don't know the Rude heads well enough to tell you how to tell them apart just from looking at them. Well at least the 60hp to 80hp heads anyway. You'll need to look at the head part numbers to make sure they're what your looking for. Hope that helps.

Others please jump in with your expertise please.

Bob

Please Log in or Create an account to join the conversation.

Re:Hot Rodding a Fat Fifty, a lesson 12 years 7 months ago #56266

Get the cylinder head part number from Bob, or from another reliable source. To the untrained eye - dozens of cylinder heads look to be the same part. But that is not the case. The Fat 50 and the later OMC 60 and 65 V4 engines has a smaller bore than the 75 hp and up V4 motors. The 75 hp and up were 89.9 cubic inch - much larger pistons than the 50 - 65 hp motors. But a part number is the best way to identify what you are looking for.

Below are 5 pictures. Study these to see the differences in the heads, and why the changes were made.

Look at the shap of the piston tops in picture #1. That "eyebrow" part is called the deflector. It helps direct the fresh intake charge upward ti the top of the cylinder. If it was not there - the fuel charge would just head straight out the exhaust ports on the opposite side of the cylinder. This is only on Cross Flow engines - Loop Charged engines work differently.

Now look at the 2nd and 3rd pic. This is a NOS Fat 50 head. Look how the chambers are open - like a soup bowl. The piston yop is not shaped like this, so there is a lot of empty space around the head and the piston. This INCREASES the volume of space between the head and the piston - resulting in decreased cylinder pressure. Also note the only cooling it has is a pipe that runs from one end of the head to the other. This creates hot & cool spots in the combustion chamber.

Photo #4 & #5 Here is a NOS 60 & 65 HP head. The water jacket cover is off this head, and asy you can see when there is water inside the jacket, all of the cumbustion chamber ceiling is cooled - chamber temp more uniform. On the underside - look how the combustion chamber has been modified. The chamber has been contoured to the profile of the piston top - allowing for a tighter squish area - increasing the cylinder pressure.

There is a lot of good marine engine info on the internet - if you find this stuff interesting.

Please Log in or Create an account to join the conversation.

Re:Hot Rodding a Fat Fifty, a lesson 12 years 7 months ago #56271

All this info has been very helpful in my quest to upgrade my fifty, I hate asking all these questions, but I have one more when I was looking for head gaskets the 50 and 60 use different part numbers so if I use the 60 heads which gaskets do i use the 50 or the 60 hp ones?

Please Log in or Create an account to join the conversation.

Re:Hot Rodding a Fat Fifty, a lesson 12 years 7 months ago #56276

  • Waterwings
  • Waterwings's Avatar Topic Author
  • Offline
  • Contributing Member
  • Contributing Member
  • Posts: 4887
  • Karma: 107
  • Thank you received: 100
Bruce, more great info thanks. Pic 2 and 3 must be those stealth heads I keep hearing about. LOL

Frank, if I remember right i used the 60hp head gaskets.

Bob

Please Log in or Create an account to join the conversation.

Re:Hot Rodding a Fat Fifty, a lesson 12 years 7 months ago #56289

Bob thanks again for the info, will be ordering the 60 hp gaskets. will keep posted on how the ol' beast turns out.

Frank

Please Log in or Create an account to join the conversation.

Re:Hot Rodding a Fat Fifty, a lesson 12 years 7 months ago #56324

  • riceman
  • riceman's Avatar
  • Offline
  • Contributing Member
  • Contributing Member
  • Posts: 397
  • Karma: 12
  • Thank you received: 0
Thanks for the pics! that really helps!

if i may, i'd like to ask one more noob question... what's the difference in the reed assemblies? would it be possible to modify the ones from my '58 or is purchasing another set mandatory? i've got a friend at a well equipped machine shop who owes me big time favors so all of my machine work is going to be free, thus making modding the ones i already have infinetly cheaper than replacing them.

Also, is there a difference between the heads off of the 1968 65hp and the 64-67 60hp? i saw that the part numbers were different, but both are supposed to work, right?

Please Log in or Create an account to join the conversation.

Re:Hot Rodding a Fat Fifty, a lesson 12 years 7 months ago #56329

The 1968 heads had a longer reach spark plug hole The old ones had a a short hole like the fat 50 and they are very easy to strip out if the plug is over tightened. The 68 heads have about 1/3 more meat for the sparkplug to thread into. But, they take a longer plug. You would have to get a cross reference from a 3/8" rech plug to 7/16 reach plug. You can not use the 1968 spark plug, as it was intended for electronic ignition (standard in 1968) Somewhere stashed away, I have the correcxt plug number to buy if you used the '68 heads.

As for the intake assembly - the '58 & '59 used a reed and cage design based on the concept that OMC had been using with their twin cylinder engines. The design worked, but not very well. It wasted a lot of fuel, and limited the breathing of the engine. In '60 every V4 switched to a redesigned sysatem, that was vastly superior. The essential design of the reed & cage assembly was used on OMC engines up to the time they went bankrupt. These parts are not very costly, easy to get & easy to swap out. They are far too complex to be fabricated by scratch.

Please Log in or Create an account to join the conversation.

  • Page:
  • 1
  • 2
Time to create page: 0.361 seconds

Donate

Please consider supporting our efforts.

Glassified Ads

Fenders - Tee Nee trailer
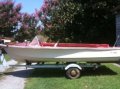
( / Parts / Miscellaneous)

noimage
09-30-2024

1958 Skagit Sportster
( / Boats)

1958 Skagit Sportster
09-25-2024

Winner Marauder - the classic 1970 runabout!
( / Boats)

Winner Marauder - the classic 1970 runabout!
09-16-2024

FG Login

FiberGoogle

Who's Online

We have 6790 guests and 2 members online