Welcome, Guest
Username: Password: Remember me

TOPIC: 1963 Glastron V143 JetFlite Restoration

1963 Glastron V143 JetFlite Restoration 5 years 7 months ago #139533

  • 63 Sabre
  • 63 Sabre's Avatar
  • Offline
  • Contributing Member
  • Contributing Member
  • Posts: 4676
  • Karma: 147
  • Thank you received: 167
I'm smiling as I read your post. With your attention to minutia/detail my first guess was that you are an engineer of some sort. A good friend of mine is a retired mechanical engineer and he helps me set up art displays at our local village center. Just hanging a picture is a challenge to be undertaken. Sounds like you have your punch list all laid out. We'll be following your progress. In all my restorations the thought of weight never entered my mind. I like the aesthetics, and designs of the older classic boats. To incorporate your structural ideas along with the uniqueness of the boat itself is a combination hard to beat. Now you have me thinking if the designers in 50's and early 60's really knew that there was enough volume in the sealed chambers under seats and bow areas to keep not only the boat afloat but the boat and motor. Then again, that's what life jackets are for:)
Keep on truckin'

Please Log in or Create an account to join the conversation.

1963 Glastron V143 JetFlite Restoration 5 years 7 months ago #139537

Yep you gotta love engineers, we're an anal bunch. ;) She's coming along nicely and ought to be one tuff boat when you're done!

Bob

Please Log in or Create an account to join the conversation.

1963 Glastron V143 JetFlite Restoration 5 years 7 months ago #139542

  • 63 Sabre
  • 63 Sabre's Avatar
  • Offline
  • Contributing Member
  • Contributing Member
  • Posts: 4676
  • Karma: 147
  • Thank you received: 167
I'm pragmatic, see a problem, fix it so it works and then come back later to clean up the mess.
The anal part...Funny you should use that expression. We'd make a good combo. I spent 38 years of my career as a master tech in a paper mill, I ran the huge building size machines that make toilet paper. Now that's something you cannot do without unless you grow corn. :P

Please Log in or Create an account to join the conversation.

1963 Glastron V143 JetFlite Restoration 4 years 11 months ago #141608

  • Kern
  • Offline
  • Junior Boarder
  • Junior Boarder
  • Posts: 105
  • Karma: 17
  • Thank you received: 1
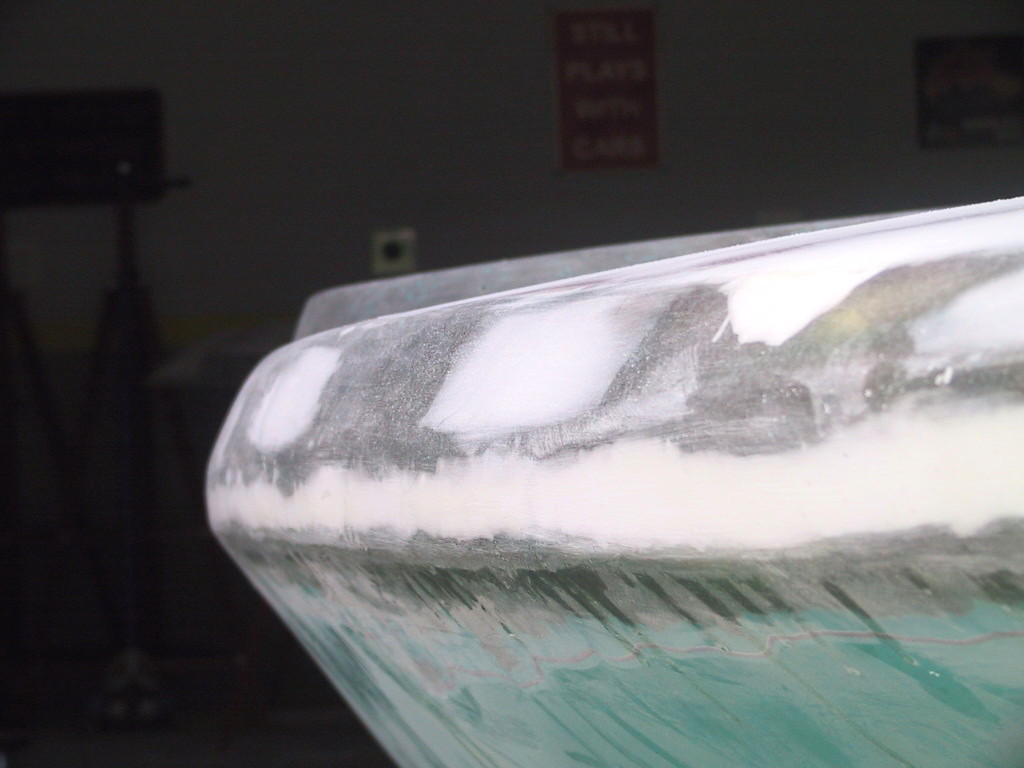
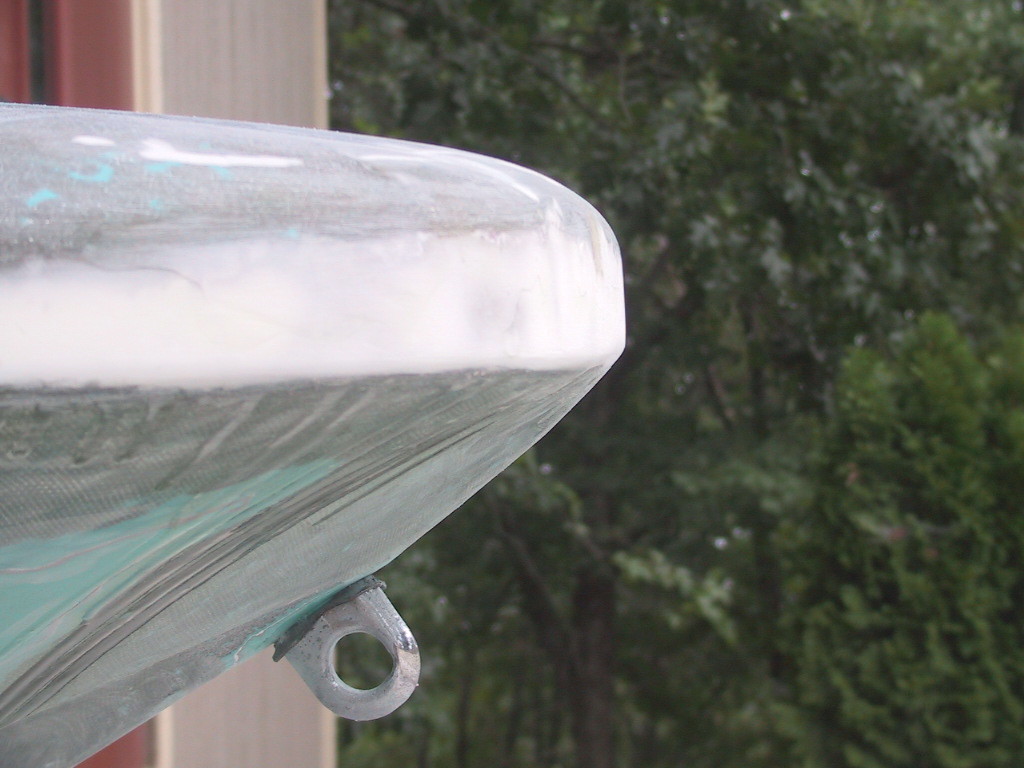
Continuing the removal of the flanges at the deck to hull joint, short sections were ground away and bonding strips were epoxied in place. Then the remaining flanges were cut away and bonding strips were added to form a continuous, watertight seal on the outside of the joint. Then the edges of the strips were ground flat and filler material was added to create a smooth, fair surface between the deck and hull. At the bow, the hull form did not extend as far forward as the deck form so filler material was added to shape the front of the hull to match the deck, resulting in a better surface to mount the rub rail. The white filler material is a mix of epoxy resin and microballoons. This mix produces a density that is less than water, so, even though it adds weight, it aids the overall flotation.


Epoxy/microballoon filler used to fair the deck/hull joint after bonding with fiberglass strips.


Filler material used to match the bow hull profile to that of the deck.

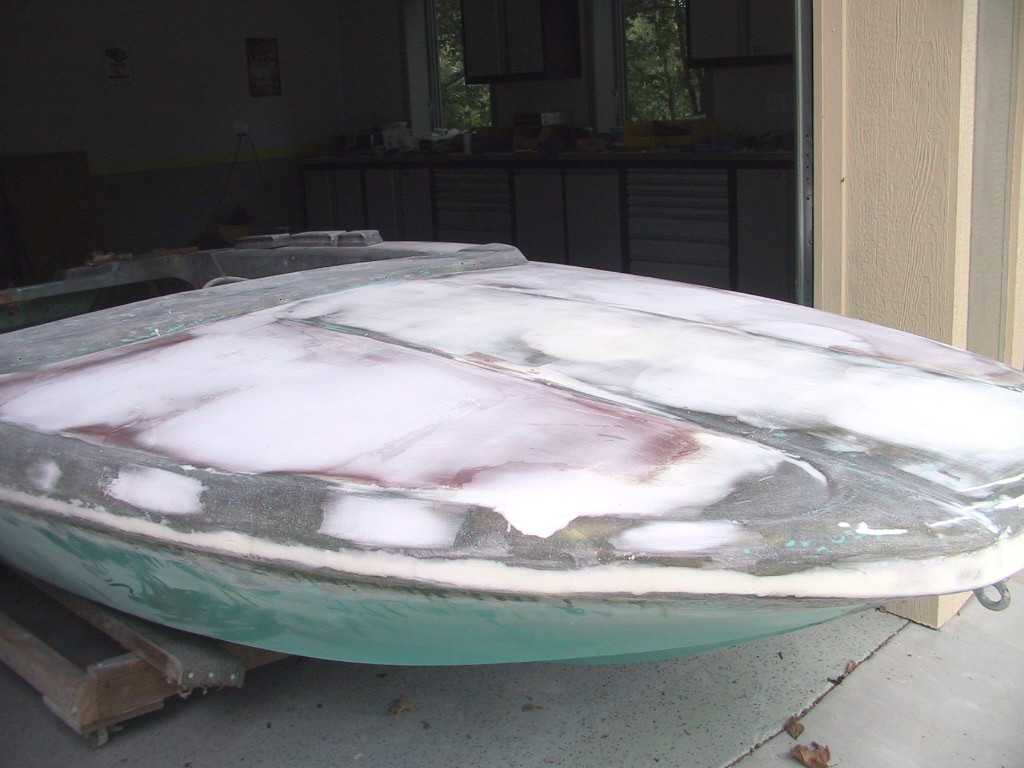
While working on the deck/hull joint, fairing of the foredeck was also started. The factory surface was very wavy. With the underdeck reinforcement and flotation material, the foredeck was now very stable and any fairing work should result in a smooth surface. While working on the foredeck three bulges were discovered where the reinforcing strips and foam had not produced a good bond to the underside of the fiberglass deck. These were ground out, filled with fiberglass cloth, and epoxied over.


Filler material used to fair the foredeck surfaces.

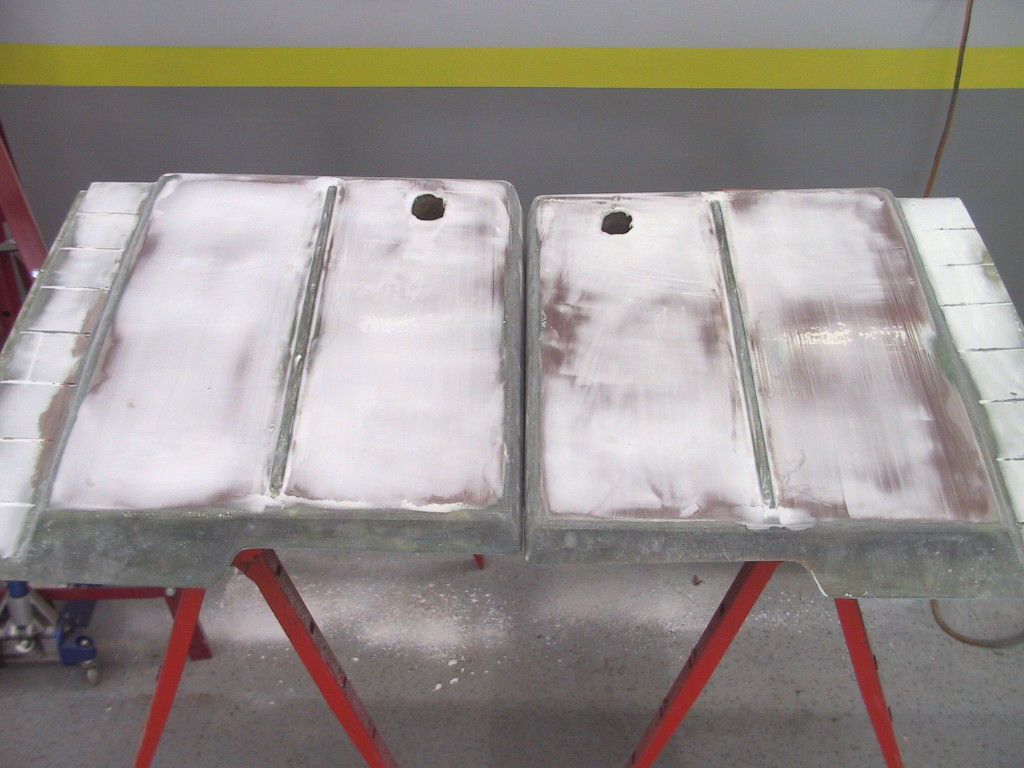
While working on fairing the foredeck, work was also started on fairing the tonneau covers. Again, the foam flotation under the covers helps to stiffen the fiberglass surface, resulting in a stable base for the filler.


Fiaring the tonneau covers.
Attachments:

Please Log in or Create an account to join the conversation.

1963 Glastron V143 JetFlite Restoration 4 years 11 months ago #141612

Excellent she'll be better than factory when your done!

Bob

Please Log in or Create an account to join the conversation.

1963 Glastron V143 JetFlite Restoration 4 years 11 months ago #141694

  • Kern
  • Offline
  • Junior Boarder
  • Junior Boarder
  • Posts: 105
  • Karma: 17
  • Thank you received: 1
It was noted that the radii between the deck surfaces and the side surfaces aft of the windshield had some variation in their sizes. To make all the radii uniform, a pair of simple templates was created that were typical of the more prevalent largest radii. Then any that were smaller were sanded to match the templates and any that were even larger were filled to the size required to match the templates. On some of the radii that were sanded, the sanding broke through the original fiberglass skin. These areas will be filled with a layer of fiberglass cloth, resined in place, under the outer skin.

Deck radii templates with the deck to outer hull closest.

Deck radii templates with the deck to inner wall closest.

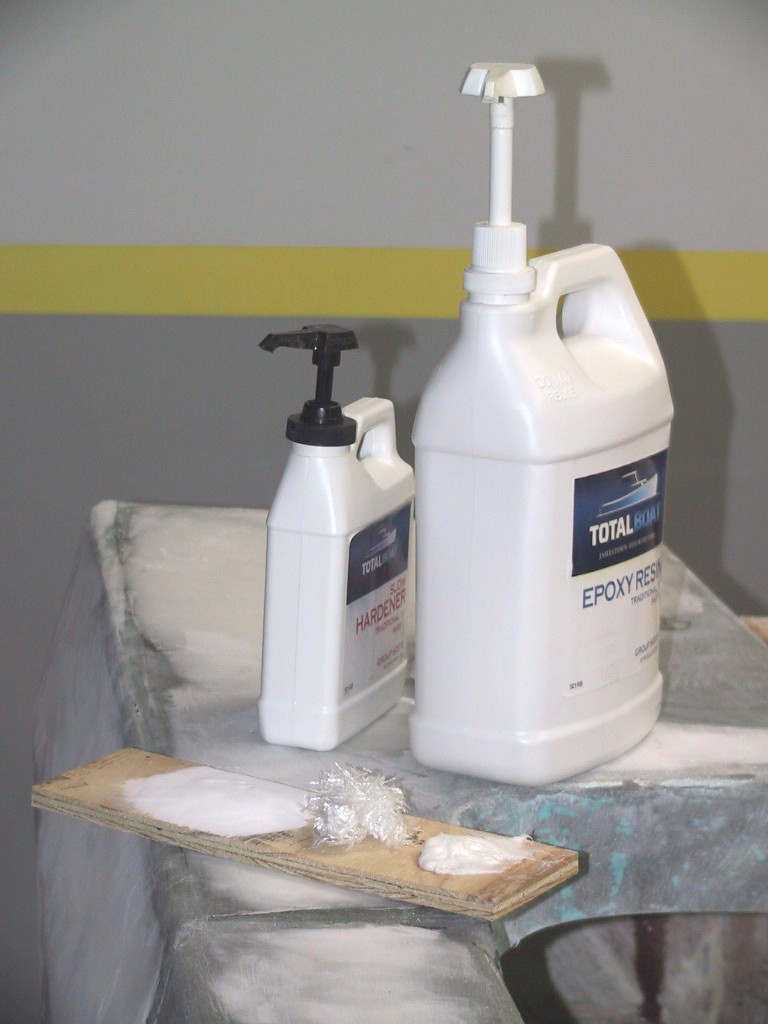
Some areas that required filler material were either quite thick or were on vertical surfaces. The mixture of resin and microballoons worked well on thinner fill areas but it was felt that thicker areas needed some extra strength. Also, the resin microballoon mixture tended to run downhill on sloped or vertical surfaces, even when it was mixed to a high viscosity.
A new recipe was created to address these issues. It consisted of the resin with microballoons added to keep it less dense. Then chopped fiberglass cloth was added to the mixture to give it additional strength and keep it from moving down sloped or vertical surfaces. This new recipe worked very well on the deck and transom areas that needed additional filler.

The ingredients of the new recipe with the microballoon pile on the left, the fiberglass strands in the center and the completed mix on the right. The mix is light and strong.
Attachments:

Please Log in or Create an account to join the conversation.

1963 Glastron V143 JetFlite Restoration 4 years 10 months ago #141834

  • Kern
  • Offline
  • Junior Boarder
  • Junior Boarder
  • Posts: 105
  • Karma: 17
  • Thank you received: 1
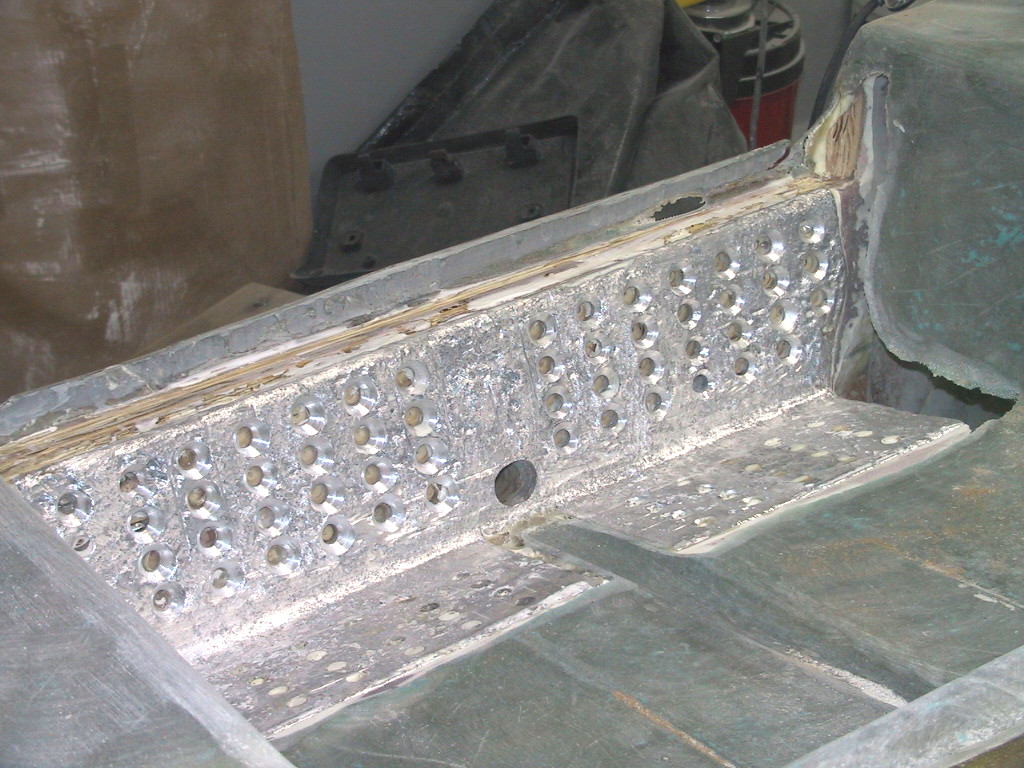
Further investigation into the transom repair performed at Starboard Marine showed that the upper two inches were just filled with random resin and a narrow metal strip across the top of their new transom board. The new board did not go all the way to the top of the transom. The top of the center transom area, the front of the transom above the motor well, and the aft portion of the motor well were cut out to expose the entire area for attention.


The cutaway of the transom face and aft portion of the motor well to expose the aluminum angle. It was cleaned of corrosion and the holes were countersunk to provide a surface for bonding other parts with epoxy resin.

Baring all revealed that the aluminum angle installed many years ago was corroded so it was cleaned and the holes were countersunk so new epoxy would bond well to it. The area above the Starboard center board was cleaned down to the top of their board. Then the inner tops of the side boards that had previously been installed were cut at an angle with the forward portion being farther outboard. This provided a surface that the new upper center transom boards could bear onto to transfer the rearward upper transom forces into the side boards and outward and upward into the transom sides and upper side decks..

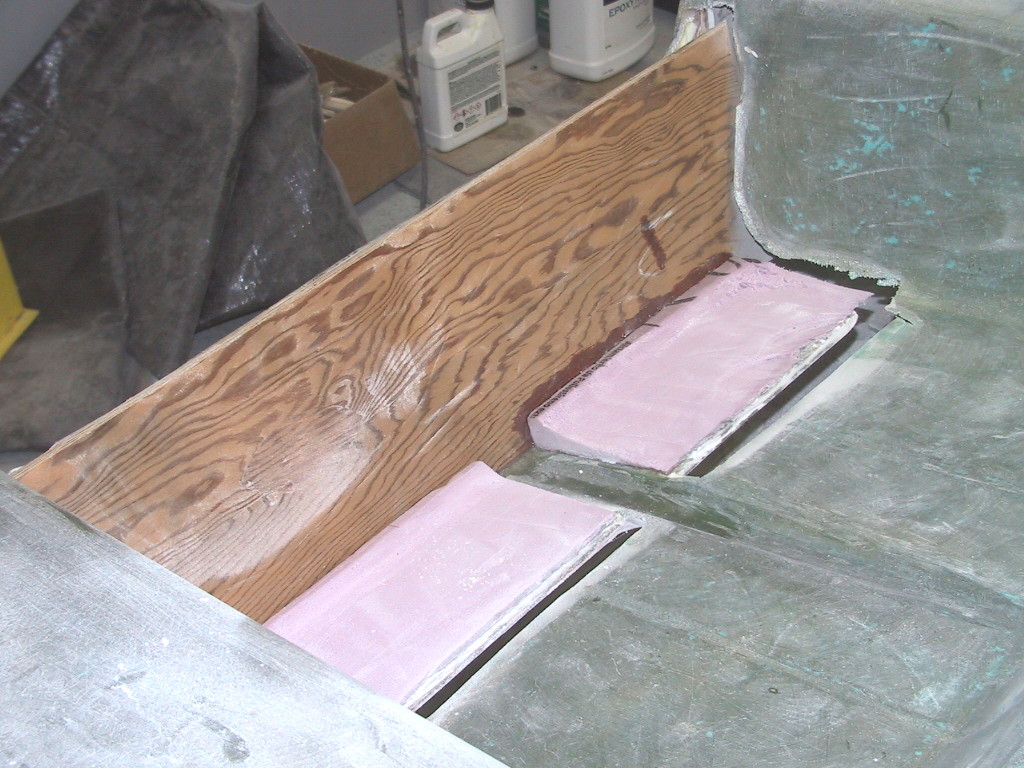
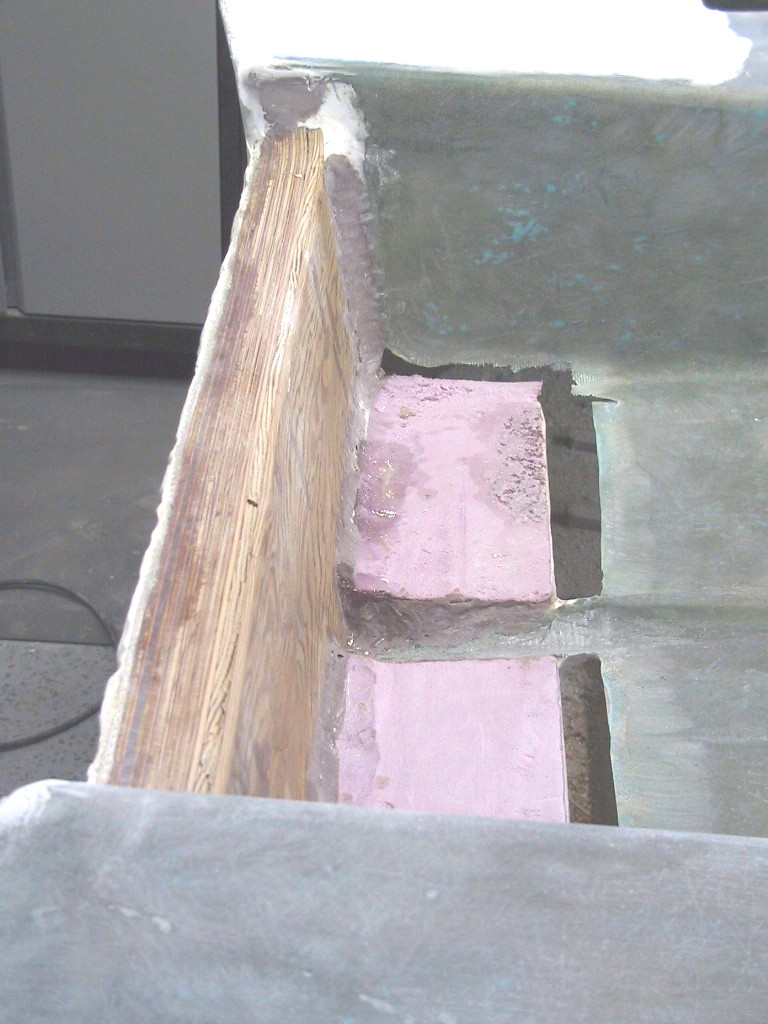
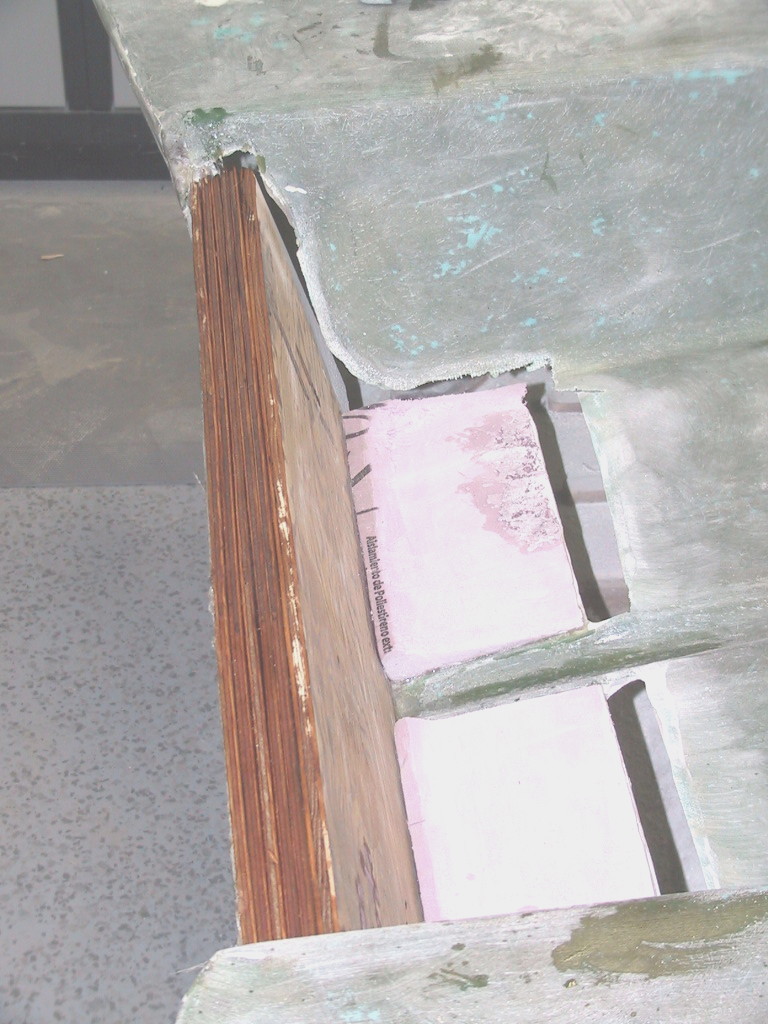
A 3/8 inch thick plywood board was cut to fit against the forward face of the aluminum angle. This board was made long enough on each side so the ends would also transfer upper transom loads into the side boards. This board was then bonded into place against the forward face of the aluminum angle. Then the gap between this board and the rear fiberglass face of the transom was filled with strips of ¼ inch plywood with the ends cut at an angle to match the previously cut angles on the side boards. Then any gaps between these strips was filled with epoxy resin to create a strong, solid, multi-piece transom structure. The top of the transom was then cut down to the height required to position the motor cavitation plate about ½ inch below the bottom of the hull.


The transom face board and the foam filler wedges bonded into position.


Top view of the plywood strips inserted between the transom face board and the transom outer skin.


The top of the transom after cutting it to the correct height and filling the cracks between the fill strips with epoxy
Attachments:

Please Log in or Create an account to join the conversation.

1963 Glastron V143 JetFlite Restoration 4 years 10 months ago #141842

As my family was a Glastron dealership from 1964 to 1970, and a Mercury dealership for 50+ years, I would advise that you rather adjust your V-143 transom height to allow the underside of the Mercury Merc 650 gear housing's anti-ventilation plate to be 1/2 inch (or a little higher - the amount of propeller blade cupping and/or a modern propeller selection would allow additional height) above the keel plane. Being 1/2 inch below could induce "porpoising", annoying water spray, and reduced fuel economy and performance.

Regards,
Joe
This email address is being protected from spambots. You need JavaScript enabled to view it.
www.fergusonpoolemarine.com

Please Log in or Create an account to join the conversation.

Profile Picture:
E. Carl Kiekhaefer (Mercury Founder) & Joe Poole Sr. @ 1964 Mercury Dealer Meeting

1963 Glastron V143 JetFlite Restoration 4 years 10 months ago #141845

  • Kern
  • Offline
  • Junior Boarder
  • Junior Boarder
  • Posts: 105
  • Karma: 17
  • Thank you received: 1
Joe,

Thank you for your comments about setting the motor height on my JetFlite.

I would definitely be interested in keeping the minimum amount of lower unit in the water for improved performance and fuel economy.

As I recall, when I purchased the boat the motor anti-ventilation plate was just below the bottom at the transom. The keel fades out as it nears the transom so there is no additional depth beyond the bottom surface at the transom.

I found when taking a very tight turn that I would get some cavitation of the prop and would have to close the throttle momentarily to let the prop get a bite. Based on that I felt that I needed to keep the anti-ventilation plate in the water and, hopefully, keep the prop biting. The prop I am using is a two blade Michigan bronze with about a 20 inch pitch. Based on the weight I am adding to the boat, I may have to dial back the pitch number a bit to get good acceleration onto plane.

I also found that running with the anti-ventilation plate in line with the bottom line that I did get some porpoising, so I usually ran with the motor tucked in slightly with the plate and prop shaft higher at the front than the rear. This tended to wet more of the bottom and slow the boat somewhat but gave a more comfortable ride. This also kept the front of the keel in the water so the boat would turn extremely well as it pivoted about the front of the keel.

At this point, I can easily change the height of the motor as the transom top is not yet closed in and the holes for the outer ends of the motor clamp have not been drilled.

Would anyone else care to add to this discussion based on their experiences?

Please Log in or Create an account to join the conversation.

1963 Glastron V143 JetFlite Restoration 4 years 10 months ago #141848

Kern,

Your described propeller slipage in turns is certainly a result of your uncupped propeller blades. Like the amazing advancements in tires which has occurred from 1963 to the present, propellers too have seen very significant improvements. To me, there are four major changes to "modern" propellers: the adoption of three blade instead of two (and four blades are no longer rare to see), standardization of blade cupping, adoption of greater blade rake angle, and the addition of ventilation or "acceleration" holes (however these holes are almost exclusively standard on "performance" stainless propellers). Unfortunately, on many vintage outboards, only a custom produced propeller would allow for a greater blade rake angle, and as most brands of vintage ouboards do not exhaust through the propeller hub, the addition of ventilation holes is not an option (switching to a three blade propeller, and/or adding cup to the blade is possible however). Fortunately, a 1963 Merc 650 does pretty easily accept currently produced "modern" propellers since it has "Jet Prop" through the hub exhaust, and the propeller shaft diameter, spline count, etc. are still the same as some currently produced Mercury outboards, however there is an issue with propeller blade area. Unfortunately, the 1963 Merc 650 models utilized the very same gear housing assembly (lower unit assembly) as the six-cylinder Merc 850 and Merc 1000 also produced for 1963, so a range (selection) of reduced blade (surface) area propellers specifically for the Merc 650 were produced to help offset the "tall" six-cylinder gear housing assembly gear ratio. Because Mercury changed to a "shorter" gear ratio for first their 66 cubic inch four-cylinder models, the final two years of production of the Merc 650 four-cylinder models, and then continuing it's use into this century for their large piston displacement three-cylinder models, the six-cylinder (blade area) propellers became "well suited". Reduced blade area "modern" propellers, as are required for a 1963-1969 Merc 650, are therefore very difficult to find. From my personal experience, your vintage Michigan bronze 20 inch pitch is too high, but a vintage 17 inch (maybe an 18 inch pitch) would allow the Merc 650 with the original 2 to 1 gear ratio to reach it's recommended RPM. However, the relatively low rake angle (speaking in today's terms) uncupped two blade sorely could be improved upon with a "modern" propeller except for the blade area issue just mentioned. So, I would recommend either a vintage Mercury Merc 650 application bronze 17 inch two blade with blade cupping, possibly "rolling" (extending a reduced cupping amount to the blade's outer diameter) the blades as well; or the purchase of a new higher rake angle stainless three-blade with a very small blade surface area. Ventilation holes added to either would also be a wise addition. Doing so will allow the suggested outboard motor transom height without propeller slip in turns, allow a preferable ignition timing for the achieved outboard rpm, and improve efficiency with reduction of gear case frontal area drag, and more often eliminate the compromised outboard tilt pin angle adjustment previously utilized. Fitment of a newer "shorter" gear ratio gear housing assembly paired with a modern propeller would be a more costly, but also an excellent solution as well.

Respectfully,
Joe Poole, Jr.
www.fergusonpoolemarine.com
This email address is being protected from spambots. You need JavaScript enabled to view it.

Please Log in or Create an account to join the conversation.

Profile Picture:
E. Carl Kiekhaefer (Mercury Founder) & Joe Poole Sr. @ 1964 Mercury Dealer Meeting

1963 Glastron V143 JetFlite Restoration 4 years 10 months ago #141851

  • Kern
  • Offline
  • Junior Boarder
  • Junior Boarder
  • Posts: 105
  • Karma: 17
  • Thank you received: 1
Hello Again Joe,

Thank you for the information you provided on propeller tech. I am a mechanical engineer but never delved into the subject as you evidently have.

Until I stopped using the boat, it had never had a tachometer so I could not tell if the motor was turning optimum RPM or not. I experimented with different pitches within about a two inch range and had the prop cupped at one time. I guess I always tended to err toward the side of more pitch to decrease revs, and, hopefully, improve fuel range. I was less interested in out of the hole acceleration as I did not pull skiers often and as long as it would plane off, I was OK with it.

When finished, the boat will have a tachometer so I can determine if the prop needs any adjustment. I will probably keep the bronze prop as it has been with the boat since day one and I like the look of it on the vintage boat. There is a major prop shop within about 15 miles of where I live, so if I need to get this one modified, I suspect they can do it for me.

The other factor that now enters the picture is that this boat will be used, but not extensively, and optimizing the performance to the nth degree will probably not be an issue.

During later years of usage I did note that I had trouble getting the boat on plane with two people aboard and had to crawl over the windshield to the front deck to get it up. After getting into the structural issues of the bottom, I attributed this to the weakness of the bottom and the probability that the hydrodynamic forces on the bottom were causing a severe hook while attempting to plane. Earlier usage of the boat had no problem planing, even with four people aboard.

I do not think the motor was significantly down on power, as a tune-up and check after about 15 years of non-usage showed good compression and it ran fine. So I will have to see how the package performs with the stiffened bottom and the extra weight I am adding to the hull.

I also have a newer 650 (About a 1968, I believe) that I bought with the intention of doing some performance work on the power head and then bolting this onto my existing lower unit. However, someone told me that the power head to lower unit bolt pattern was different on those years. That may mean that I should do the work on the newer motor and replace it in total. That is a decision for down the road.

Clarification of a couple of terms you used will help me better understand propeller technology. I think I know what rake angle is but, perhaps you can confirm for me. And the plusses and minuses of different rake angles.

And, what are ventilation holes and where are they positioned? What is their effect on propeller performance?

And, am I correct in the assumption that blade area affects the amount of water pushed by the blades, and in turn the amount of thrust generated?

Please Log in or Create an account to join the conversation.

1963 Glastron V143 JetFlite Restoration 4 years 10 months ago #141855

Kern,
The notion that the propeller selection and outboard set-up need not be taken to the nth degree has been expressed by many customers through the decades, but what is not realized is the potential for eventual engine damage. For the lion's share of outboard motors until quite recent models with computer control of ignition timing, correct ignition timing is only achieved, beginning at somewhat higher than idle engine speeds and extending to wide-open engine speeds, when a propeller is fitted which allows the outboard to achieve it's wide-open rpm range. Said another way, the mechanical timing advance and carburetion linkage does not know which propeller is in use, but assumes that a "correct" pitch propeller is chosen. Mercury's original recommendation was 4800 to 5300 rpms for a 1963 Merc 650, with a preferably the upper (high) portion of it's range being achieved with lighter load (persons and gear) in the boat. Although not published for the most part, engine speeds from 5500 to 6000 rpms are now considered preferable for many vintage models. The big concern is when the engine is lugged from too higher pitch propeller, the timing is now over-advanced, with piston damage, and crankshaft breakage eventually possible. A 4-cylinder Merc 650 is a hardy design, and hopefully lugging will not eventually "kill" yours, but that should be the real concern. While I certainly agree that a polished bronze propeller is a beautiful thing, unfortunately most all of them were produced in older designs, as the advent of cost-effiencies (cost reduction) for the use of even stronger stainless steel coincided with more modern propeller designs and has instead been adopted for 40+ years now. If a "shorter" gear ratio gear housing assembly I previously mentioned was fitted, the 20 inch pitch Michigan would seem about "right" for pitch, but would sorely need the cupping, maybe blade rolling also.
As to your reduced performance in later years, actually, a "hooked" boat bottom, either allowed during hull production when the hull is removed from hull mold too soon and before complete resin curing, or due to weak structure, will instead aid boat planning, not make it more difficult. From experience, my first thoughts are of swelling of the sealing portion of the carburetor inlet needle & seat assemblies (which occurs over time from fuel exposure, especially so from enthanol blended fuel)(the swelled material greatly lowers the float level, or said another way, the available fuel in the bowl, effecting acceleration and full throttle performance), stretched fuel pump diaphragms from age and usage (also reduces available fuel to the carburetors), reduced breaker point gap/excessively worn breaker point, fuel delivery restriction, crankshaft oil seal hardening causing loss of crankcase sealing, and maybe higher piston to cylinder bore clearance to name a few.
The 1965 to 1971 Merc 650 models do differ from the first two years (1963-1964) with the exact position of the cooling water entrance to the cylinder block, and do not make for simple swap for each other. A 1968 does have breaker-less capacitor discharge ignition and 2.4 cubic inches greater piston displacement, and quieter operation from changes to the driveshaft housing and isolation of the cowl mounting.
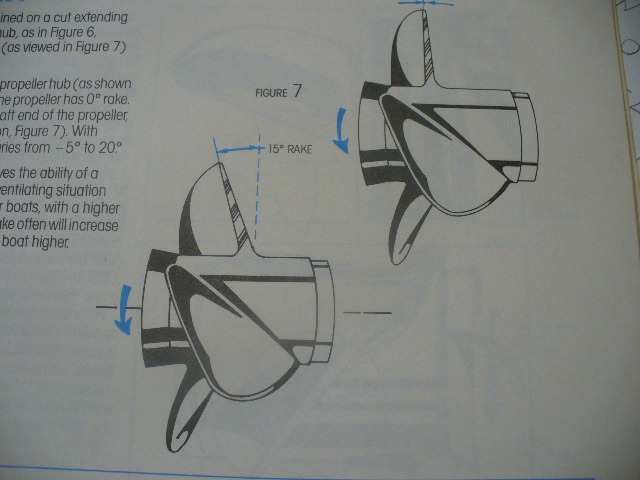
I hopefully am posting a picture showing a 15 degree rake angle propeller left, and 0 degree rake angle propeller on the rignt. Plusses are improved "grip"/"bite" from ventilating, and increased hull bow lift when trimmed to reduce wetted bottom surface.
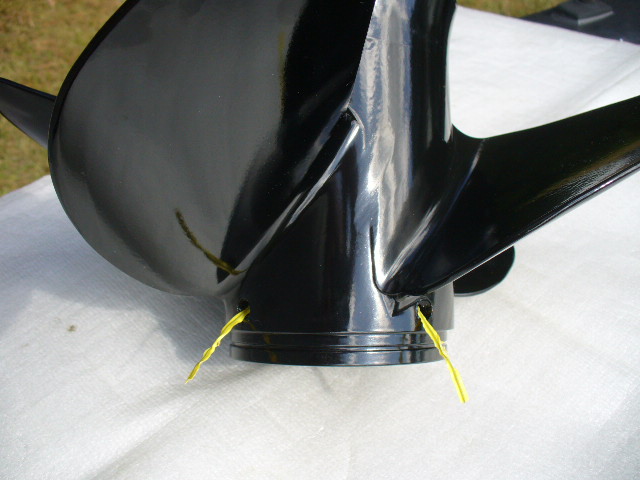
Again hopefully a picture of a four blade propeller in this example, showing two of the four ventilation holes (I utilized yellow "bread ties" into the holes to accentuate them). I can eventually search-out a Mercury service bulletin showing the recommended hole location for drilling, but basically they should be on the backside of each blade close to the blade root. The proper size (diameter or area) holes allow exhaust gasses to escape somewhat unloading each blade during acceleration to plane. The effect is somewhat like a car accelerating on wet pavement where a little tire slipage allows higher engine rpms. With the increased engine rpms, additional horsepower and torque are produced resulting in faster planning. Once the hull planes, the velocity of the water stream over the propeller's outer tube effectively seals the holes, so all of the exhaust exits from the rear of the propeller hub. Note that too larger holes would allow excessive rpms and surpass the engine redline.
Yes, blade area controls the amount of water pushed, and thereby the engine loading, the reason for reducing the blade area with the smaller cubic inch Merc 650 versus the comtemporary six-cylinder models.

Joe
This email address is being protected from spambots. You need JavaScript enabled to view it.
www.fergusonpoolemarine.com
Attachments:

Please Log in or Create an account to join the conversation.

Profile Picture:
E. Carl Kiekhaefer (Mercury Founder) & Joe Poole Sr. @ 1964 Mercury Dealer Meeting

1963 Glastron V143 JetFlite Restoration 3 years 2 days ago #145893

Thank you for sharing your story and build process! I’m looking for a a well sorted survivor or Restored Jetflite particularly love the tonneau covers.

Any chance you would like to sell?

Please Log in or Create an account to join the conversation.

1963 Glastron V143 JetFlite Restoration 3 years 1 day ago #145903

  • Kern
  • Offline
  • Junior Boarder
  • Junior Boarder
  • Posts: 105
  • Karma: 17
  • Thank you received: 1
Hello Grigio,

Thank you for your interest in JetFlites and your interest in buying mine. I too greatly admired the design and purchased my boat the day I saw it.

Mine is not for sale. It is still some ways from being completed. As mentioned earlier in this thread, I bought it new and my goal is to make it the best JetFlite in the world. As such, I am making some modifications that were desired based on years of previous usage.

I may have mentioned earlier in the thread - I asked the question on a couple of web forums whether there were any other 1963 JetFlites out there. I received only four responses. Three are just old, used boats. One was in good original condition. None are being restored. None of the owners indicated whether they had any interest in selling.

Having noted the few remaining examples, I hope you have success in finding one. Later JetFlites are more frequently noted.

Kern

Please Log in or Create an account to join the conversation.

Time to create page: 0.370 seconds

Donate

Please consider supporting our efforts.

Glassified Ads

1956 Lonestar Meteor
( / Boats)

1956 Lonestar Meteor
12-24-2024

Mercury outboard
( / Engines)

noimage
11-03-2024

Classic Mercury Outboard Motors
( / Engines)

Classic Mercury Outboard Motors
10-18-2024

FG Login

FiberGoogle

Who's Online

We have 10032 guests and no members online