Welcome, Guest
Username: Password: Remember me
  • Page:
  • 1
  • 2

TOPIC: Acrylic vs. Polycarb windshield replacements

Re:Acrylic vs. Polycarb windshield replacements 8 years 7 months ago #126627

HI Denny,

I am working up my post on heating equipment this week. The shop got a little swamped these past few weeks and I hadn't had time to do so. I want to get together some photos and videos to show how the various heating equipment works rather than just write about it. Seeing the process first hand will make a big difference.

Please Log in or Create an account to join the conversation.

The Plastics Guy
- Sacramento, CA

Re:Acrylic vs. Polycarb windshield replacements 8 years 7 months ago #126646

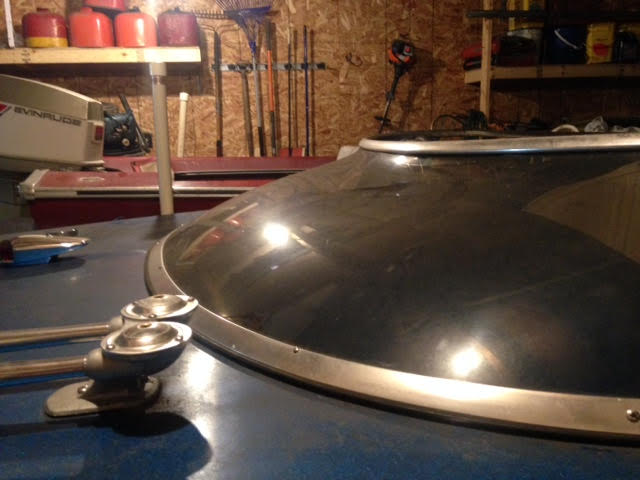
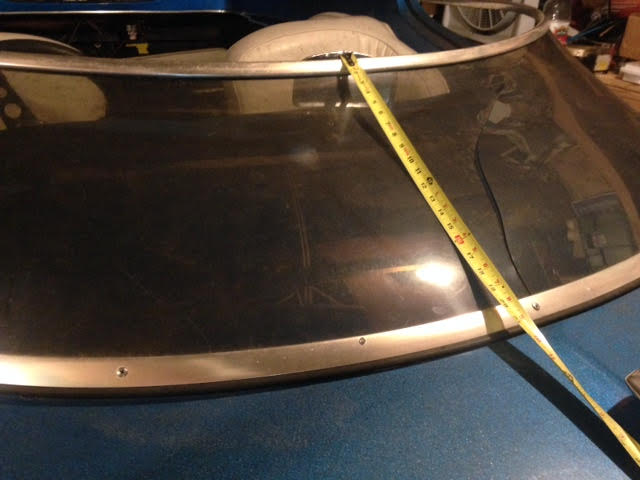
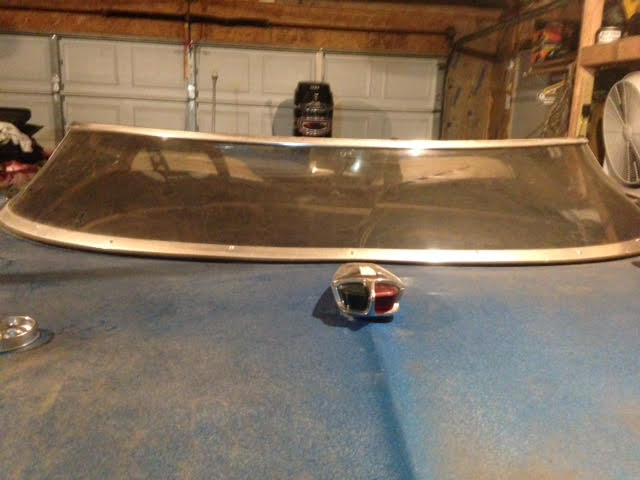
Is there an option to repair a cracked windshield using any of your methods. The "kids boat" is a 1974 Marlin that is in great shape with the exception of a big crack. We are trying to keep the costs down, and we are looking at a repair vs replacement right now, but I want something a little more aesthetic than the "duct tape solution" suggested by my daughter.

Here are a few pics:


Attachments:

Please Log in or Create an account to join the conversation.

Remember - There's always room for one more project!! (not really, my garage is full!!)

1963 Lone Star Triton w/ 1979 55 hp Johnson (soon 1963 Merc 850!!!)
1968 Lone Star Mustang w/1974 70 hp Evinrude
1974 Marlin with 1971 Merc 1350
1980 Glastron GT-150 w/1977 115 hp Johnson ( soon 1977 Merc...

Re:Acrylic vs. Polycarb windshield replacements 8 years 7 months ago #126665

Ironically, I was just asked to quote on this exact windshield last week...is this boat in the Sacramento area?

Remaking this style of windshield is never easy as a one off because it does require that some type of molding be made to assist in holding the reverse curve in place. The molding alone on something like this would run you at least a few hundred dollars.

You can do a short term fix by drilling a 3/16" diameter hole at the very end of the crack to stop it from spreading (NOTE: USE ONLY DRILL BITS DESIGNED FOR PLASTICS AND PRESS A PIECE OF WOOD BEHIND THE DRILL LOCATION TO PREVENT FURTHER CRACKING.)

After you drill your hole to stop the crack from spreading you can use an acrylic solvent like Weldon #3 or Weldon #4 to bond the crack shut. This solvent is applied using a needle applicator and will run through the crack via capillary action (basically the solvent gets sucked into any voids). The solvent will melt the two touching surfaces down and as they dry, will re-bond them.

You need to make sure the crack is aligned snugly in as close to an original position as possible and be prepared to clamp the crack to keep it completely stationary for 24 hours to allow proper bonding time.

After 24 hours I will sometimes run a bead of E6000 cement on the inside and outside of the crack and let that sit for another 24 hours. E6000 is a thick self leveling cement that dries perfectly clear. It isn't a solvent so it won't rejoin the pieces but will help strengthen the solvent bond you made with Weldon #3 or #4 the previous day.

Be cautious using Weldon products because they can mar the surface of the acrylic if any over spill drips away from the crack. Be prepared with a paper towel to dab any over spill right away. If you clean it up fast it doesn't have time to melt the surface, but we are talking seconds, not minutes.

One tip for using the needle applicator with weldon #3 or #4. I always only fill the bottle up half way leaving plenty of space for air in the bottle. Before I tilt the bottle over to squeeze solvent into the joint I am gluing, I squeeze air out of the bottle, face it away from what I will be gluing, tip it over and release pressure on the bottle so air sucks back up the needle tip and prevents the solvent from coming out until I get the needle in place on the crack. Once in place you can start squeezing the bottle again to force out solvent.

If you don't use this method, solvent will spill right out of the needle tip when you flip the bottle over to start gluing and you will make a mess.

Hopefully that was helpful. If you want me to post a video showing how I do this in my shop let me know. I have a few windshields in house right now which need this done prior to making replacements and could shoot a quick video and post it on YouTube.

63LStriton wrote:

Is there an option to repair a cracked windshield using any of your methods. The "kids boat" is a 1974 Marlin that is in great shape with the exception of a big crack. We are trying to keep the costs down, and we are looking at a repair vs replacement right now, but I want something a little more aesthetic than the "duct tape solution" suggested by my daughter.

Here are a few pics:


Please Log in or Create an account to join the conversation.

The Plastics Guy
- Sacramento, CA

Re:Acrylic vs. Polycarb windshield replacements 8 years 7 months ago #126673

That was awesome!! You probably can't tell from the pics, but the first thing I did upon getting her home was to drill a hole at the end of the crack. I did not do everything you mentioned, but I did make sure to use a sharp bit.

Posting the repair to YouTube would be an amazing help. I am not going for perfect, but structurally sound and more aesthetically appealing would be great.

Where do you source the Weldon products?

Please Log in or Create an account to join the conversation.

Remember - There's always room for one more project!! (not really, my garage is full!!)

1963 Lone Star Triton w/ 1979 55 hp Johnson (soon 1963 Merc 850!!!)
1968 Lone Star Mustang w/1974 70 hp Evinrude
1974 Marlin with 1971 Merc 1350
1980 Glastron GT-150 w/1977 115 hp Johnson ( soon 1977 Merc...

Re:Acrylic vs. Polycarb windshield replacements 8 years 7 months ago #126705

theplasticsguy wrote:

HI Denny,

I am working up my post on heating equipment this week. The shop got a little swamped these past few weeks and I hadn't had time to do so. I want to get together some photos and videos to show how the various heating equipment works rather than just write about it. Seeing the process first hand will make a big difference.


That sounds great ! I'll be making this a winter project.

Please Log in or Create an account to join the conversation.

Thanks !

Denny Cole
Clayton NC

Re:Acrylic vs. Polycarb windshield replacements 8 years 5 months ago #128284

FYI I just posted a video on YouTube.com of a basic temporary crack fix for plex windshields.

I think it might be easier to just show people how to do these repairs on video than it is to write them out. So as time permits I will make videos and let you know when they are up on our YouTube page.

Here is the link to the video on DIY Acrylic Boat Windshield Crack repair.


It's non-edited and a first take on the video so if info is missing that you need to fix yours just message me and we can walk through it.

Please Log in or Create an account to join the conversation.

The Plastics Guy
- Sacramento, CA

Acrylic vs. Polycarb windshield replacements 3 months 4 days ago #148983

Hi, I’m attempting to make a replacement windshield for my 1959 Blue Star runabout and am going to be using lexan so that it can be cold bent to frame. The question I have is on how to fasten the lexan to frame, there was a good how to on this that said to rivet it to the frame, if so do you know what type of rivets to use or should it be fastened in another way? Thanks

Please Log in or Create an account to join the conversation.

Acrylic vs. Polycarb windshield replacements 2 weeks 2 days ago #149016

I seldom recommend using lexan for a boat window, but I know many folks go that route to cut costs. Lexan really is not a great outdoor material because it is not UV stable and scratches really easily. But it can be bent to a curve without heat or a mold.
So if you are going that route, try and cause as little damage to your frame as possible. Putting rivets in the metal frame will leave permanent holes that will show if someone wants to go back to an acrylic curved window in the future. Frames are one item in a restoration I have had a heck of a time trying to get fabricated. Nobody seems to be set up to make one off metal channel or bend it to the shape of a frame. So preserving your original frame as best as possible really has a lot of value.
If anything I would recommend using black butyl seam tape (or grey from home depot). It is a sticky almost clay like material that folks use to seal up residential windows and skylights. I wrap it over the edge to form a gasket in the frame that holds the lexan in.
If it doesn't feel tight enough in the frame, then I would dabble around with adding some small screws through the frame on the side facing the helm (not out towards the deck).

What we do here is drill a small hole for a #6 screw in 3 to 5 places in the frame. Then we pop the lexan in the frame so we can mark on the material where those holes will line up with the window. On the lexan I would drill a hole 1 drill bit size larger than your screws thread diameter. This will give the plastic room to expand and contract without putting pressure on the hole in the window. Tight screw holes are what often lead to cracks in windshields.

Next, put the butyl seam tape back on the edges but don't put any where the holes are (so you can see them and line them up with the frames holes). Pop it all back in the frame, line up the holes, THEN squeeze just a little dab of silicone or Dow 795 into each screw hole before you put the screw it. This will harden and act like a gasket between the screw and the window. Get all your screws in, let the silicon set, trim back any of the butyl seam tape that shows from under the frame and you are good to reinstall it on the boat.

If you have any trouble always feel free to get in touch with me at This email address is being protected from spambots. You need JavaScript enabled to view it. I don't get a ton of time to read or post on here, so that is usually the fastest way to get a response.

Please Log in or Create an account to join the conversation.

The Plastics Guy
- Sacramento, CA
  • Page:
  • 1
  • 2
Time to create page: 0.066 seconds

Donate

Please consider supporting our efforts.

Glassified Ads

1970 Duo V-bottom excellent!!
( / Boats)

1970 Duo V-bottom excellent!!
04-14-2025

Jarvis deck hardware NOS
( / Parts / Miscellaneous)

Jarvis deck hardware NOS
03-27-2025

1957 Crosby Capri NOS Canvas cover
( / Parts / Miscellaneous)

noimage
03-27-2025

FG Login

FiberGoogle

Who's Online

We have 8899 guests and no members online